User avatar
pinksand
Greener Thumb
Posts: 869
Joined: Thu Aug 23, 2012 2:13 am
Location: Columbia, MD

Planning my front/side garden

This house may look familiar since I recruited your help for the small garden up against the house last Fall. I still plan on rounding off the hedge and shortening it up, but need to buy a new hedge trimmer :( (please ignore the ugly railing planters, I tried taking apart my Christmas display but everything is stuck frozen in there)

Anyway, I would really love to convert some of our weedy lawn space into garden space. I'm also hoping to redo the path along the side of the house to the back.

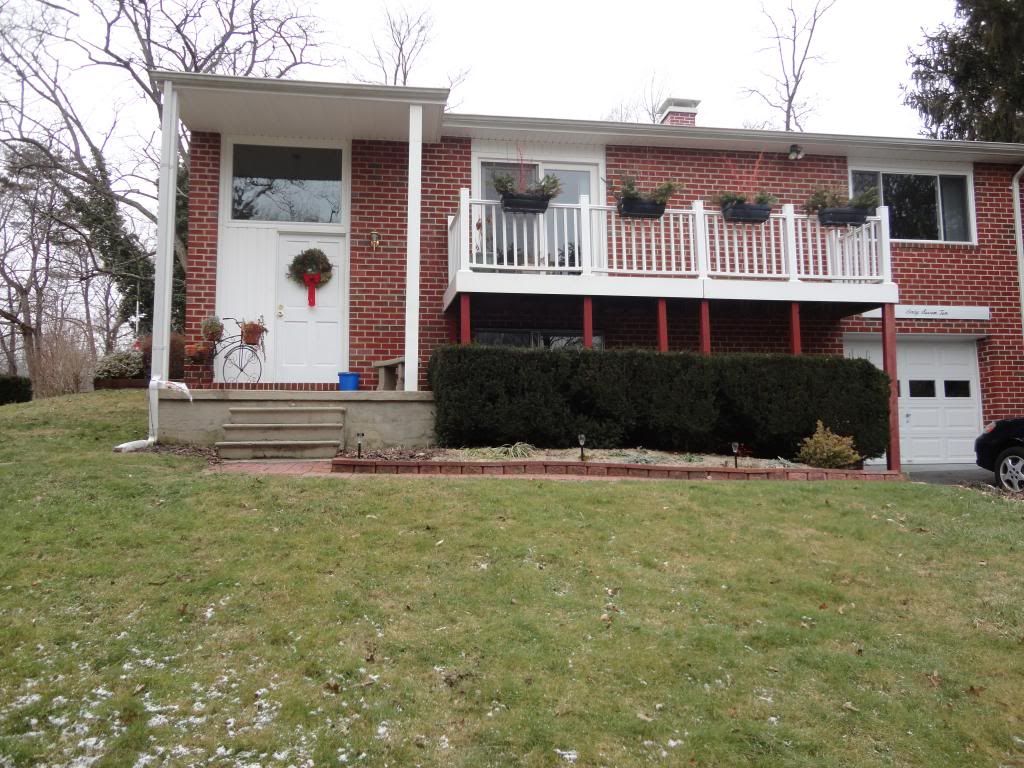
Here's the space I'm dealing with...
Image

Image

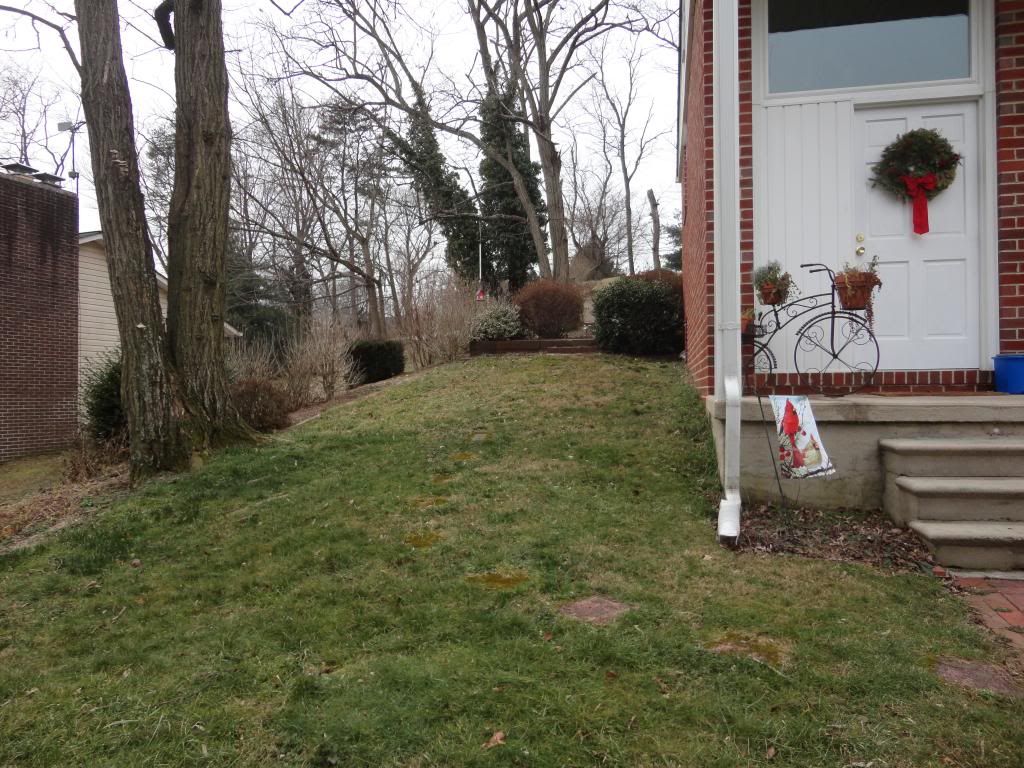
For the side garden, here's what I'm thinking...

Something like this:
https://www.helenahomegallery.com/wordpr ... tdoor1.jpg

Except with more of a winding path like this:
https://www.landscapingnetwork.com/pictu ... path_3694/

It's the South side of the house so I'm thinking some red hot poker plants (my sister-in-law has some to share with me!) I'm thinking wooly thyme creeping around the flagstones. Maybe a lilac bush? It's a lot of space to fill!

In the front I plan on curving a garden... something like this:
Image

Now, I'm pretty intimidated by the actual work that will go into this project. My husband said he will help me dig up the grass and I've been saving tons of newspaper I was planning to put down, water, then have compost delivered (mine isn't anywhere close to ready and won't be nearly enough) and cover the newspaper with that. Is this doable? Should I consider renting a sod cutter or something?

I have a lot of garden out back and am worried about keeping up with it all, but really hate all the useless grass. I'm hoping for something somewhat low maintenance with some good naturalizing perennial plants. My husband and I are both working full time and going to school so this might be a slow process. We're also dealing with a tight budget so we'll probably have to start with some smaller plants.

I've never done anything like this so tips for the process and the layout would be greatly appreciated!

User avatar
rainbowgardener
Super Green Thumb
Posts: 25279
Joined: Sun Feb 15, 2009 6:04 pm
Location: TN/GA 7b

Your pictures are gorgeous! I think it is really nice to have an inspiration like that to draw from.

If you want a lilac, which would be gorgeous in the spring, look for a dwarf variety. Regular lilacs eventually get HUGE!

I don't think you need a sod cutter. Just laying lots of cardboard down on the grass and piling a mixture of compost and top soil on top works great. I have turned three different sections of my lawn in to beds that way. Just be sure to water well at each step: water the grass, then water the cardboard thoroughly (dry cardboard takes forever to break down), then water the soil.

Think about 4 season interest - some spring bulbs and flowers and the lilac or other spring flowering shrub, lots of summer blooming flowers like daylily, coreopsis, coneflower, bee balm, etc etc. For fall, some mums and asters, joe pye weed & sunchoke (which are great for being tall accents, a lot of the other stuff tends to be all the same medium height), and maybe another shrub that has fall color or berries. Viburnum is very nice or fothergilla. Both have fragrant spring flowers, then fall color and the viburnum has berries that birds like. The terra cotta pavers provide a hit of winter color. Red twig dogwood is great for winter color -- the red twigs once the leaves are gone are gorgeous against snow. Ornamental grasses are nice for fall and winter interest as well. Something with colorful foliage, like the wine and roses weigela, is a good accent as well - flowers come and go, but the foliage is there all through the season, so provides much more constant color. And of course you can always edge with annuals like impatiens and petunias that will pump out color all season.

And be sure to put up some bird feeders. Then you will have blue jays and cardinals hopping around on the snow and it will look like a Christmas card!

All of the stuff I mention will take some attention and regular watering in the first year or so to get established (as would most things you might plant). After that it should be pretty self maintaining, just mulch well.

A lot of these things can be ordered pretty cheap on line. What you will get will be pretty small and won't look like much the first year. But if you have patience and a tight budget, it is a way to get a lot of plants for your money.

One of the things I like best about your first picture is the garden arch. I think it is really nice to have an arch or gateway to mark, now you are entering the garden. Helps focus people's attention and give a different spirit to it.

User avatar
rainbowgardener
Super Green Thumb
Posts: 25279
Joined: Sun Feb 15, 2009 6:04 pm
Location: TN/GA 7b

any comments, pinksand? any of the previous post, you like, don't like, think might be useful or not useful for you?

User avatar
pinksand
Greener Thumb
Posts: 869
Joined: Thu Aug 23, 2012 2:13 am
Location: Columbia, MD

YES! Thank you for your encouragement and suggestions RBG!

If I were to do the layering in March, when do you think the bed would be ready for planting? I know it can take a few months, and if I were to start in March when it's cooler, I'm assuming it would take longer?

I've got newspaper and my husband works at a bicycle shop where they have lots of huge cardboard boxes I should be able to get my hands on :) I found a local place that will deliver a nice compost/topsoil mix. How thick should this layer be?

Do you have any favorite online stores for purchasing quality plants? Buying them online might help me stay within budget since I have the tenancy of filling my cart and then realizing how much I'm about to spend, but don't want to put anything back. Online it might be easier to keep track of the cost and decide what I can live without ;) I'll definitely take your suggestions to keep in mind a variety of seasonal interest and plant shapes. Viburnum is at the top of my list! The wine and roses weigela is new to me and I love that it will keep it's leaves. I'd really like to put a redtwig dogwood in the front somewhere too. What do you think of cardinal flowers? I like the joe pye for some floral height as well. I have some daylillies in the back that have gone wild and dividing them to bring to the side garden might do them some good. I'm curious to see what bulbs I have in my current garden and will wait until Fall to purchase and plant new bulbs.

I think I'll have to get some more bird feeders too! Although the squirrels and I are constantly at battle... me trying to find ways to keep them out and them cleverly finding new ways to reach and climb the unclimbable ;) The feeders in the back are frequented by lots of cardinal pairs, blue jays, titmouse (is the plural "titmice?"), house finches, red bellied woodpecker, and some fat guy that sits on the feeder but doesn't eat anything and chases everyone away. You are sooo right, it's like a Christmas card when it snows! The cardinals are particularly striking. As you might be able to tell from my avatar I'm a bird lover!

Oh, and regarding the garden arch... that's actually how I found the picture! I was looking for garden arch ideas :) It might have to wait a year, but that's on my list of projects for the side garden!

User avatar
rainbowgardener
Super Green Thumb
Posts: 25279
Joined: Sun Feb 15, 2009 6:04 pm
Location: TN/GA 7b

Look for bird feeders with the wire cage around them to keep squirrels out:

https://www.birdfeeders.com/store/wild-b ... ers/5108-2

Small birds can get through the openings, squirrels can't. They work really well.

If you just put down the cardboard, pile finished compost/ topsoil on top, you can plant in to it immediately. You can cut holes in the wet cardboard to plant larger things down into the soil underneath. You want about 4" of soil on top. Some people do "lasagna gardening" where they put down a variety of uncomposted organic stuff, under the cardboard, in which case you would want to wait for it to break down some. I think you are actually better off to plant in to it immediately. The plant roots help hold your new soil in place, so it won't wash away. Once planted then mulch over the top with wood chips, grass clippings or whatever you have.

The weigela is not evergreen (or ever red/purple in this case). Mine is just bare sticks right now. I just meant that all through the growing season it is constant color, as opposed to flowers that come and go.

User avatar
pinksand
Greener Thumb
Posts: 869
Joined: Thu Aug 23, 2012 2:13 am
Location: Columbia, MD

Lol, I have a similar bird feeder with a cage around it but it also pulls down so the food isn't accessible if something heavy like a squirrel climbs it. This worked for a while but they figured out how to climb a nearby branch, reach out, and shake the feeder so it emptied on the ground. Naughty little bush tails! I'm going to have 100 sunflowers popping up in my yard. I will outsmart them one day!

Thank you for the clarification regarding the weigela! I probably would have thought it was dying if it dropped leaves unexpectedly in the Fall ;)

It's good to know I can get to planting right away. I was worried about having a massive dirt pile of a yard for months!

Two more questions:

1) Obviously March will be too early, when would be an ideal time to plant? May? They always say "after last frost" but mother nature has never announced to me "LAST FROST! I'm ready to warm up for the season!" Spring is always teasing me with warm days :(

2) Any recommendations for good quality websites to purchase plants from?

User avatar
rainbowgardener
Super Green Thumb
Posts: 25279
Joined: Sun Feb 15, 2009 6:04 pm
Location: TN/GA 7b

Looks like your average last frost date is sometime in the week of April 21:

https://www.plantmaps.com/interactive-ma ... te-map.php

This is the 50% last frost date (half of the years, there is no frost after this date), based on over 100 years of data. In these global warming times actual last frost date may well be a week or more early. When it is getting close watch your ten day extended forecasts.

Elk Mountain Nursery https://www.elk-mountain.com/catalog.html is excellent for native plants. They send well grown plants, beautifully packed, for reasonable prices.

Park Seeds and Plants https://parkseed.com/ has a pretty good variety and good quality.

User avatar
pinksand
Greener Thumb
Posts: 869
Joined: Thu Aug 23, 2012 2:13 am
Location: Columbia, MD

Thank you for all of your guidance Rainbowgardener!

I've purchased a variety of seeds and I've been reading through all the seed starting stickies and doing some research since it's something completely new to me! I plan on attempting to grow some indoors and save some seeds for direct sowing when it warms up (and in case I fail indoors). I'll start a thread in the seed starting section once they arrive and I begin that project :)

Here's what I ended up with:
Blazing Stars
Butterfly Weed
Blanket Flower Arizona Sun
Lavender Rosea
Agastache Golden Jubilee
Sunflower Giant Sungold

I know it's a lot of Summer bloomers. I'll have to see if I can divide some of my Spring and Fall bloomers that are going wild out back. When the time comes I'll have to purchase the shrubs as well :)

I also have ranunculus bulbs that I accidentally purchased last Fall, not realizing they should be planted in the Spring (you helped me with that one too!). They still look healthy, no mold or anything. Do you think April would be too late to plant them in the new bed? I'm storing them in my garage which is cool, but not freezing. If it's too late, I can plant them elsewhere. What do you think?

User avatar
rainbowgardener
Super Green Thumb
Posts: 25279
Joined: Sun Feb 15, 2009 6:04 pm
Location: TN/GA 7b

Have you planted your seeds yet? How's it going?

User avatar
pinksand
Greener Thumb
Posts: 869
Joined: Thu Aug 23, 2012 2:13 am
Location: Columbia, MD

Not yet :( I placed the order on Feb 8 and still haven't received the seeds. Apparently the blazingstar was backordered but they sent the rest of the order earlier this week so I should be getting them soon! I really love the blazing star so I hope they'll get it in soon too.

I'm such a nerd! I started a spreadsheet of all the plants I want, their bloom times, sizes, prices I found online with links and the quantity. Yikes it added up quickly!

I'm going to visit a locally owned nursery that I love to support and see what I can find there, then purchase the rest online. I'll wait until April to do that though.

Besides the perennials I purchased, I'm planning to get one Cranberrybush Viburnum, 3 Purple Beautyberry bushes, 3 verigated weigela, and 3 Pink Muhly Grass. I love the texture that grasses add to a garden!

I still haven't decided on a creeping ground cover, but might end up doing several different types. The sedum I planted last Fall has done excellent in the front of the house and is spreading nicely so I might go with some sedum. I like that it stays pretty, unlike my mazus reptans that is kind of nasty looking right now. I love wooly thyme, but both my mom and mother-in-law haven't had much luck with it here in MD. It was always so beautiful at our house in Colorado growing up so I still might give it a try. I also have a good carpet of creeping phlox and dianthus in the back that I can steal from.

The thing I'm now struggling with is where to place things. I keep looking through my garden books for inspiration. I have trouble achieving balance without falling back on symmetry. I'm also concerned about planning the space when my plants are going to start out so tiny! Obviously it will take some years for them to fill in and mature.

User avatar
rainbowgardener
Super Green Thumb
Posts: 25279
Joined: Sun Feb 15, 2009 6:04 pm
Location: TN/GA 7b

I think asymmetrical balance is a lot more interesting and alive than symmetry. Think about planting things in 3's or 5's. Think about balancing one big thing, like a shrub with several smaller plants instead of pairing it with another shrub. Keep looking at pictures and examples.

Think about how things grow in nature. When I am planting bulbs, I just toss a bunch of them over my shoulder and plant them where they land. The wonderful thing about garden design is it is flowers, you can't go wrong. They are going to be beautiful anyway! :) It really doesn't matter exactly where you plant them, because the following year, they will have gotten bigger, multiplied, planted themselves in new places, died back, etc, etc. I love my garden because it is never the same, through a season, with new things coming up and dying back, or from year to year.

You will need to leave lots of space around your little plants for them to grow into. It will look a little bare, but just mulch heavily. You can fill some of it in with annuals if you want.

User avatar
ElizabethB
Super Green Thumb
Posts: 2105
Joined: Sat Nov 24, 2012 12:53 am
Location: Lafayette, LA

Pink - your inspirations are beautiful but very ambitious. I DO NOT want to discourage you. There are a few obvious things that I see. One is that hedge wall along the front of your porch. If you are going to install a lovely garden you need to remove that so you can actually see and enjoy your efforts. You have a beautiful balcony. Start your beds no less than 6" - 8" out side of the balcony drip line otherwise you will have big issues with erosion and splash back. Install a gravel barrier between the porch and the bed. It will provide you with a maintenance strip and will eliminate errosion and splash back issues. It also looks very clean and nice.

Your property appears to be very sloped. This will cause erosion problems. Your lovely new beds will wash away. Around the perimeter of your beds you need some type of barrier to prevent erosion. When faced with that situation as a landscaper I installed a locking stone wall. You can find it at any big box store. The first course has to be partially buried on a base of crushed paver stone. All of the manufacturer web sites have detailed installation instructions. Build your retainer wall and fill behind it.

The more time you spend researching and planning the better your result will be. I really do not want to sound negative but I have had to repair so many poorly planned DIY landscapes.

Rainbow has some good suggestions. Specimen plants should be planted individually. Other shrubs should be planted in odd number and always staggered. Mother Nature does not do straight lines. Think about line of sight. If you have a lovely view you do not want your plantings to block it.

When selecting plants pay close attention to mature size as well as sun and water requirements.

There really is a lot involved in sucessful landscaping but you can do it if you put in the time to plan. I use 1/4" - 1' scale graph paper. I also have a 1/4" scale plant template that I got from the university book store. That really helps with proper spacing for mature size.

Don't be intemidated by the scope of your project. Familiarize yourself with regional plants and their growing requirements. Prepare for erosion issues ahead of time. Don't try to every thing at once. You can stage your landscaping. Install a retainer wall and plant your larger plants. Next year add more. You really don't have to do every thing at once. A big mistake that I see home owner's make is that they focus on the cute, small, colorful plants before they consider structure - ie larger, backbone plants. Get your structure planted first then fill in later. Any seeds that you ordered will keep.

Take your time and plan and you will have a show place garden.

Best of luck

User avatar
tomf
Super Green Thumb
Posts: 3233
Joined: Mon May 18, 2009 8:15 am
Location: Oregon

Yes +1 on the best advice, putting in some locking stone for a wall. You do not want your foundation to be damaged.

User avatar
pinksand
Greener Thumb
Posts: 869
Joined: Thu Aug 23, 2012 2:13 am
Location: Columbia, MD

Thank you for your advice Elizabeth!

Due to several family emergencies I've been doing a lot of traveling and my seedlings haven't received the care they require. At this point I don't have high hopes :(

Come April, I'm hoping life may settle down but I may end up scaling the project back for now and slowly expanding the garden space. The side of the house doesn't have much of a slope so I may start there. I'll have to figure out what to do for the front since it is sloped as you said. The hill is very steep where I was standing for the photo, but isn't too bad toward the top... I'm feeling very discouraged about the whole idea now.

User avatar
rainbowgardener
Super Green Thumb
Posts: 25279
Joined: Sun Feb 15, 2009 6:04 pm
Location: TN/GA 7b

Don't be discouraged, just be patient! :) Understand that it will ALWAYS be a work in progress, so just keep working on it as you can. We get distorted impressions from the TV shows where they bring in a huge crew, many thousands of $$ worth of trees and plants, tons of equipment, and create a show place yard in a weekend. For ordinary people, landscaping is not a project of one season. But each year it will be more beautiful.

User avatar
pinksand
Greener Thumb
Posts: 869
Joined: Thu Aug 23, 2012 2:13 am
Location: Columbia, MD

Very true Rainbow! When we were house hunting this time last year, all I watched was HGTV, which may have skewed my perspective a bit ;)

I've always worked within existing gardens, so starting from scratch is something completely new to me and I don't know quite what to expect. I tend to get a bit crazy about trying to finish projects, but you are so right that gardens are always an ongoing project that will continue to evolve every year.

I'll keep you posted on this project come April!

User avatar
pinksand
Greener Thumb
Posts: 869
Joined: Thu Aug 23, 2012 2:13 am
Location: Columbia, MD

Just wanted to give an update and ask for a few recommendations/tips...

I was able to revive some of my butterfly weed and blanket flower seedlings that had been neglected and crispified. My sunflower seedlings are doing great on the other hand and I can see true leaves starting to pop out! The lavender and agastache haven't shown a hint of germination yet... I know they take longer and the package says they like cooler temps, so I'm hanging in there with them, keeping them moist... we'll see but so far it's not looking too hopeful. I may end up trying to sow some of the seeds outside as well.

It looks like I have some bulbs coming up in the lawn on the side. I'd hate to smother these (most likely daffodils). Any suggestions for when I go about spreading the cardboard etc? Should I attempt to dig them up? Leave them?

I found a garden arch that I'm thinking of purchasing but then got to thinking about what to plant to climb the arch? I know you often see roses, but I'm a fan of gardening in bare feet and bare hands so thorny plants aren't on the top of my list. Any suggestions for something not too invasive?

I'm thinking that I'll purchase my shrubs and ornamental grass first as suggested and get those planted the first weekend to help keep everything in place. If my seedlings are ready and hardened off I'll plant those as well. I'll plan to add things here and there over time.

I have a question about directly sowing seeds outdoors... if I'm planning to mulch, how does this work exactly? Should I leave seeded sections unmulched?

User avatar
rainbowgardener
Super Green Thumb
Posts: 25279
Joined: Sun Feb 15, 2009 6:04 pm
Location: TN/GA 7b

Yes, you can't mulch on top of your seeds. Part of the point of the mulch is to suppress weed seeds, but it works the same on seeds you plant. Mulch after the seedlings are up and established.

One of the vines I like is the trumpet honeysuckle vine (lonicera sempervirens). It is a native honeysuckle and hummingbirds love it. It is long blooming and then has berries afterwards. Mine has not spread at all, just gets bigger.

User avatar
pinksand
Greener Thumb
Posts: 869
Joined: Thu Aug 23, 2012 2:13 am
Location: Columbia, MD

Ooo I really like the lonicera sempervirens! I'm assuming it's fragrant? I love the color! The arch was on sale so I went ahead and bought it :) So much for waiting a year and spreading out these expenses... oh well!

I've found a few different stone stores/quaries. Anything in particular I should keep in mind when picking out the stones for the path?

User avatar
rainbowgardener
Super Green Thumb
Posts: 25279
Joined: Sun Feb 15, 2009 6:04 pm
Location: TN/GA 7b

You would think being honeysuckle it would be fragrant. Unfortunately, it's an American honeysuckle and unlike its foreign cousins, no fragrance. But still a very nice plant for an arch.

If you wanted fragrant, good choices would be clematis (the native one is clematis virginiana, called Virgin's Bower. Or the white blooming sweet autumn clematis. The big showy colored ones they sell aren't particularly fragrant). Or common hop that they use in beer making, that is a pretty vine with fragrant flowers. Or american wisteria - But then your arch needs to be very big and strong, because it gets huge. The American wisteria is not so aggressive and spreading. The asian wisteria that they usually sell is very invasive.

User avatar
pinksand
Greener Thumb
Posts: 869
Joined: Thu Aug 23, 2012 2:13 am
Location: Columbia, MD

Interesting! I didn't particularly want fragrant, just automatically think of it when I hear "honeysuckle." The woods here are full of the bush honeysuckle :( and although I love the smell when they first start to bloom, when they all turn yellow it becomes a bit sickeningly sweet in the humid heat.

I think the trumpet honeysuckle is still my favorite of those, I love the color and it will be in view of the kitchen window so I'd love if we got some hummingbird visitors :) Thank you so much for the suggestion, I'm adding it to my "To Buy" list!

User avatar
pinksand
Greener Thumb
Posts: 869
Joined: Thu Aug 23, 2012 2:13 am
Location: Columbia, MD

I ordered weigela, 3 pink muhly grasses, trumpet honeysuckle, red hot poker, bee balm, Agastache cana, a peony, and carpet sedum mix. I'm not sure when they will be shipped, but hopefully it will be well timed! I'd also like to get a few golden false Cypress shrubs because I love their cheery chartreuse color in the dead of winter. I'm thinking that blue festuca grass might be a nice addition as well for some texture.

My sunflowers are getting their second set of true leaves and I will be hardening them off when those fill in. Since I started my seeds a bit later than planned, everything else is still tiny!

My neighborhood is very hilly so I've been trying to take note on what neighbors have done to deal with erosion. A lot of people have island gardens in the middle of a slope and they're bordered in various styles. My favorites have rocks of various sizes bordering the bed and I think I like the more natural look of the rock. I'm thinking of going this route and digging the rocks into the ground a ways keep them in place. It this a terribly idea Elizabeth? If you think so, do you mind explaining a bit more about the locking wall? I did a google search and it came up with all kinds of very different ideas so I'm not exactly sure what kind you were referring to.

User avatar
rainbowgardener
Super Green Thumb
Posts: 25279
Joined: Sun Feb 15, 2009 6:04 pm
Location: TN/GA 7b

The interlocking concrete blocks I have used to build 4 different retaining walls down my steep slopes are kind of like this:

Image

The big box Home Depot/ Lowes kind of places have them, in a bunch of different sizes and shapes and colors. The ones I have used just have a lip that hangs down from the bottom/back of the brick. It hooks over the brick below to hold it in place. There's other kinds that have various slots/tabs.

They are super easy. The hardest part is that the first course has to be buried half way in the ground on a layer of paver sand and has to be ABSOLUTELY level. After you get the first course laid all the rest is dry stacking blocks.

User avatar
pinksand
Greener Thumb
Posts: 869
Joined: Thu Aug 23, 2012 2:13 am
Location: Columbia, MD

I've been meaning to post some "After" photos. It will of course take time for everything to grow and fill in, so it looks a bit pathetic at the moment but over the next few years it should fill in nicely I think. There are lots of blazing star bulbs in front of and next to the locust tree. A lot of the perennials in there should naturalize and my seedlings will eventually mature and bloom. My pink muhly grass is TINY!!! I ended up returning the arbor and am on the lookout for another that will go towards the top of the path, so for now the trumpet honeysuckle is in a pot until it has something to climb.

Before
Image

After
Image

Wow, there are some plants you can't even see in this photo they're so teeny! :(

Before
Image

After
Image

You can't really see it, but I have a dormant pink dogwood planted in the curve on the right. It's a twig!

User avatar
rainbowgardener
Super Green Thumb
Posts: 25279
Joined: Sun Feb 15, 2009 6:04 pm
Location: TN/GA 7b

Very nice! It will be beautiful. Show us again later in the season, when it will have filled out a little and then next year when it will have filled in a lot! :)

Dillbert
Greener Thumb
Posts: 955
Joined: Sun Apr 04, 2010 3:29 pm
Location: Central PA

wow. nice job! - my back hurts just looking at the work! (g)

User avatar
pinksand
Greener Thumb
Posts: 869
Joined: Thu Aug 23, 2012 2:13 am
Location: Columbia, MD

Thank you both! For your encouragement and the help you provided, Dilbert with the path and RBG with the plant selection!

I directly sowed some of my leftover seeds last weekend and just saw some butterfly weed sprouting out there... at least I hope that's what it is!!! I have little areas here and there where I've cleared the mulch and planted various seeds so we'll see how that goes. At least I have a few seedlings that made it from my indoor attempt.

It was a lot of work and there were evenings that I couldn't move, but it was totally worth it! My neighbors were all shocked by how quickly we got it done. They laughed when I'd tell them my goal for the day. The path took 1 full weekend including trips to the store. The rest of the garden took the entire following weekend from morning through dark. I ended up recruiting friends to help the second day :)

I'll take some more photos at the end of the season! The railing boxes should be filled in better by then as well. RBG - I planted different things in each one of them... trying to follow your advice to fight the symmetry ;)

User avatar
tomf
Super Green Thumb
Posts: 3233
Joined: Mon May 18, 2009 8:15 am
Location: Oregon

Nice changes, I like the path along the side of the house, it makes you feel like it is some place you want to go. I like landscaping that carries the eye to some place and makes you want to know what is down there.

User avatar
applestar
Mod
Posts: 30541
Joined: Thu May 01, 2008 7:21 pm
Location: Zone 6, NJ (3/M)4/E ~ 10/M(11/B)

That looks beautiful, pinksand!
Enjoyed "watching" the progress. You all did a wonderful job. :D

User avatar
rainbowgardener
Super Green Thumb
Posts: 25279
Joined: Sun Feb 15, 2009 6:04 pm
Location: TN/GA 7b

Incidentally, the interlocking concrete block picture above is just one I found on line to show what the blocks look like. In this thread

https://www.helpfulgardener.com/forum/vi ... 62#p298962

I posted some pictures of the retaining walls I actually built.

User avatar
pinksand
Greener Thumb
Posts: 869
Joined: Thu Aug 23, 2012 2:13 am
Location: Columbia, MD

Wow, you did a fantastic job!

I was hesitant to post photos because I was embarrassed that I didn't follow the advice about the wall :oops: I was also confused since a lot of the photos I saw online looked like the walls were at the bottom of the steepest part of the slope and the ground at least seemed to be leveling off a bit where the wall was placed. My new garden is on the more level section of the hill and the wall would begin where the slope steepens, so it seemed a bit backward. Did you work to level a section of the hill for that stepping bath at the bottom of the first photo or was that section just less steep than the contained garden?

I guess it comes down to a depleted budget and intimidation. I was worried I'd do a shoddy job and the wall would just end up falling down the hill. Thanks for sharing photos of your projects! We'll see... this could get added to my "to do" list.

User avatar
tomf
Super Green Thumb
Posts: 3233
Joined: Mon May 18, 2009 8:15 am
Location: Oregon

That is not her wall, I thought so too, but in a different topic she said no and posted photos of her walls.
I am sure you would be able to make a wall with the same blocks and do a fine job.

User avatar
pinksand
Greener Thumb
Posts: 869
Joined: Thu Aug 23, 2012 2:13 am
Location: Columbia, MD

:lol: Yes I know, I was responding to this comment with the link to the thread you're referring to.
rainbowgardener wrote:Incidentally, the interlocking concrete block picture above is just one I found on line to show what the blocks look like. In this thread

https://www.helpfulgardener.com/forum/vi ... 62#p298962

I posted some pictures of the retaining walls I actually built.
Thank you for your bode of confidence though!

valley
Greener Thumb
Posts: 1335
Joined: Tue Mar 06, 2012 1:25 am
Location: ranches in sierra nevada mountains California & Navada high desert

I'm impressed, you really knew what you wanted and put the work in. The pictures are super.

User avatar
rainbowgardener
Super Green Thumb
Posts: 25279
Joined: Sun Feb 15, 2009 6:04 pm
Location: TN/GA 7b

It was just steep hillside. I made all the paths, just by cutting into the hillside to make a vertical place for the retaining wall and then spreading that dirt to be the path and compacting it. It is retained, but not terraced, that is behind the retaining wall it is not flat (except the top one with the herb garden behind it). I didn't try leveling the hillside into a series of flat terraces, that would have been way too much work - digging in to the clay/rock/roots/ buried trash was hard.

Building the wall is really pretty easy. The main trick is digging a trench for the bottom layer and then partly filling it back up with paver sand. You want the bottom layer to be half buried. And then you need to make sure it is PERFECTLY LEVEL. If it isn't, your wall will eventually fall apart. After you have the bottom layer all laid and leveled, all the rest of it is very easy and fast, just stacking blocks.

Thanks for all the kind words! Mine was more work than some, because of hauling all the blocks down the hill and then having no level place to stand while I was working on it (until I got the path made).


Return to “Landscaping”