
Has anyone grown oyster mushrooms on logs?
I'm going to try to raise oyster mushrooms on a log or two. Has anyone done this before? Please share your experience. Thanks.
Sorry but the only experiences I can share with you are from finding oyster mushrooms growing naturally. My parents woods has tons of spring oyster mushrooms when the conditions are right. I have also come to find that some of the bagged mulch I bought for the landscaping around my house must have a bunch of fall oyster mushroom spores.
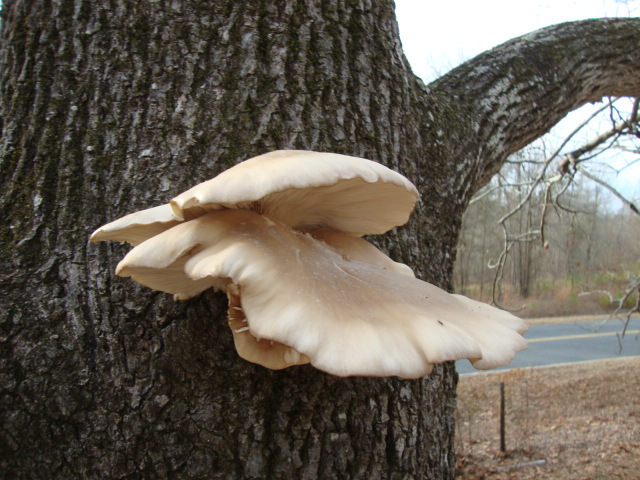
Here's a pic of one of the harvests from the mulch at the house. My wife and I were eating these for a week straight. We had about 3 harvests like this (all in the same spot) last fall. Delicious!

Here's a pic of one of the harvests from the mulch at the house. My wife and I were eating these for a week straight. We had about 3 harvests like this (all in the same spot) last fall. Delicious!
To SOB,
Those mushrooms do look yummy!
To mywebinfo,
Here's a link on how to grow Shitake mushrooms. I'm going to try the technique with the oyster mushrooms. I'll let you know how it turns out.
Edited to embed extra long link
-- applestar
Those mushrooms do look yummy!
To mywebinfo,
Here's a link on how to grow Shitake mushrooms. I'm going to try the technique with the oyster mushrooms. I'll let you know how it turns out.
Edited to embed extra long link
-- applestar
This is just an update on my new hobby. I got the oyster plug spawns early this week and decided to inoculate 4 logs. Since the logs were small, I had some left-over plugs so I went ahead and put them in a plastic bag full of pasteurized hay. The plugs in the bag are definitely growing while the ones in the logs haven't shown much growth. Of course it's hard to see when they are sealed over with beeswax.
https://www.keepandshare.com/photo/45453 ... 13&jj=1914
https://www.keepandshare.com/photo/45453 ... 13&jj=1914
-
hendi_alex

- Super Green Thumb
- Posts: 3604
- Joined: Sun Jul 06, 2008 7:58 am
- Location: Central Sand Hills South Carolina
I'm experimenting with shitake plugs in oak logs. Mine were prepared last summer, so we are patiently waiting. The logs are blocked up off the ground a few inches, are set in the semi shade of an oak tree, and are at the end of the sprinkler range that is on a timer during warm weather. Will post an update when and if we get a bloom. As I understand it, it may take up to 1-2 years for mushrooms to start developing.
As a related note, we have a half dead walnut tree in the yard, and what appear to be oyster mushroom started growing this winter, which has been very mild. I'm scared to harvest any wild mushroom however, as have no real training in such.
As a related note, we have a half dead walnut tree in the yard, and what appear to be oyster mushroom started growing this winter, which has been very mild. I'm scared to harvest any wild mushroom however, as have no real training in such.
-
ElizabethB

- Super Green Thumb
- Posts: 2105
- Joined: Sat Nov 24, 2012 12:53 am
- Location: Lafayette, LA
-
applestar

- Mod
- Posts: 31021
- Joined: Thu May 01, 2008 7:21 pm
- Location: Zone 6, NJ (3/M)4/E ~ 10/M(11/B)
I have been avoiding this thread because I have been wanting to do this but have not been able to. 
FWIW -- I did a pretty thorough experiment with growing them indoors a couple years back. Here's the thread if you are interested.
 https://www.helpfulgardener.com/forum/v ... hp?t=20130
Please keep us updated -- if it become less daunting after following your experiences, I may try to do this.

FWIW -- I did a pretty thorough experiment with growing them indoors a couple years back. Here's the thread if you are interested.
Please keep us updated -- if it become less daunting after following your experiences, I may try to do this.
In case anybody is interested in experimenting with me, here is the procedure I am trying.
1. Prepare the work area by cleaning surfaces, containers and utensils. Materials needed: clean plastic bag, wheat or grass hay, big pot of water (I used my pressure cooker), thermometer, gloves, mushroom spawns (I actually used the extra plug spawns that were intended for inoculating logs). Sawdust spawns could probably be used also.
See https://www.fungi.com/shop/pure-mushroom ... spawn.html
2. Prepare the substrate by pasteurization. See this link for detailed explanation. https://oystermushrooms.net/front.htm
How: Pasteurization is heating wet material to 55º to 60ºC (131º to 140ºF) for 30 minutes. No part may be at less than 55ºC (131ºF) or more than 60º (140ºF).
Why: The purpose of pasteurization is not to get rid of all organisms, but to get rid of those that compete with the mushrooms and to INCREASE the organisms that discourage diseases, consume hemicellulose, provide nitrogen, and become food for the mushrooms.
Procedure: On the stove top, boil a big pot with 2/3 full of water close to 140 degrees F. If it gets too hot, I just add some cold water or ice to bring the temp down to around 140. Turn the heat down enough to maintain the water temp between 131 to 140ºF. Add the hay and place a smaller pot over the hay to keep it submerged in the water. Place the thermometer into the hay to monitor water temp. Leave the hay in the hot water for a minimum of 30 min but no more than 60 min. Then drain the water from the pot and let it cool to around 70ºF.
3. Place substrate and spawns in bags. I copied part of the method shown in the link below.
MObeek’s procedure: Place a roll of hay in the bottom of the bag, place several plugs on top of the hay on the outside edge. Add more layers of hay and plugs till you fill the bag. Compact the straw as much as possible, leaving no air pockets within. Leave enough room at the top to loosely seal the bag with ties or duct tape. Cover the hole created by the loose seal with a clean cotton ball to prevent bugs from crawling in. Wipe a pin and the outside surface of the bag with alcohol or hydrogen peroxide (where you want to poke pin-size holes on). Poke several holes (maybe 6 to 12 holes) into the side of the bag. Place the bag in a dark warm room (spare bedroom) until mycelia has completely covered the substrate within and 10 to 25 days. At this stage, cut small horizontal holes (about 1 inch) on the bag (with sterilized razor blade) where you want mushroom flowers to grow through. Move the bag in another place that has good aeration and soft light (I.e., kitchen). Spray with filtered water 2x/day (morning and evening) until mushrooms have emerged and are ready to be harvested.
More links
Good luck.
Just some updates:
For the bag = the mycelia is slowly spreading inside the bag. I could smell the anise-like aroma whenever I pass close by that bag.
For the four logs = I decided to bring them to the main floor instead of leaving it in the basement to keep any mice lurking around down there from eating the beeswax or any mushroom that tries to fruit out. When I took a picture of the logs, I noticed green patches on 2 of the logs' barks. So I emailed Fungi.com for advice and Mr. Gouin suggested I spray them with 10 parts of water mixed with 1 part of H2O2 (peroxide) for about 2-3 applications. I hope it works.
-
applestar
- Mod
- Posts: 31021
- Joined: Thu May 01, 2008 7:21 pm
- Location: Zone 6, NJ (3/M)4/E ~ 10/M(11/B)
I harvested plenty for my family to eat. It was a lot of fun too while they were growing well.MObeek wrote:Thanks for the info, Applestar. I did find your link last night and read through most of it. Why did you stop growing them? Weren't you able to harvest mushrooms?
The fun stopped when there was a huge outbreak of fungus gnats. At first I was able to control them but I wanted to stay organic and when they exploded after temps warmed up and it became impossible to keep up ... And I realized I was spending unacceptable amount of time on the effort and that I was not having fun anymore, I decided to throw in the towel. It was also time to start spring seeds and I needed the space.
I want to try outdoor growing but haven't been able to get that project started, and although I believe I would only try growing indoor mushrooms during the cold months, I have been consumed with other winter indoor growing projects since then
Just another update. The mycelia in the bag are still growing but it doesn't look as moist inside today. When I watched the video from India again, the commentator said they put 35-40 (pin)holes into the bag after inoculating. So I went and added more holes into my bag. The logs, on the other hand, still look the same. It will take about twelve or more months to get mushrooms out of them.
So it has been 12 days since I've inoculated the bag. Hopefully, in 2 more weeks, I'll be harvesting. I need to be patient.....
https://www.keepandshare.com/photo/45453 ... ?fv=y&ifr=
So it has been 12 days since I've inoculated the bag. Hopefully, in 2 more weeks, I'll be harvesting. I need to be patient.....
https://www.keepandshare.com/photo/45453 ... ?fv=y&ifr=
-
applestar
- Mod
- Posts: 31021
- Joined: Thu May 01, 2008 7:21 pm
- Location: Zone 6, NJ (3/M)4/E ~ 10/M(11/B)
Did you see this accidental grow I posted about? -- well not really since I don't have any expectation that they'll survive ... 
https://www.helpfulgardener.com/forum/v ... 031#288031
Looks good. I can't remember now how straw compared to coffee grounds and paper products without reading over my own thread I think typically, the entire bag becomes filled with white mycelia before fruiting bodies start to grow, then they take 3-5 days to mature.
https://www.helpfulgardener.com/forum/v ... 031#288031
Looks good. I can't remember now how straw compared to coffee grounds and paper products without reading over my own thread
If you spray them daily, would they survive? Or can you scrape some and use them for starters?
I think oyster mushrooms in coffee ground and paper products grow faster. Oh well, I'll just have to keep waiting.
By the way, I am having some problems with fungus gnats flying around ever since I planted my indoor seed starter. But, thanks to the suggestions in another link in this forum, I've been keeping their numbers way down. Now if I can only eliminate them all together.
Just an update: the substrate in my bag is not fully colonized yet so I'm still impatiently waiting. In the meantime, I have been reading some more and found the method below which I plan on applying:
Vietnam’s method of fruiting and harvesting:
After the bags have been cut with 4-6 slits on the sides of each bag, they are sprayed with water 2 or 3 times a day to keep the mushrooms moist, and the growers are careful not to give them too much water. No water should collect inside the bag. Growers take the cotton out of the mouth of the bag and suspend the bags on a wire or rope, with the mouth of the bag pointing downwards.
The mushrooms will begin to appear in the slits, looking like small round buttons. As soon as they begin to appear, growers should move the bags to the growing or harvesting area. The bags should be placed 7-10 cm apart. The first oyster mushrooms can be harvested 7-10 days after the bag is cut. After the mushrooms are harvested, growers stop spraying water for several days. When the young fruits begin to appear again, they begin to spray the bags with water again. This cycle can be repeated 3 to 4 times giving a total harvest of 50-80 kg of oyster mushrooms from 100 kg of straw.
https://fungiforum.com/documents/handboo ... er-7-1.pdf
Another update:
I did a bad thing and opened the bag a couple of days ago to retrieve some plugs and add it to cardboard with hopes of starting more spawns. As a result, I may have contaminated the bag cause there are some green stuff growing in the bottom right of the bag. So if this gets worse, I may just have to dispose of the bag.
https://www.keepandshare.com/photo/45453 ... ?fv=y&ifr=
I hope the logs fair better.
I think I'll buy more spawn and try to keep that from getting contaminated.
-
applestar
- Mod
- Posts: 31021
- Joined: Thu May 01, 2008 7:21 pm
- Location: Zone 6, NJ (3/M)4/E ~ 10/M(11/B)
Yep. Avoiding introducing contamination is the toughest, especially until the mycilia have grown sufficiently vigorously.
More elaborate operations involve "clean room"
For my spore and agar media cultures and grain substrate culturing, I used a translucent storage tote with a clamp on lid laid on on its side. And an air filter fan blowing away from the opening. I think I described the set up in my thread.
You need to be rigorous about washing hands, wearing clean clothes, and using sterile tools. I used rubbing alcohol and peroxide sprays. I found out the hard way that using peroxide to "sterilize" my own skin was a bad idea. Rubbing alcohol did not damage the skin.
How did you open the bag? Best way I found is to squeeze the contents away from a band where you intend to cut, create a double-fold airlock seal on the side you want to preserve, then wipe down both sides of the band with alcohol, slice open with a very sharp knife dipped in flame or alcohol and spray down the opening to kill any airborne organisms. Deposit the excised portion of the bag in a prepared sterile container with a lid, and immediately re-seal the bulk of the bag with sterile tape or another method.
If you have a guillotine heat sealer, you can make a double seal and cut in between, but I never got around to getting fancy equipment. So my methods were pretty low tech.
Update: I decided to try killing the green bugs by pouring diluted hydrogen peroxide in the bag, swishing the fluid where the bugs are (mostly bottom of bag) and pouring it back out of the bag. Here is how my bag looks now.
https://www.keepandshare.com/photo/45453 ... -2013?ifr=
The mycelia in the cardboard seems to be growing also. So I still have a chance for harvesting mushrooms later on. I've got my fingers crossed.
https://www.keepandshare.com/photo/45453 ... -2013?ifr=
The mycelia in the cardboard seems to be growing also. So I still have a chance for harvesting mushrooms later on. I've got my fingers crossed.
P.S. This will be my next project this Spring.
https://www.shroomery.org/10677/Monotub
https://www.shroomery.org/10677/Monotub
-
Ohio Tiller
- Green Thumb
- Posts: 463
- Joined: Wed Jan 11, 2012 11:39 am
- Location: Ohio
Another update: I had to treat the bag with hydrogen peroxide again (2 parts water and 1 part H2O2) to really kill the green bugs. It seems to have worked. The mycelia at the top of the bag is still growing. And I am now on day 33. There is still hope.
https://www.keepandshare.com/photo/45453 ... ?fv=y&ifr=
https://www.keepandshare.com/photo/45453 ... ?fv=y&ifr=
Update: The mycelia in the bag is still growing. No stinky smell so far so I must have eliminated the green molds.
https://www.keepandshare.com/photo/45453 ... ?fv=y&ifr=
https://www.keepandshare.com/photo/45453 ... ?fv=y&ifr=
I was hoping to grow Phoenix Oyster mushrooms since we have a few logs from my pine tree hanging out in the back yard. Plus I'm in Los Angeles, which seems perfect for them since we have a lot of warm days.MObeek wrote:What kind of mushroom are you going to try to grow?
So is the green mold the mossy stuff that grows on wet dirt? Or is it something more sinister...
To Alloyjane: Here's a link where you can find out about different contiminants that could ruin your mushrooms. The green mold is of the genus Trichoderma. It is another type of fungus. According to the link, it gives out toxin that causes the mushrooms to develop soft decay. I'm just glad I managed to stop its growth by dousing it with diluted hydrogen peroxide. Supposedly, the peroxide won't hurt the oyster mushroom. In fact, someone from fungi.com also recommended I spray my logs with diluted peroxide when I found green mold growing all over the logs. It worked on the logs also!
https://www.shroomery.org/5276/What-are- ... om-culture
Wikipedia said moss is a small plant.
Here's some good info on your Phoenix oyster mushroom.
https://www.shroomery.org/9411/Pleurotus-pulmonarius
My mushroom is called Pearl oyster mushroom = Pleurotus ostreatus
You may have to register with shroomery.org to see the links I gave you. But registering is free so that's not a problem.
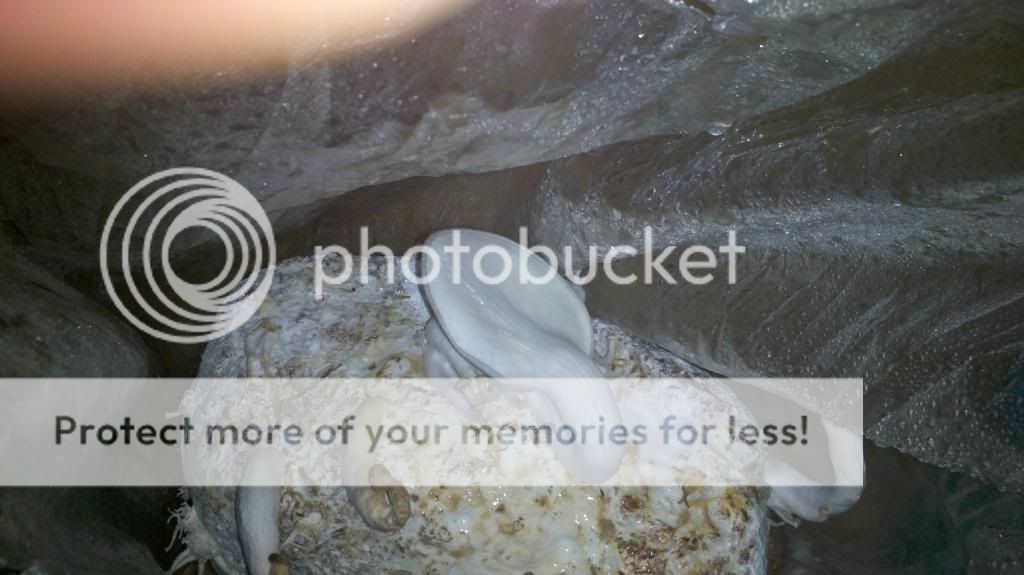
Oh joy! Something is peeking on top of the bag! 
I hope the fungus gnats don't discover it.
https://www.keepandshare.com/photo/45453 ... ?fv=y&ifr=
I hope the fungus gnats don't discover it.
https://www.keepandshare.com/photo/45453 ... ?fv=y&ifr=
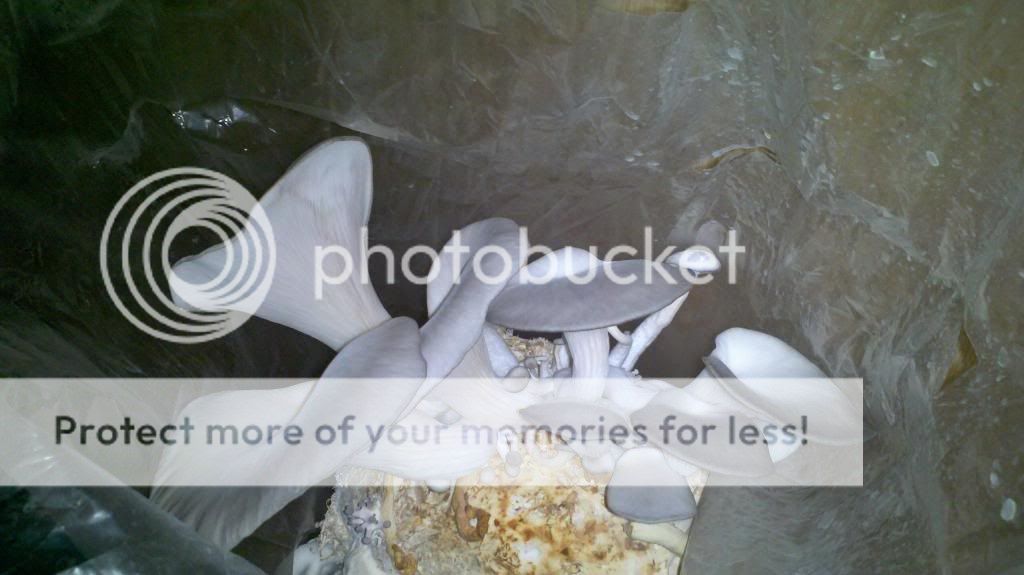
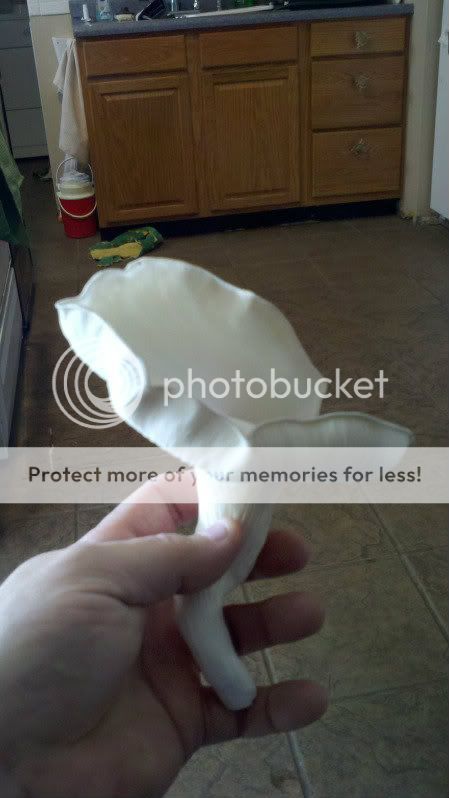
Update: I didn't get much out of the first flush of mushrooms. But the bag is producing a second flush now. I'm hoping I can get the two fruit bodies to produce big caps by watering both the caps and the bases of the fruit bodies.
Also, I transfered my logs outdoors. No shrooms peeking out of the plugs still.
Last, I'm still battling green molds in my monotub experiment with dilluted hydrogen peroxide. I'm still hopeful though.
https://www.keepandshare.com/photo/46194 ... ?fv=y&ifr=
FYI: I'm still battling with fungus gnats, too, and one or two has discovered my bag of shrooms.