
In some cases I like to start seeds on damp paper towel; but if I then want to plant them it's difficult to untangle their rootlets from the paper without damaging them - even if I try tearing the paper to plant them still embedded in it.
Does any one have a better way of starting seed indoors in dishes, without using soil? I do this either to check the general viability/vigor of a seed group, or - if I already expect a low germination rate - so that I won't be planting any dead seed.
-
Vanisle_BC
- Greener Thumb
- Posts: 1356
- Joined: Mon Apr 13, 2015 9:02 pm
- Location: Port Alberni, B.C. Canada, Zone 7 (+?)
-
pepperhead212
- Super Green Thumb
- Posts: 2878
- Joined: Wed Oct 15, 2014 1:52 pm
- Location: Woodbury NJ Zone 7a/7b
I use that method for some - mostly old, or low % varieties, or when I'm starting just a few varieties, and I don't want to start my heat mats up for them (I just stick them up on my griddle, with the pilot lights that keep it warm). What I do is watch closely for the sprouts starting, then transfer the sprouted seeds to the pots, before those roots get started, as I had the same problem with them growing into the PT.
-
Vanisle_BC
- Greener Thumb
- Posts: 1356
- Joined: Mon Apr 13, 2015 9:02 pm
- Location: Port Alberni, B.C. Canada, Zone 7 (+?)
-
applestar

- Mod
- Posts: 30540
- Joined: Thu May 01, 2008 7:21 pm
- Location: Zone 6, NJ (3/M)4/E ~ 10/M(11/B)
My favorite is sand grain size Diatomaceous Earth. I’ve accidentally found them sold at auto supply as Ultrasorb when trying to buy gravel size (size of large perlite) which is good for potting mix addition.
DE grains sink like sand but is loose when wet and roots pull out easily. So I add extra water to quicksand consistency, coax out the seedlings, then - because de sinks — pour out excess.
I’ve run out this year so am using/experimenting with screened 50/50 perlite and vermiculite, but I don’t like that they float — makes cleanup a mess unless willing to send down the drain or collect in a bucket - but the floating bits stick to you as you dip hands in and out.
I’ve also found plain copier/printer paper can be useful because they disintegrate into pulp when wet (no strengthening fibers like paper towel) and some fast food restaurant napkins work as well — loosely tears — without disintegrating quite as fast.
Watch out for seeds that take long time to germinate like peppers — the paper contains starch/glue that can attract mold.
-
Vanisle_BC
- Greener Thumb
- Posts: 1356
- Joined: Mon Apr 13, 2015 9:02 pm
- Location: Port Alberni, B.C. Canada, Zone 7 (+?)
I had the same problem with germinating seeds on paper towels from the sticking. It worked better if I spaced the seeds rather than scatter them with the paper towel on a tray. I would have another towel on top and keep it moist. I would have to moisten the towel on top to get it to release better. I would only peel back just to see if the seeds are germinated, not remove it. If I see that the seeds are germinating,I can just cut the towel into squares with a knife. (A scissors was a disaster). Paper towels are degradable so just plant the whole thing.
-
pepperhead212
- Super Green Thumb
- Posts: 2878
- Joined: Wed Oct 15, 2014 1:52 pm
- Location: Woodbury NJ Zone 7a/7b
If you want to let the sprouts get larger - the reason for them rooting in the paper - try a seed sprouter. This is what I use in a last attempt to sprout some old seeds. Rinsing them a few times a day with warm water speeds up germination, and with those very slow ones, that might get moldy, I use some H2O2 solution every few rinses.
-
Vanisle_BC
- Greener Thumb
- Posts: 1356
- Joined: Mon Apr 13, 2015 9:02 pm
- Location: Port Alberni, B.C. Canada, Zone 7 (+?)
-
applestar
- Mod
- Posts: 30540
- Joined: Thu May 01, 2008 7:21 pm
- Location: Zone 6, NJ (3/M)4/E ~ 10/M(11/B)
OK, I can’t find one or two good posts with clear cut information, so I’m going to send you to what is probably my first year to experiment, then subsequent years’ posts can be perused by clicking on my name, then click on search for user’s? member’s? posts, then [search these results] for “spoonzip” or ”seedzip“ — this will result in search results with surrounding text blurb. It’s been an evolving process with “something learned” each time (since of course I change and tweak even after something has worked perfectly....  )
)
 Subject: Starting pepper seeds >> spoon in zip bag germination
So, my results have been that it’s better with some kind of material to hold moisture and buffer the extremes of too much water/waterlogged <-> seeds dry out too quickly. Something that has pores and provide some air for the seeds that are sensitive to drowning.
Typically contamination sets in (likely my own fault, although partly due to experimenting with nitrogen infusion to see if Reluctant seeds will respond) and green mildew starts to grow or seeds start to rot after about 4 weeks. But almost every year, I can’t bring myself to “call it” and some of the seeds end up germinating/sprouting/growing weeks later, often without my noticing.
-
TomatoNut95

- Super Green Thumb
- Posts: 2069
- Joined: Sun May 26, 2019 11:11 am
- Location: Texas Zone 8
-
Vanisle_BC
- Greener Thumb
- Posts: 1356
- Joined: Mon Apr 13, 2015 9:02 pm
- Location: Port Alberni, B.C. Canada, Zone 7 (+?)
Wow, lots to read there Applestar - thanks. I think I'm still OK with starting my indoor seed either in soil blocks and v. small pots - or on damp paper-type material if I want to observe germination. But paper towel is not ideal because the rootlets get embedded. It looks as if I should try coffee filters, paper napkins, regular copy paper instead.
I'm too much of a laissez-faire gardener to watch/fuss/look over seed starts more than once a day - maximum! The spoonzip method looks very good & well organised but I don't think I'd enjoy it . An added disincentive is that I'm trying hard to minimize my use of plastic, which is ideal for spoonzipping. Must admit I'm having trouble finding a good "natural" material for labels though. I re-use as much as I can.
For space saving I start seed in soil blocks, halved toilet-tube centres, coin wrappers etc - anything I can plant directly without disturbing the roots. My strategy is to seed at least one more 'block' than I want to grow out, with 2 or more seeds; to be thinned to the strongest one. For example if I intend to grow 2 Ailsa Craig tomato plants I will put 2 seeds in each of 3 soil blocks. If they all germinate I snip the weaker seedling in each block and discard (or not) whichever of the 3 blocks finishes up having the weakest young plant.
I'm too much of a laissez-faire gardener to watch/fuss/look over seed starts more than once a day - maximum! The spoonzip method looks very good & well organised but I don't think I'd enjoy it
For space saving I start seed in soil blocks, halved toilet-tube centres, coin wrappers etc - anything I can plant directly without disturbing the roots. My strategy is to seed at least one more 'block' than I want to grow out, with 2 or more seeds; to be thinned to the strongest one. For example if I intend to grow 2 Ailsa Craig tomato plants I will put 2 seeds in each of 3 soil blocks. If they all germinate I snip the weaker seedling in each block and discard (or not
-
applestar
- Mod
- Posts: 30540
- Joined: Thu May 01, 2008 7:21 pm
- Location: Zone 6, NJ (3/M)4/E ~ 10/M(11/B)
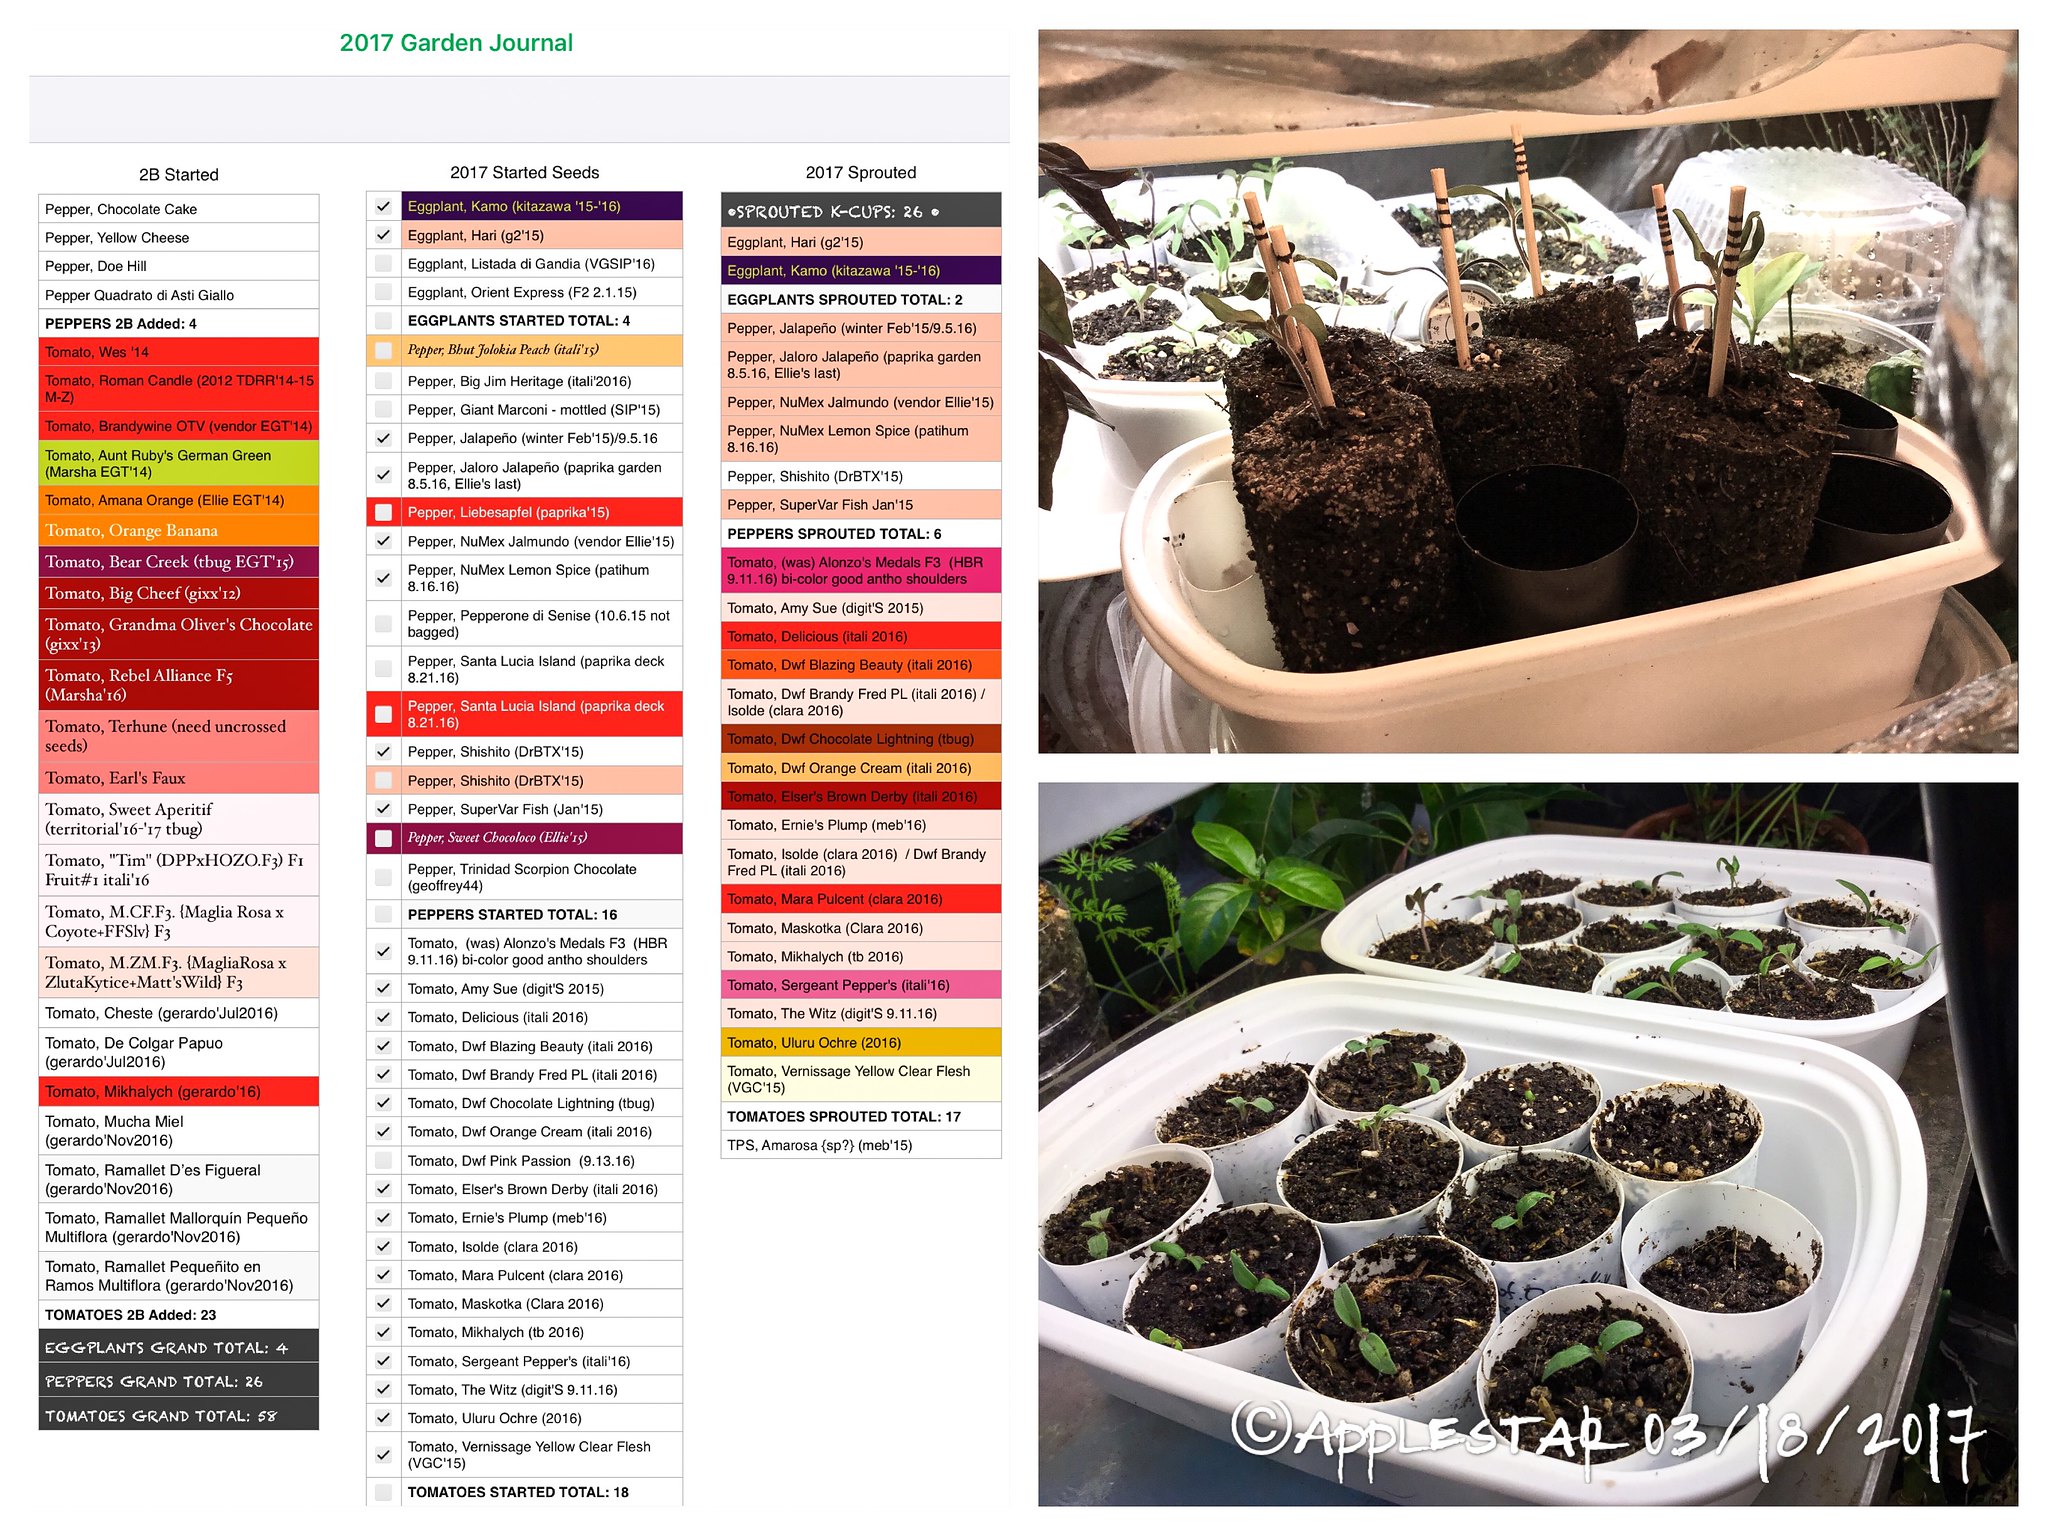
Color/stripe-marked toothpicks work fairy well when combined with good seedblock map. Here’s one example that I was able to find quickly —
Subject: Applestar's 2017 Garden
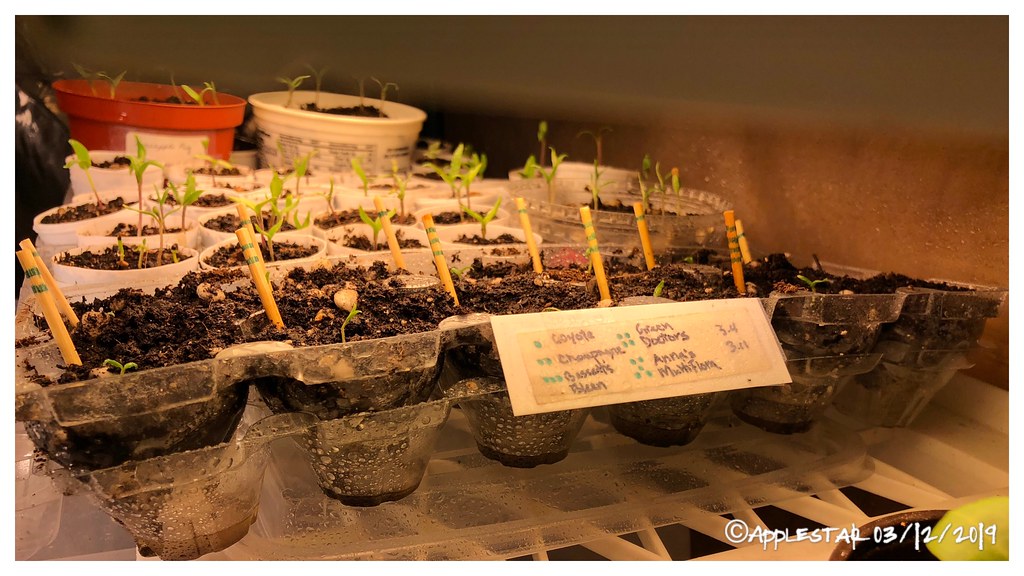
...one more example from last year... UPGRADED to cut up BAMBOO skewers (saved/recycled from take out Chinese beef/chicken on stick) which weathers much better than wooden toothpicks. Experiment with markers for ones that don’t bleed or wash off.
Subject: Applestar’s 2019 Garden
Subject: Applestar's 2017 Garden
...the list on the left is NOT the seed block map...applestar wrote:Repotted the tomatoes with true leaves into mostly individual K-cups (still need to conserve space). I had a tray for TJ's Mocha Mochi icecream that looked worth using, so I uppotted the biggest of the dwarfs in the tray. I'm also trying a DIY soilblocker made from pill bottles. I made the mix a little too sandy, and I need a better tray system -- and I'm fumbling from not using this method last year ...I bottom watered the new blocks a they started to meltI'm holding them up with bottomless K-cups
...
...one more example from last year... UPGRADED to cut up BAMBOO skewers (saved/recycled from take out Chinese beef/chicken on stick) which weathers much better than wooden toothpicks. Experiment with markers for ones that don’t bleed or wash off.
Subject: Applestar’s 2019 Garden
applestar wrote: - I’m trying planting these tomato seedlings in the clear egg case cells. I usually don’t like to plant seedlings in conjoined cells, but these are all cherry tomato seedlings, and hopefully will undergo nearly the same growth habits.
- Coyote, Champagne Cherry, Bassett’s Bleen, Green Doctors, and Anna’s Multiflora.

-
TomatoNut95
- Super Green Thumb
- Posts: 2069
- Joined: Sun May 26, 2019 11:11 am
- Location: Texas Zone 8
Hey, neat! Never thought of using a cotton ball. Have you ever tried those Jiffy dirt pellets? They're good for starting small seeds like peppers and tomatoes. You have to soak the dry pellets a few minutes to get them to grow, but the soil in them is nice and soft. Then when the plant is big enough, stick all of it right where it's gonna stay.
-
applestar
- Mod
- Posts: 30540
- Joined: Thu May 01, 2008 7:21 pm
- Location: Zone 6, NJ (3/M)4/E ~ 10/M(11/B)
Jar-type sprouter does work and particularly well for germinating just the root tip — first hook — on larger seeds like beets on up to peas, cukes, corn, squash, etc. BUT, because you need to keep rinsing, seed sprouter tend to roll the seeds around and the roots will grow DOWN according to gravity, twisting and turning, while if delayed until sprouted, the top will grow UP or towards any light source. So the roots could end up strangling themselves or growing in a corkscrew to sprouting stem, making it difficult to plant.
If allowing the seedling to sprout cotyledons before sowing — sometimes advantageous for peppers and cucurbits to avoid/overcome"helmet-head" — be sure to keep sprouting seedlings upright for the purpose (see examples in recent photo my 2020 garden thread).
I actually do find larger seeds can manage with just seeds only in any size deep container (to contain humidity) because they can absorb enough water to keep from drying out for a time — they actually DISLIKE too much moisture. Just thoroughly soak them first — 4-8 hours depending on size — then drain thoroughly, and rinse often (3-4x a day)
Wheatgrass sprouter with a mat underlayment — MICRIGREEN TYPE as @imafan mentioned —might certainly work but with same caveat as the paper towels — entangled roots are difficult to extricate. Slow growing seeds can end up with mildew or mold on the mat and especially if some of the seeds are old, they decay and contaminate the mat. (SPROUTING seeds are — should be —fresh/nearly 100% germination).
...BTW if you bury part or all of the entangled paper, cotton, etc., you need to (carefully) adjust the fertilizer because the excess carbon in immediate contact with the roots can cause N tie-up/deficiency. Also be sure to bury completely so as not to allow moisture to wick and evaporate away from root hairs.
-
HoneyBerry
- Greener Thumb
- Posts: 1216
- Joined: Sat Jul 18, 2015 1:10 pm
- Location: Zone 8A Western Washington State
I sometimes buy brocolli sprouts that are sprouted inside a clear plastic box with brown paper on the bottom. The brown paper is similar to a paper towel, but the paper is heavier with a waxy coating and tiny pin size holes. The paper holds moisture and the seed sprouts lay on top of it but the roots don't penetrate into the paper. I don't know where the company gets the paper. It works so perfectly, so they must have experimented before hand.
I am thinking about making my own brocolli sprouts in a similar manner, and am trying to figure out where to get the paper.
I am thinking about making my own brocolli sprouts in a similar manner, and am trying to figure out where to get the paper.
-
TheWaterbug

- Greener Thumb
- Posts: 1082
- Joined: Mon May 02, 2011 5:15 pm
- Location: Los Angeles