User avatar
applestar
Mod
Posts: 30550
Joined: Thu May 01, 2008 7:21 pm
Location: Zone 6, NJ (3/M)4/E ~ 10/M(11/B)

2014–2016 Luffa • Luffah • Loofah Growing Adventure

OK, As I mentioned elsewhere, I have acquired luffa/loofah seeds. Long fruited and most likely late maturing variety.

I've coaxed some of the seeds out of the entire fruit dried fibre/sponges and tried dropping about two dozen in some luke warm coffee. I had four immediate sinkers, so we're good to go. :D The plastic pudding cup of warm coffee and seeds are sitting on top of the T-5 light fixture for now. I'll soak them for about four hours and then plant them (or proceed with a pre-germinating method).

At the moment, I'm thinking of planting them in individual micro-greenhouse/ made from 1 gal plastic vinegar jugs. Last time, I planted them in 1 qt plastic containers and they got a little tight. Cut off 1 gal jugs should make approx 1/2 gal (2 qt) as well as the dome to keep them warmer.

If anyone else is growing loofah (I decided I like this spelling better :wink:) this year and want to join in journaling their process, please do. We could compare notes. ...and besides, I have a lot to learn and need to pick your brains. :>

For information on how to grow, check out this thread: Advice growing loofah / luffa where there have been lots of good info posted already and where I'm trying to consolidate links of previous threads. :wink:

User avatar
Aida
Senior Member
Posts: 129
Joined: Sun Jan 06, 2013 4:02 am
Location: Central Florida

Wow, this is so cool!

User avatar
rainbowgardener
Super Green Thumb
Posts: 25279
Joined: Sun Feb 15, 2009 6:04 pm
Location: TN/GA 7b

Do squash bugs and squash vine borers bother them? If so, I won't even try.

User avatar
applestar
Mod
Posts: 30550
Joined: Thu May 01, 2008 7:21 pm
Location: Zone 6, NJ (3/M)4/E ~ 10/M(11/B)

Not SVB's I think, but most likely squash bugs, stink bugs, and harlequin bugs as well as cucumber beetles.

Last time, I had a house wren family living in a nest box behind the trellis and three praying mantis ootheca had been deposited the pervious autumn.... And this was the area that always end up with giant brown garden spider and black and yellow garden spider orbs by fall. -- all despite best efforts by the house wrens. :wink:

Heh, heh, by three o'clock when I had planned to sow the seeds, I had about ten complete sinkers and ten semi-sinking bobbers. Only four floaters.... :roll: I sowed twelve in six 2" mini soilblocks -- 2 @, and rolled up the rest of the bobbers in moist paper towel pre-germination method.

I used warm water for the paper towels and set the miniblock tray in warm water in the sink to warm up. They have been tucked in between and under the tomato and flower seed germinating trays on the heat mat.

...now we wait. 8)

User avatar
applestar
Mod
Posts: 30550
Joined: Thu May 01, 2008 7:21 pm
Location: Zone 6, NJ (3/M)4/E ~ 10/M(11/B)

Well, last year was a bust -- one or two seeds may have tried to grow but died.

This year, I tried the saved seeds from last year as well as purchased seeds from Fedco, and used the aquarium heater maintained incubation chamber. The saved seeds did not germinate,mbut the Fedco seeds went bonkers! :D

...Then planted the seedlings after the seeds germinated and started to sprout and/or cotyldons emerged in self-watering containers. Out of 10 seeds, two didn't germinate, I lost three to damping off but still have FIVE growing:

Subject: Self Watering Container and Sub-irrigated Planter
applestar wrote:One of my NEW EXPERIMENTS this year will be trying different ideas for DIY SWC (Self Watering Container) and SIP (Sub-irrigated Planter).

I've been looking at different designs and plans on-line for a while now. I want to stick with something simple that I can make easily, hopefully with minimum need to purchase supplies.

For starters, I made these from recycled 2L soda bottles and drinking straws.

Image

I made the two for Dwarf Orange Pixie tomato seedlings a while ago, but it had been worrying me that there was no vent/drainage hole for the water reservoir. It has been my observation that most of the recent designs provide for an air space between the soil and the water surface in the reservoir.

Today, while I was making two more containers for the sprouted/germinated luffa seeds, I had an :idea: moment when a portion of the sidewall kept buckling inward.

I punched poles on opposite sides of the outer reservoir container, then aligned the buckled part of the inner container with the hole, then pushed a straw in the gap so the bottom of the straw is in the airspace above the water.

It was an easy retrofit to make for the tomato containers as well. Now there is a ventilation/watering tube. I'm not worried about drainage hole for these since they will be indoors and watering will be strictly monitored.

Luffa containers needed a humidity cover, and it turns out the quart size zip bag (also previously used) fits perfectly, and all I had to do was cut the corner off to let the straw out. Once the luffa seeds sprout, I'll cut off the other corner for better ventilation.

User avatar
applestar
Mod
Posts: 30550
Joined: Thu May 01, 2008 7:21 pm
Location: Zone 6, NJ (3/M)4/E ~ 10/M(11/B)

Now they look like this :D :shock:

Image (ignore the tomato)

...I started the seeds extra early because it seemed like they took forever to germinate. Now I'm in trouble because they are starting to vine already and getting way too big. :roll:

I may have to start a back up batch, just in case these lovely starts fail. I think I have at least another full month to go before they could be planted in the ground outside even with some kind of protection.....

User avatar
ElizabethB
Super Green Thumb
Posts: 2105
Joined: Sat Nov 24, 2012 12:53 am
Location: Lafayette, LA

Applestar - can you move them to a larger container until it is warm enough to plant out doors?

BTW - your orchids are stunning.

I have toyed with the idea of planting Loofas and Gourds but never did so because of space restrictions. I have friends who live on "in the country" and have lots of room for large vining plants. Mostly along fence lines. They do not jump through hoops to germinate seeds. A soak in warm water then toss them on some tilled ground. They grow like weeds. Amazing how much difference climate makes.

I am interested in your progress.

Good luck

User avatar
sweetiepie
Green Thumb
Posts: 397
Joined: Wed Mar 11, 2015 12:18 pm
Location: York, ND (Zone 3b)

I tried loofah two years ago, just threw them in the ground and they didn't germinate for me but I was using traded seed and did not do a germination test. If I did it again, I would probably grow starts since our season here is so short.

User avatar
applestar
Mod
Posts: 30550
Joined: Thu May 01, 2008 7:21 pm
Location: Zone 6, NJ (3/M)4/E ~ 10/M(11/B)

Image SOOOO EXCITED!

First male blossom opened yesterday.
image.jpg
As I mentioned, last time they grew for me, they didn't flower until nearly first frost. With all of August and September and at least first half of October ahead of us, I'm hopeful that we will see something more this year... Image

User avatar
applestar
Mod
Posts: 30550
Joined: Thu May 01, 2008 7:21 pm
Location: Zone 6, NJ (3/M)4/E ~ 10/M(11/B)

Look! Female blossoms FINALLY SHOWED UP :-()

I hand pollinated two of these. Didn't see the third one in time. I noticed one more HIGH up on the trellis yesterday. It looked like it had opened the day before (and too high to reach) so I hope some pollinators took care of that one.
image.jpg
They are growing on a trellis a foot away from the wall in the house/garage South corner nook so hopefully they will be protected from the cold and earliest frost and keep going a little while longer. The corner location doesn't get the best sun exposure, but by climbing high up, they are managing to catch some rays that don't reach all the way to the ground.

...they have also been performing double-duty to shade the SW family room wall all summer :mrgreen:

User avatar
applestar
Mod
Posts: 30550
Joined: Thu May 01, 2008 7:21 pm
Location: Zone 6, NJ (3/M)4/E ~ 10/M(11/B)

7 developing and/or potential fruits as of today :()
image.jpg
...and 60's/50's for the next 10 days Image

User avatar
applestar
Mod
Posts: 30550
Joined: Thu May 01, 2008 7:21 pm
Location: Zone 6, NJ (3/M)4/E ~ 10/M(11/B)

2016 luffah. I did NOT hand pollinate any of these. I keep forgetting to take a picture but two of the fruits fell off last Saturday -- probably because I was clipping off browned leaves and accidentally cut a few supporting tendrils :roll: . (I don't know because these were growing on my neighbor's side of the fence, but he kindly picked them up and left them by my porch. :D )

One is *almost* mature enough, the other one is probably not. But they are hanging in the house in hopes of getting them to develop a bit more.... Here are the rest of the fruits growing strong on the fence. Image

Image


...these were grown from seeds purchased for 2015 from Fedco and were started around May 16

Subject: 2016 -- starting seeds and cuttings for the new season
applestar wrote:ALREADY? OH, YEAH :-()

Image

...did I mention I only just soaked them last night? :()
I'm only spoon-zipping them temporarily (I think) -- I did successfully SPOONZIP and grow them last year, so I might just keep them in these until they sprout with seed leaves, then plant if weather is favorable. If not, they will go in 16 oz - 20 oz cups with plenty of room for their roots.

User avatar
applestar
Mod
Posts: 30550
Joined: Thu May 01, 2008 7:21 pm
Location: Zone 6, NJ (3/M)4/E ~ 10/M(11/B)

I was hesitant about harvesting and eating the younger fruits that most likely won't mature completely for making sponges or saving viable seeds because I had not mentioned eating them in this thread and these are obviously not the *angled* luffah (Chinese Okra) that are often mentioned for cooking.

But going back over my own notes, I found this entry that for some reason, I didn't post here last year :? 8) :-()
Oct 19, 2015

With the freeze last night, the Luffah might be done for. I left four largest that are growing from vines on the trellis along the house wall and draped in front of them with double layers of floating cover and tarp.. But looking out the window, it looks as if the one upper corner of the second layer got loose -- haven't gone out today so I'm not sure. A young, uncovered vine that was crawling across the window, and vines that were growing in exposed areas look wilted/dead though.

I harvested the rest yesterday -- one medium and two smallish fruits -- and added them to a stir fry last night with cabbage and green peppers, onions, garlic, myoga, miso, and peanut butter. Very yummy served with rice.

User avatar
applestar
Mod
Posts: 30550
Joined: Thu May 01, 2008 7:21 pm
Location: Zone 6, NJ (3/M)4/E ~ 10/M(11/B)

I found a really helpful video for processing mature fruits for seeds and sponge... And his loofah fruits look same or similar to mine Image

...and this is something else I want to try :mrgreen: ...

https://m.youtube.com/watch?v=w0UI31Vi5EQ

User avatar
applestar
Mod
Posts: 30550
Joined: Thu May 01, 2008 7:21 pm
Location: Zone 6, NJ (3/M)4/E ~ 10/M(11/B)

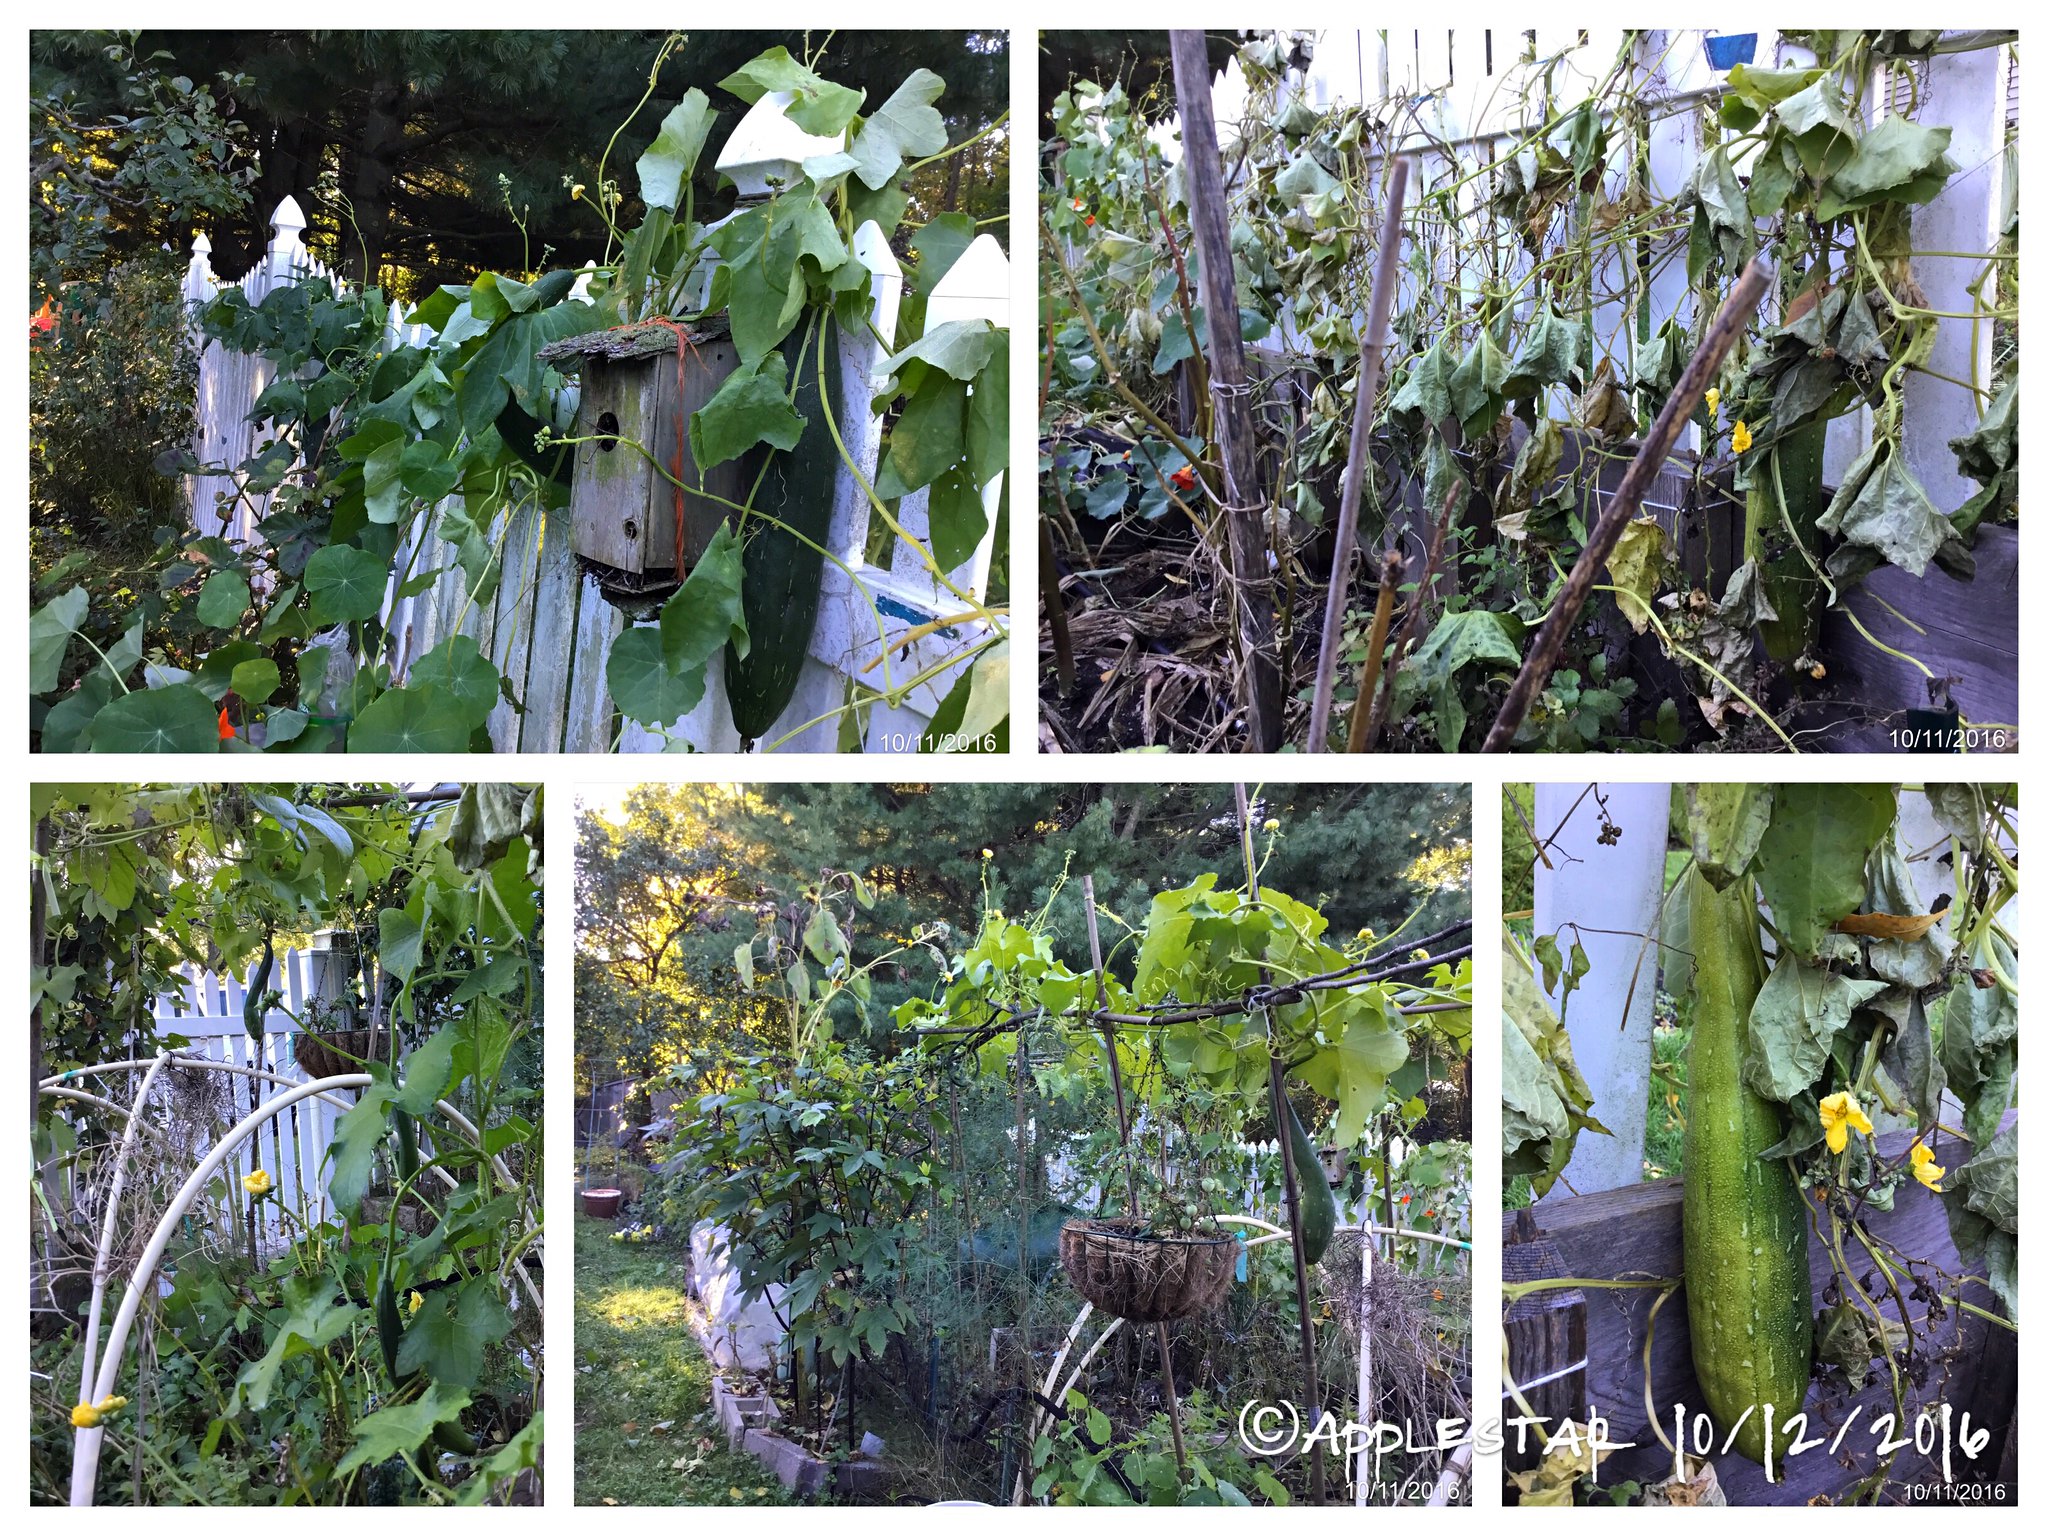
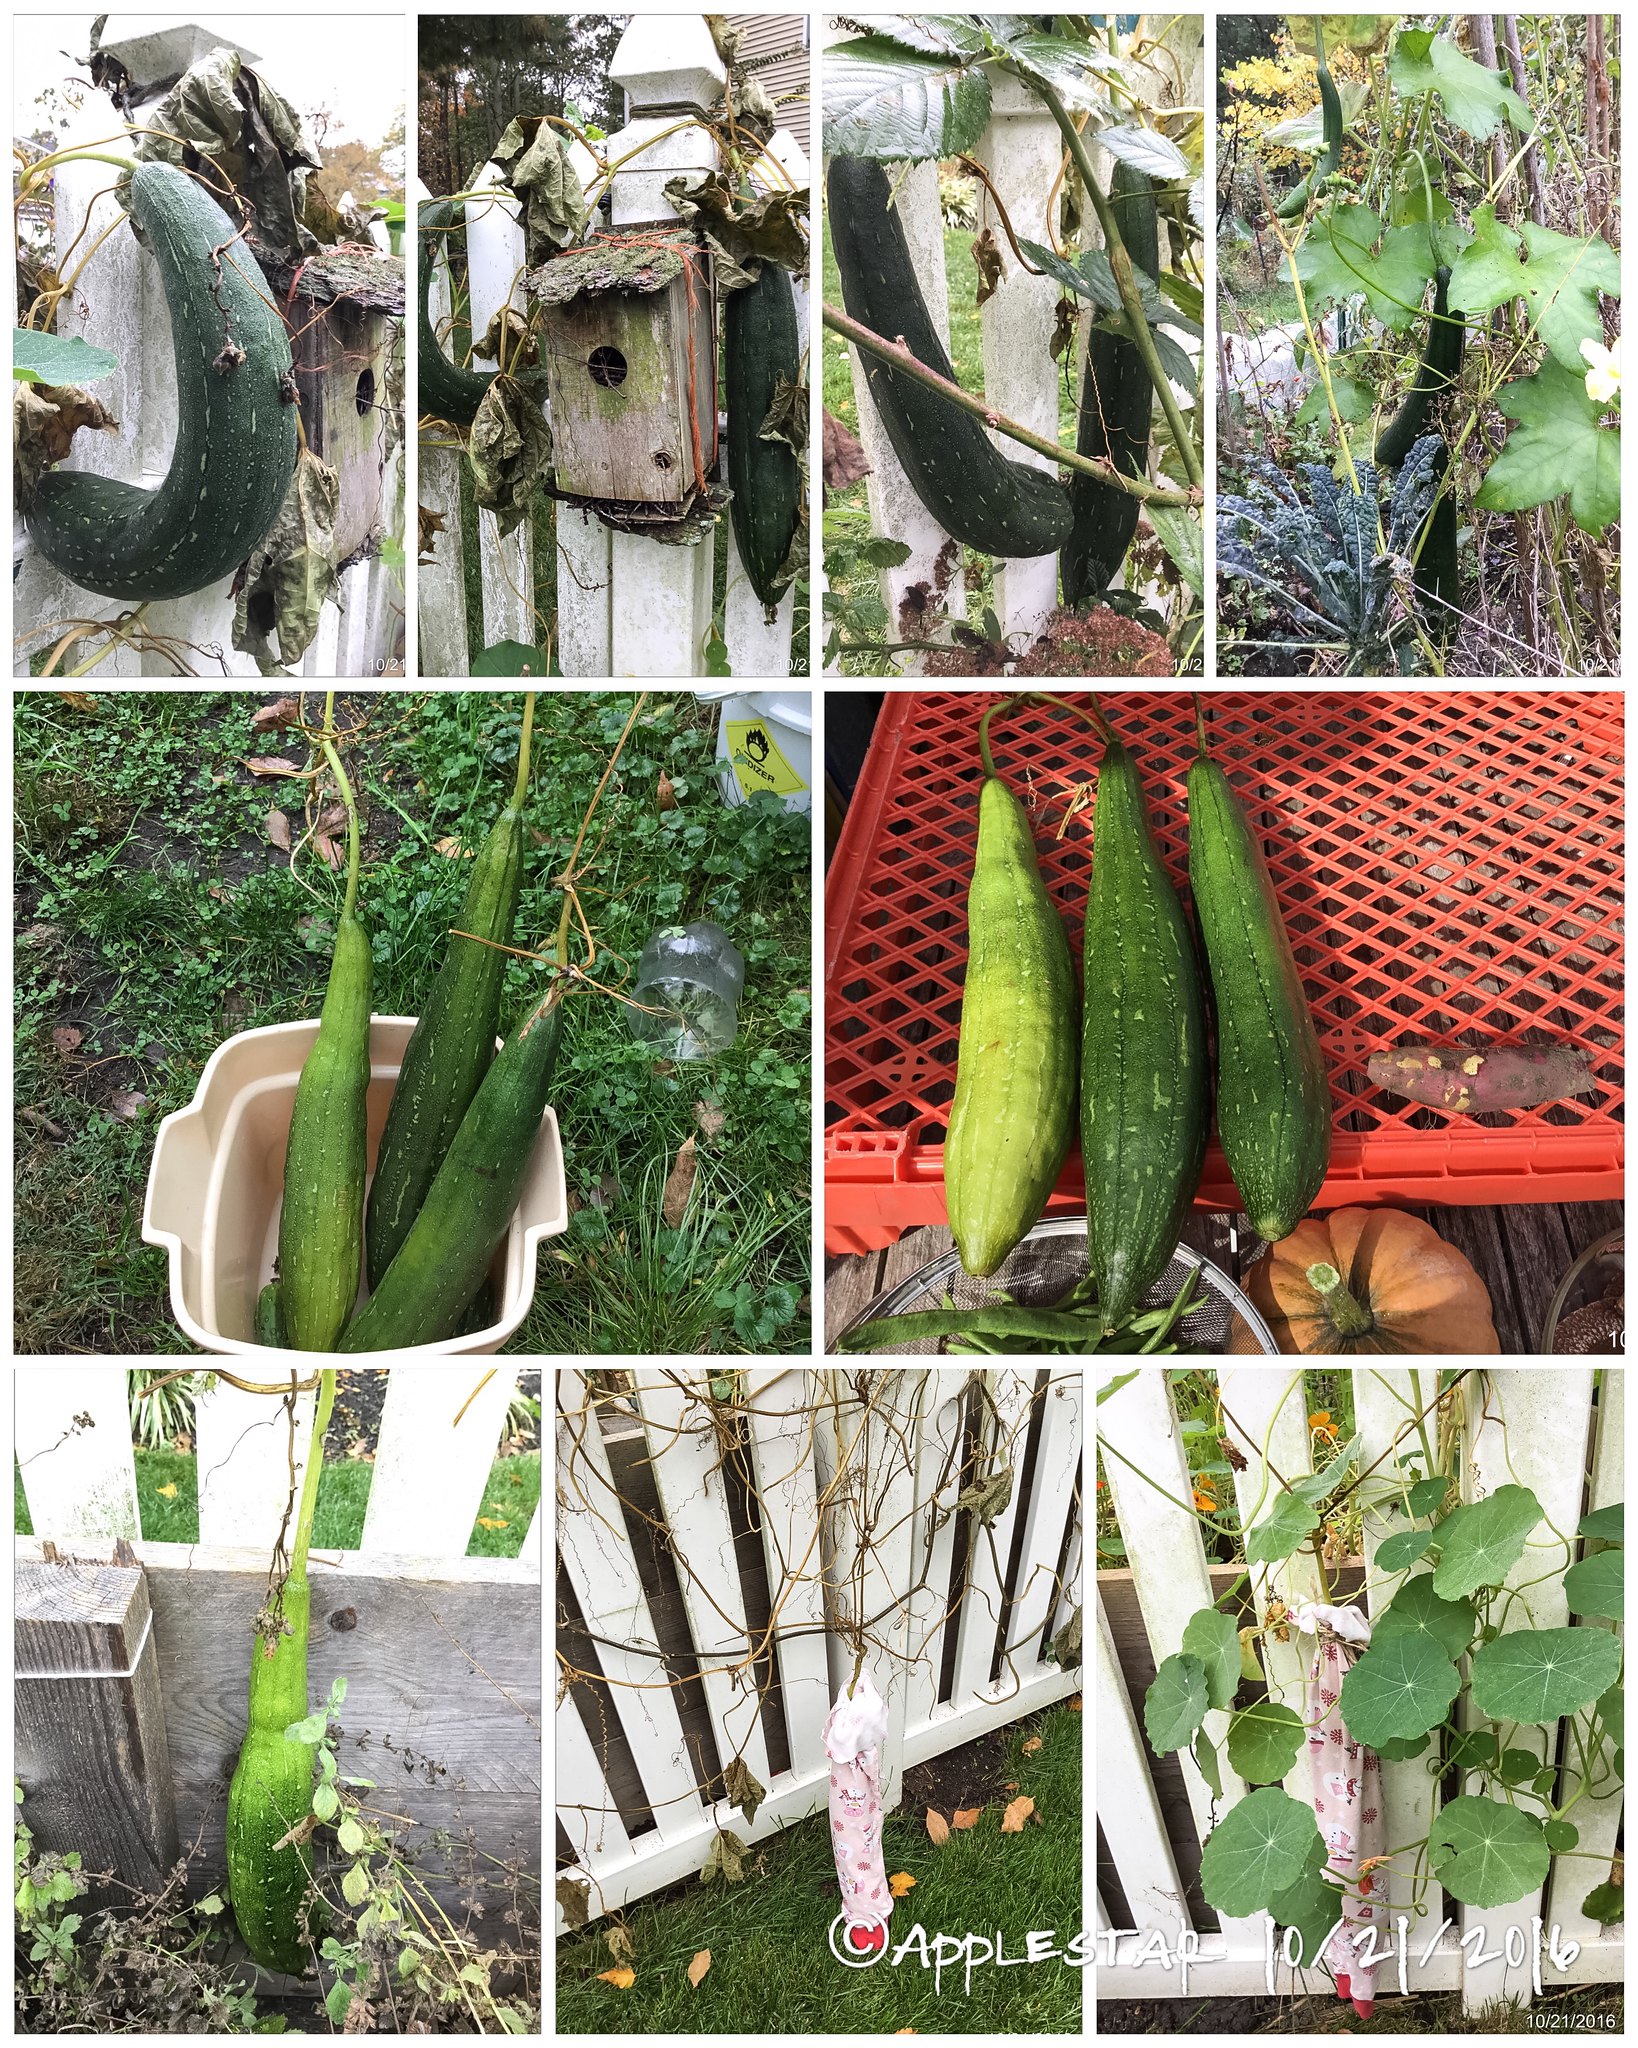
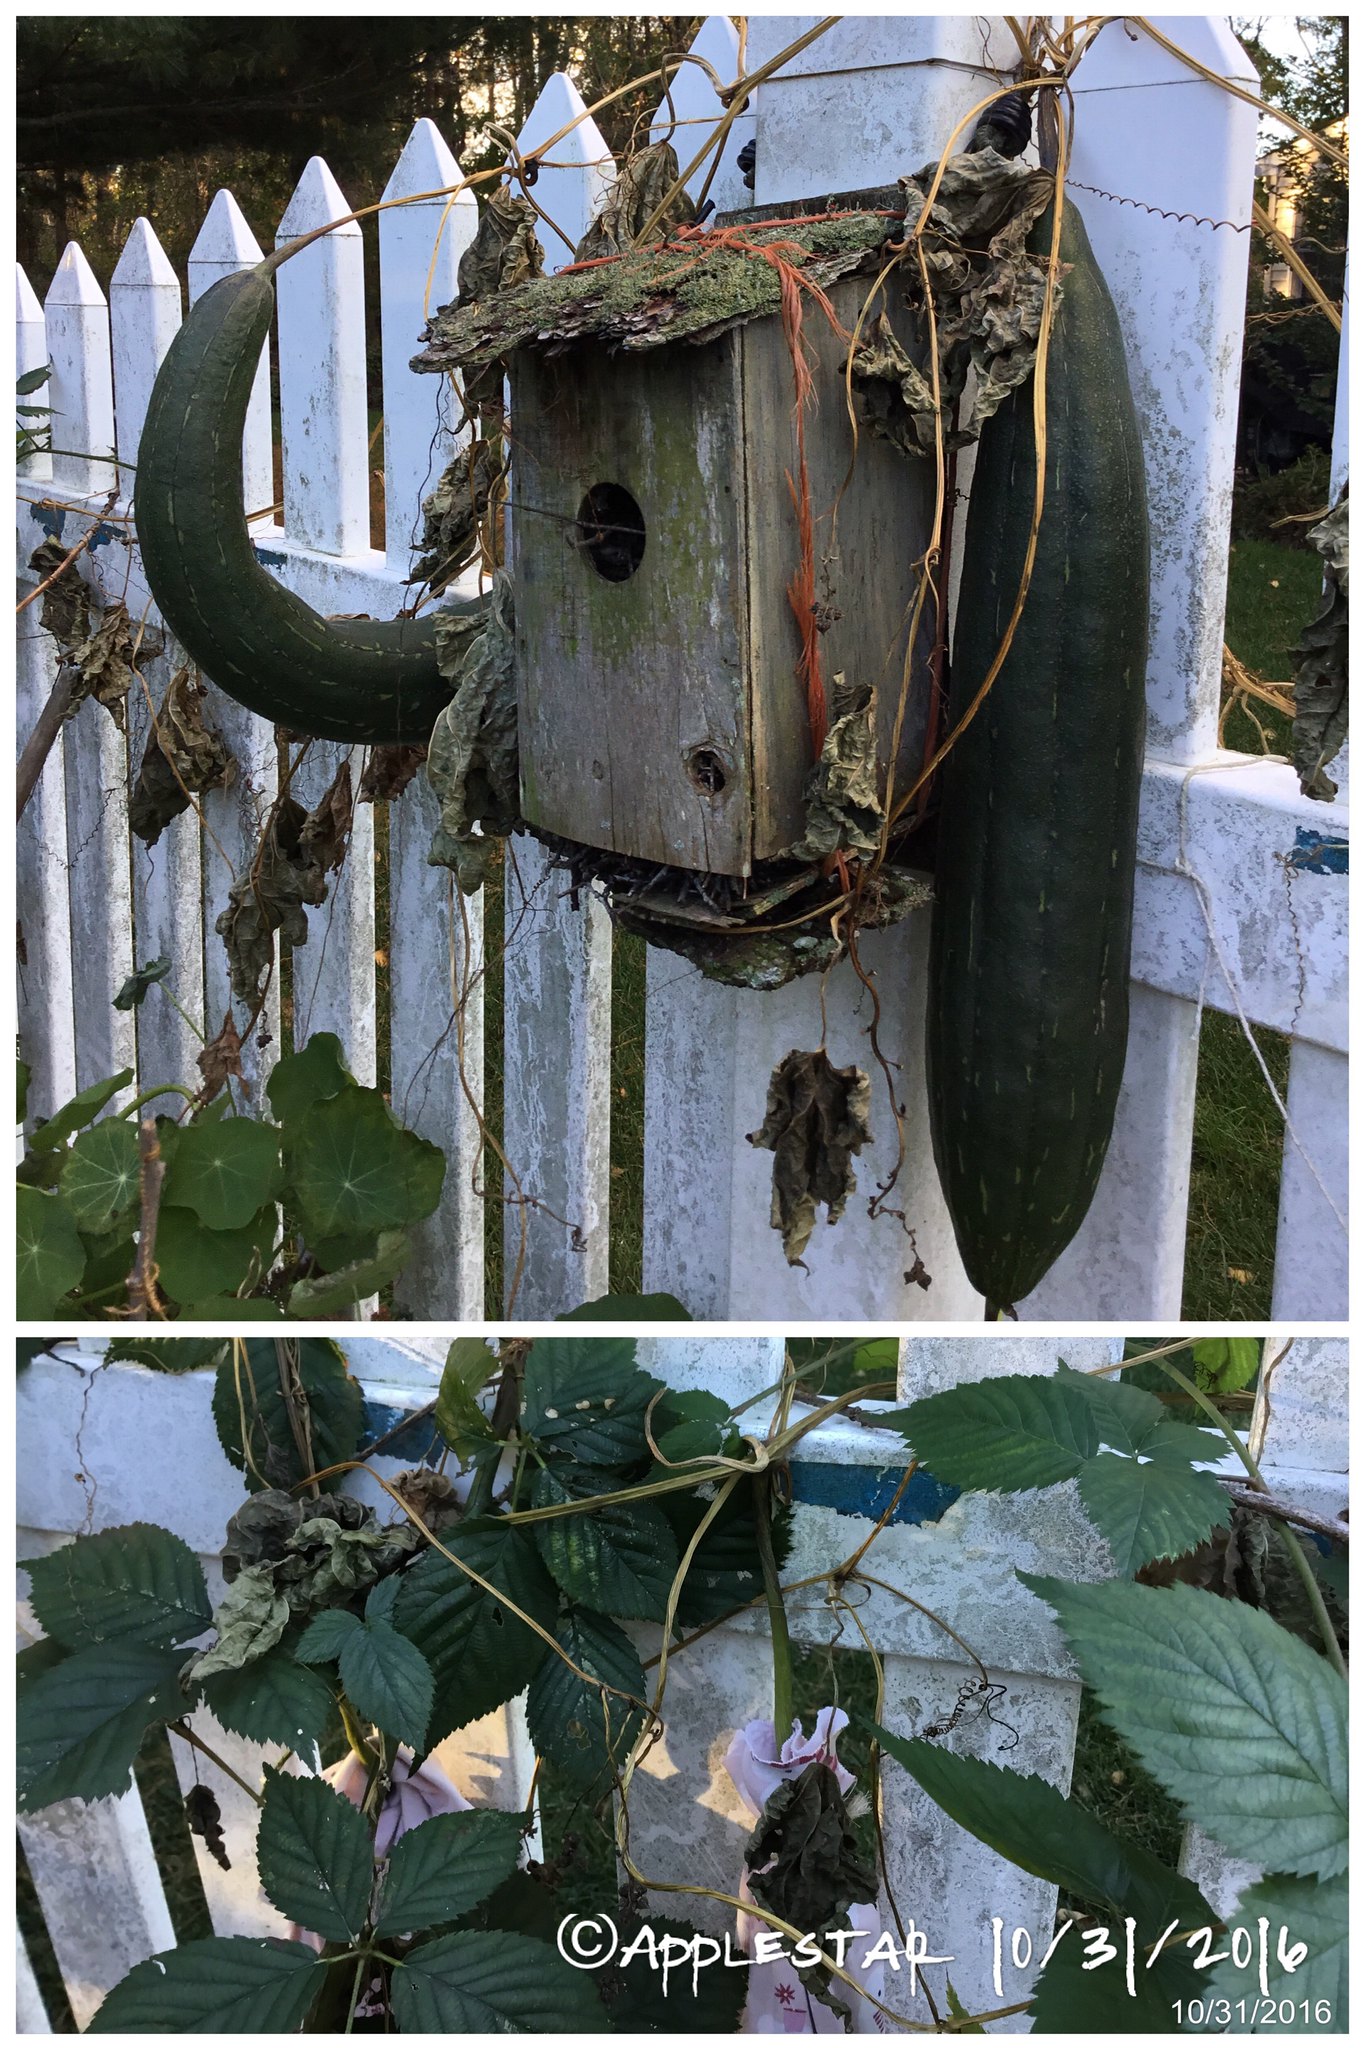
Yesterday morning, official pre-dawn temp went down to 45°F. When I went to check on the luffah on the neighbor's side of the fence, there were a whole bunch of leaves that had blackened -- they looked like they had been hit by frost. Here is a photo I took after removing all the blackened and worst of the yellowed/browned leaves.

Image

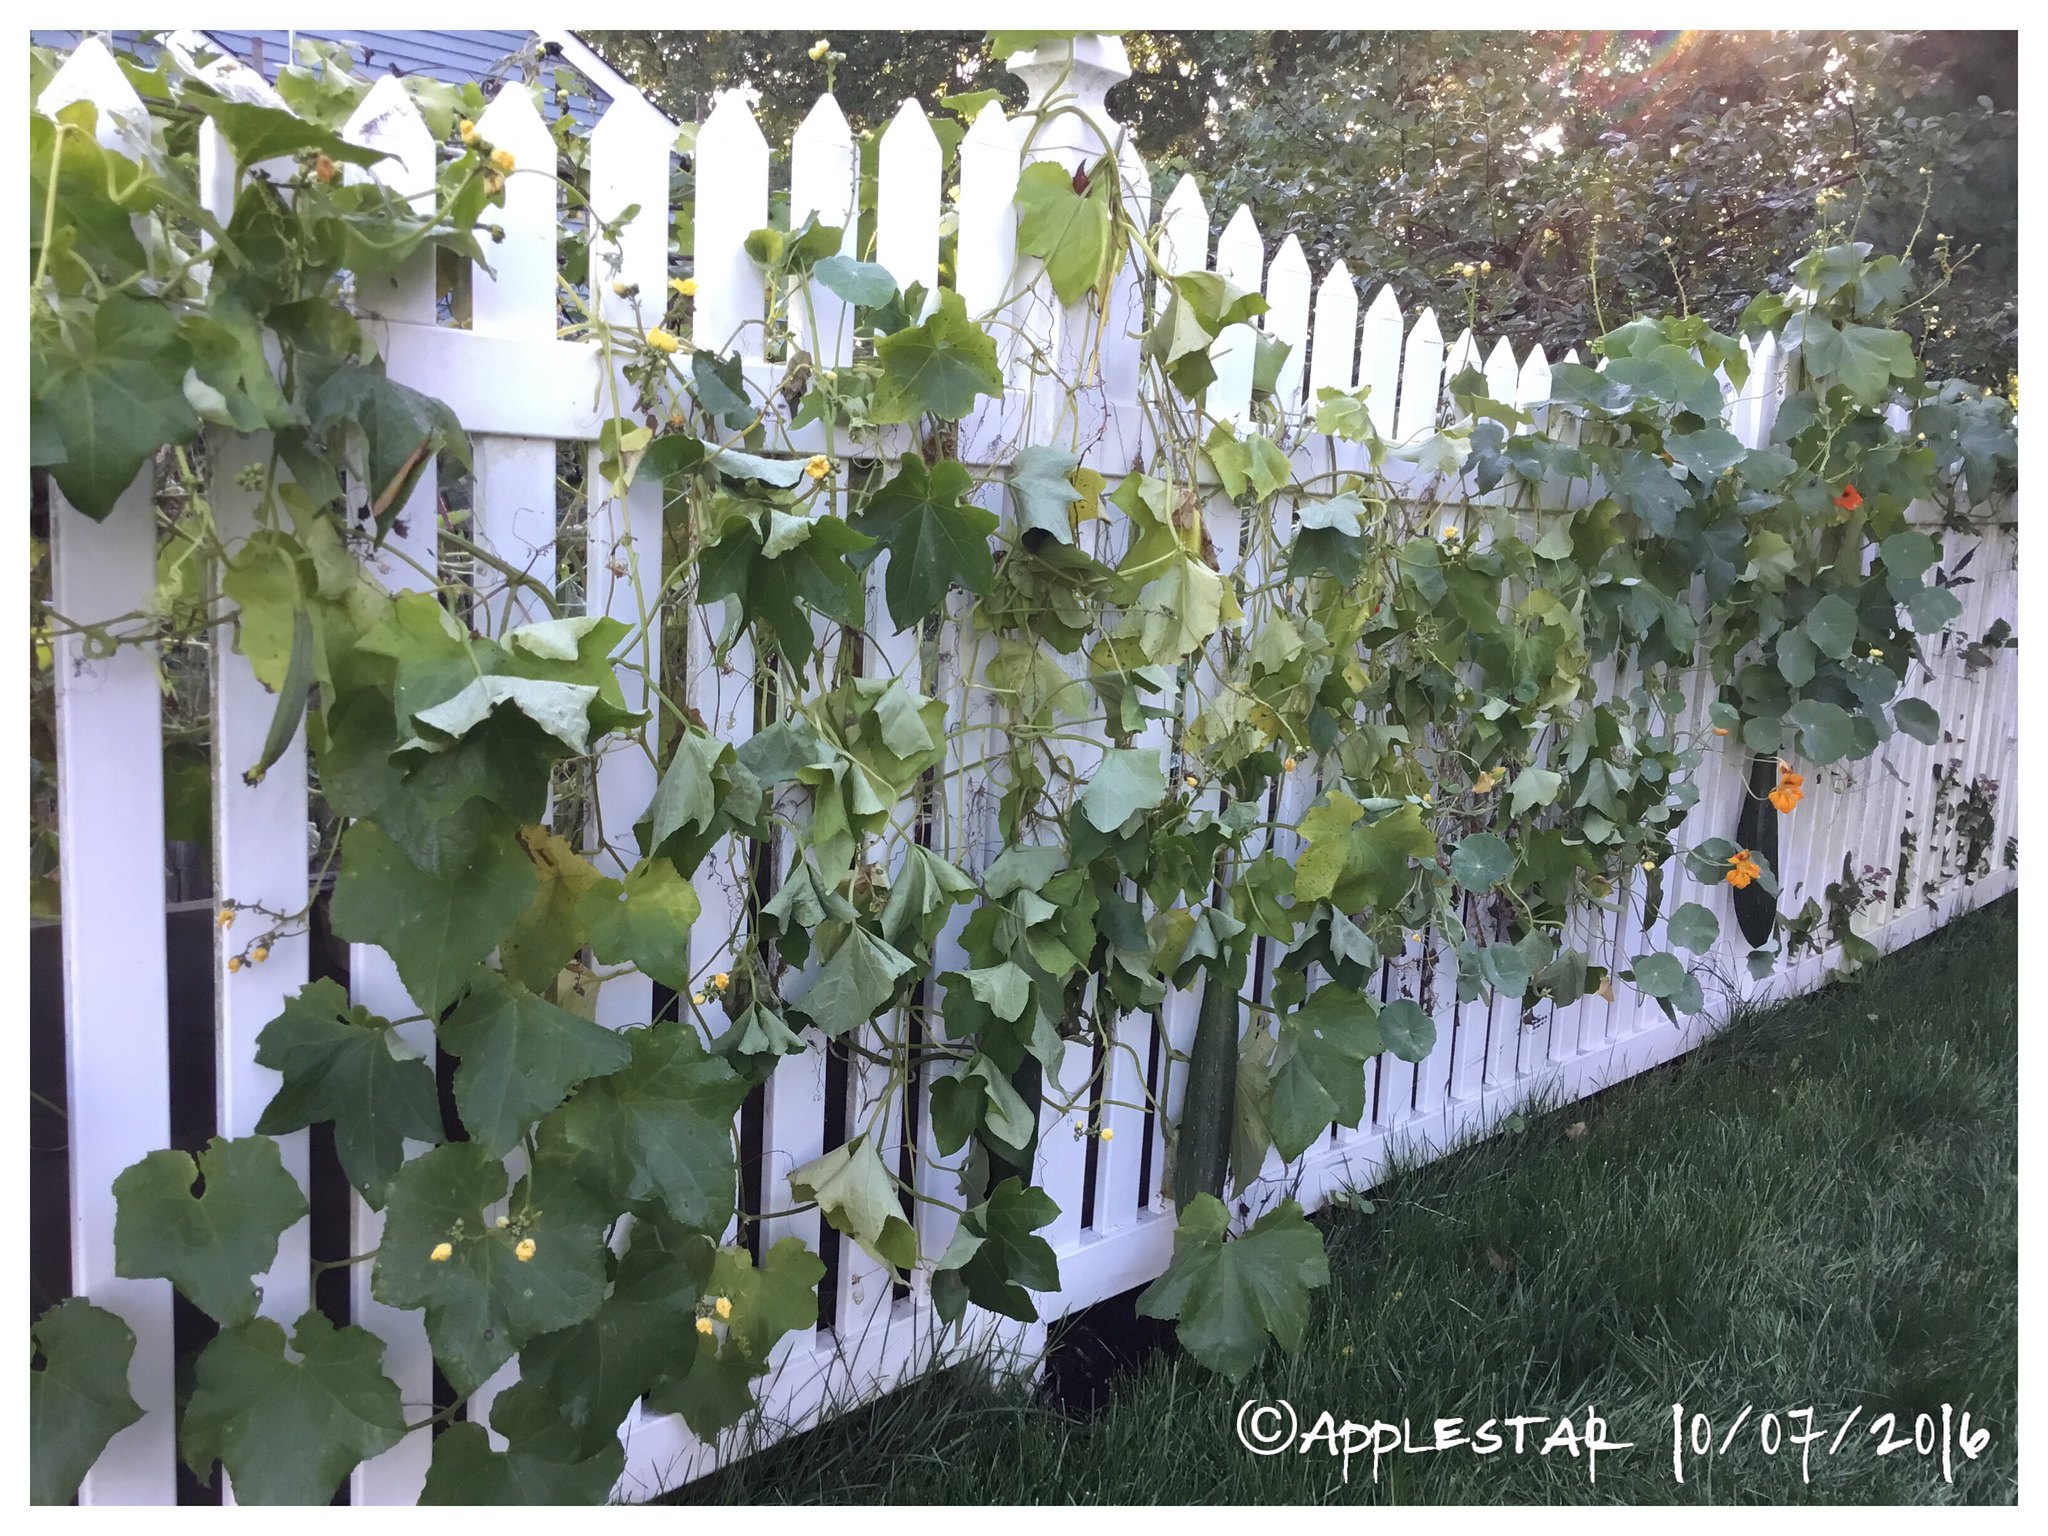
But after looking at the photo and noting the lush green lawn all the way up to the bottom of the fence, I'm wondering if their lawn service had been randomly spraying again even though I have asked a number of times to hold their sprayer wand CLOSE to the ground when they are spraying along the fence. One young man actually said the wand "doesn't reach" as he stood upright and held the handle at his waist level.... :roll:

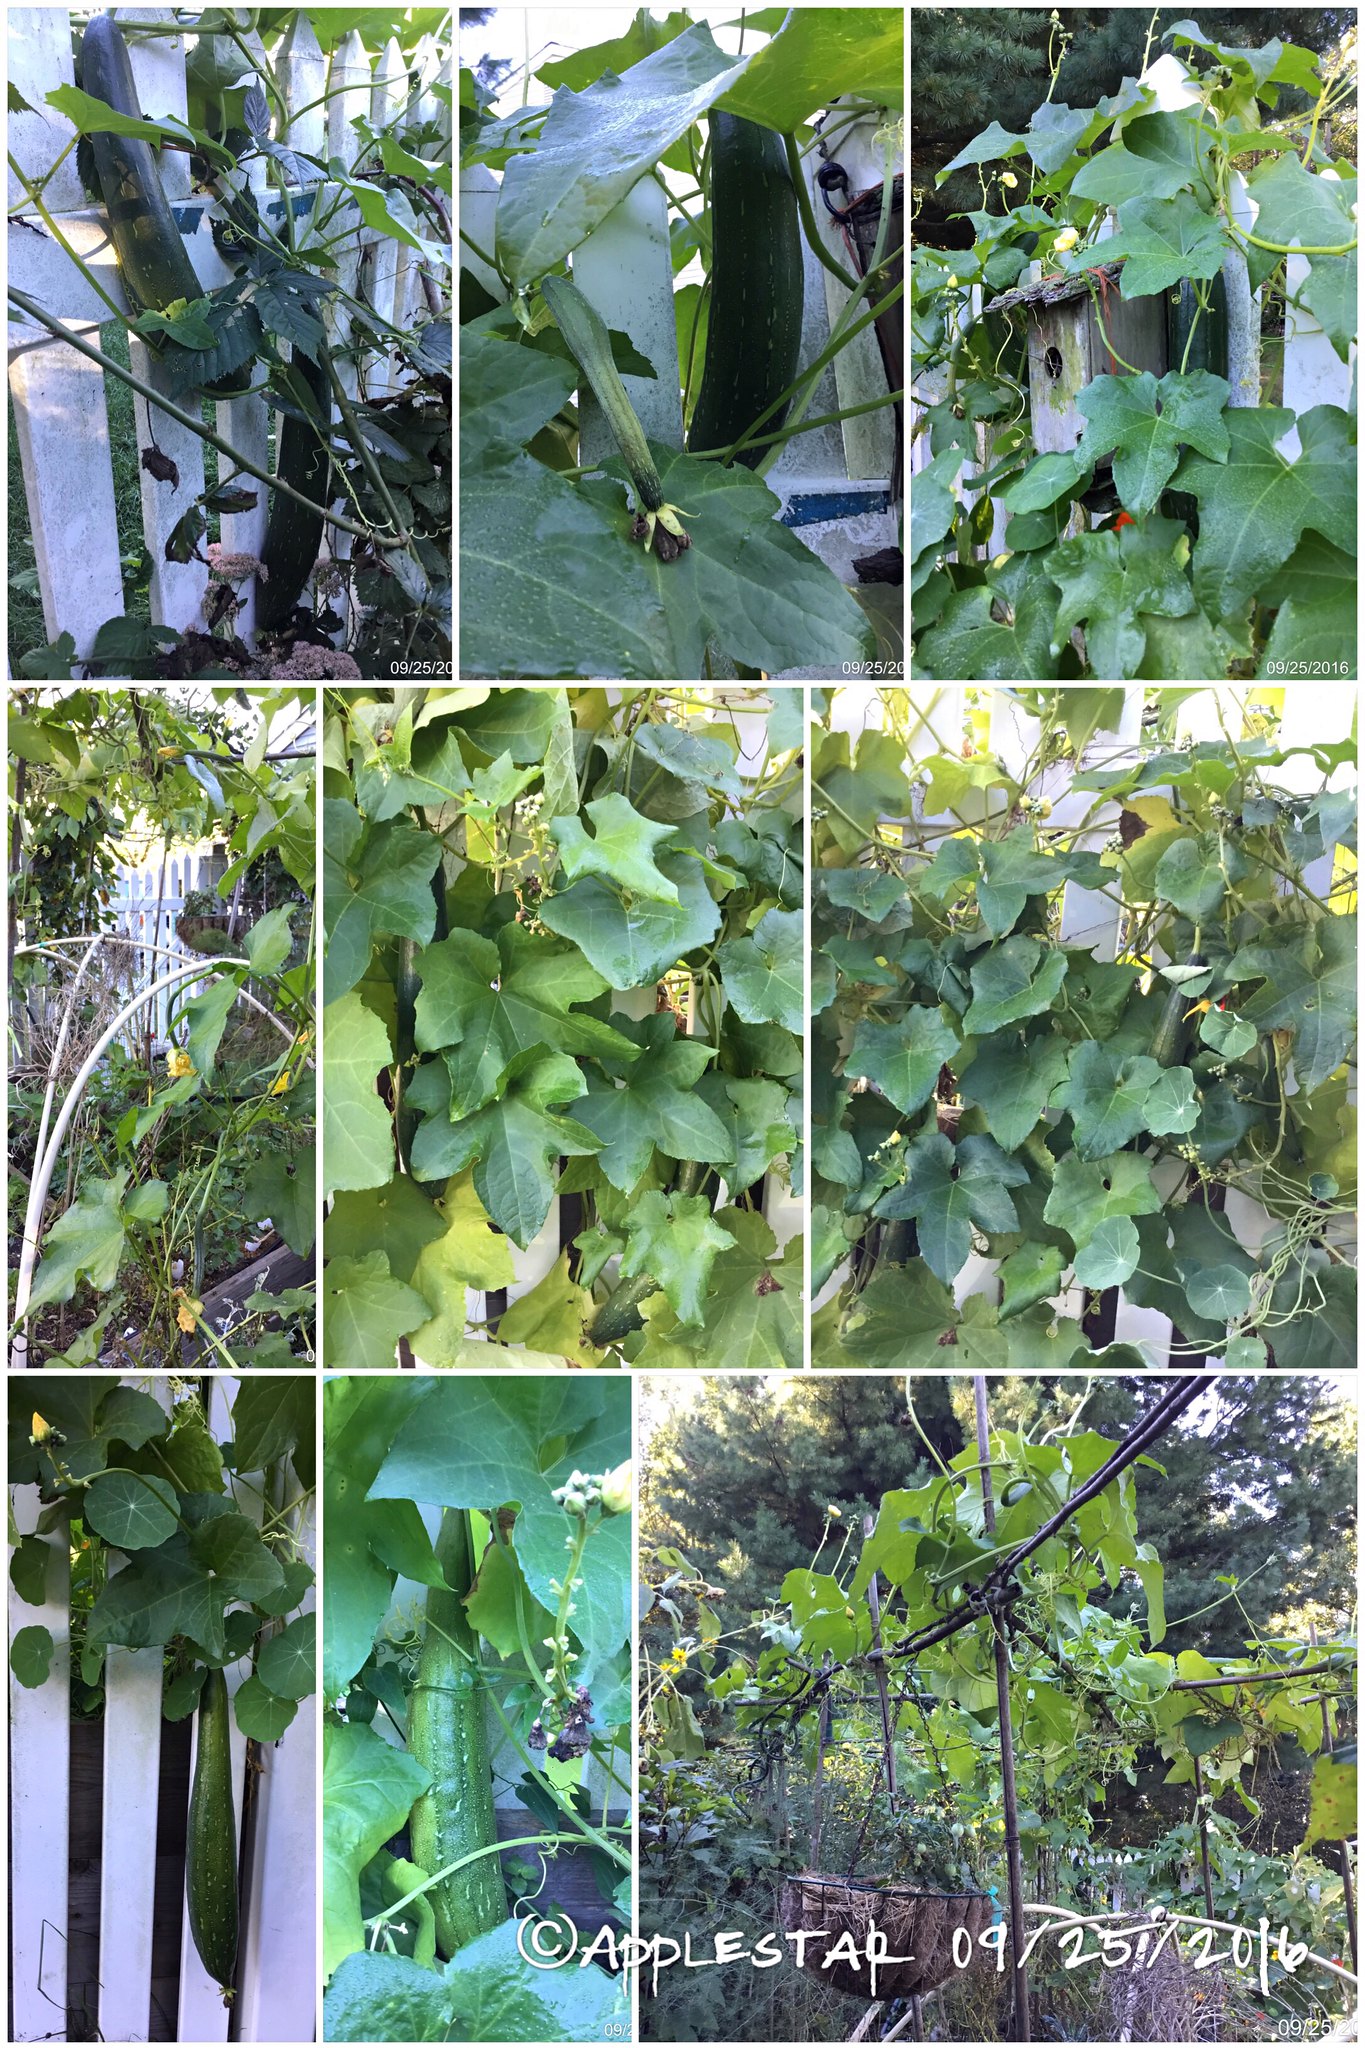
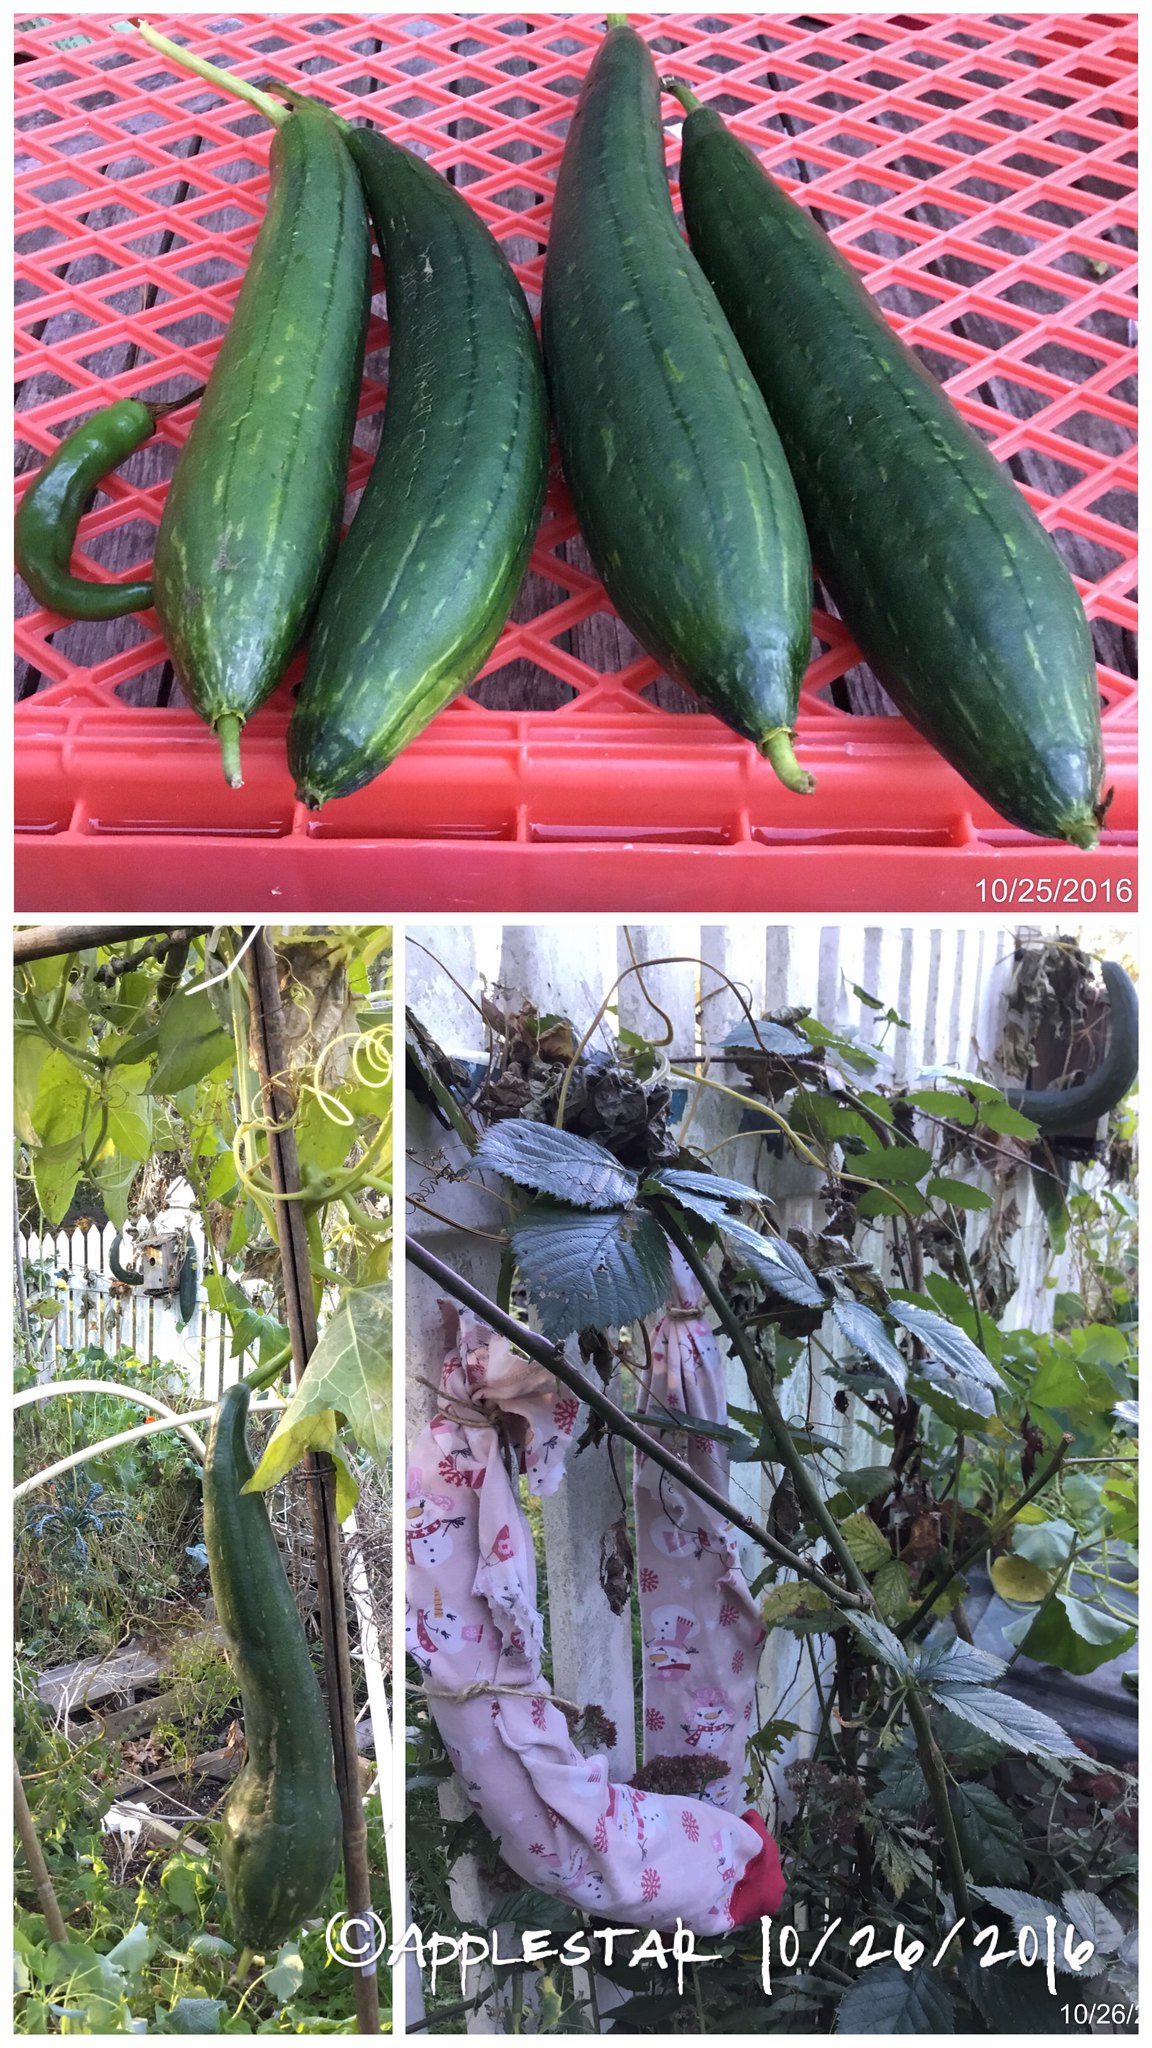
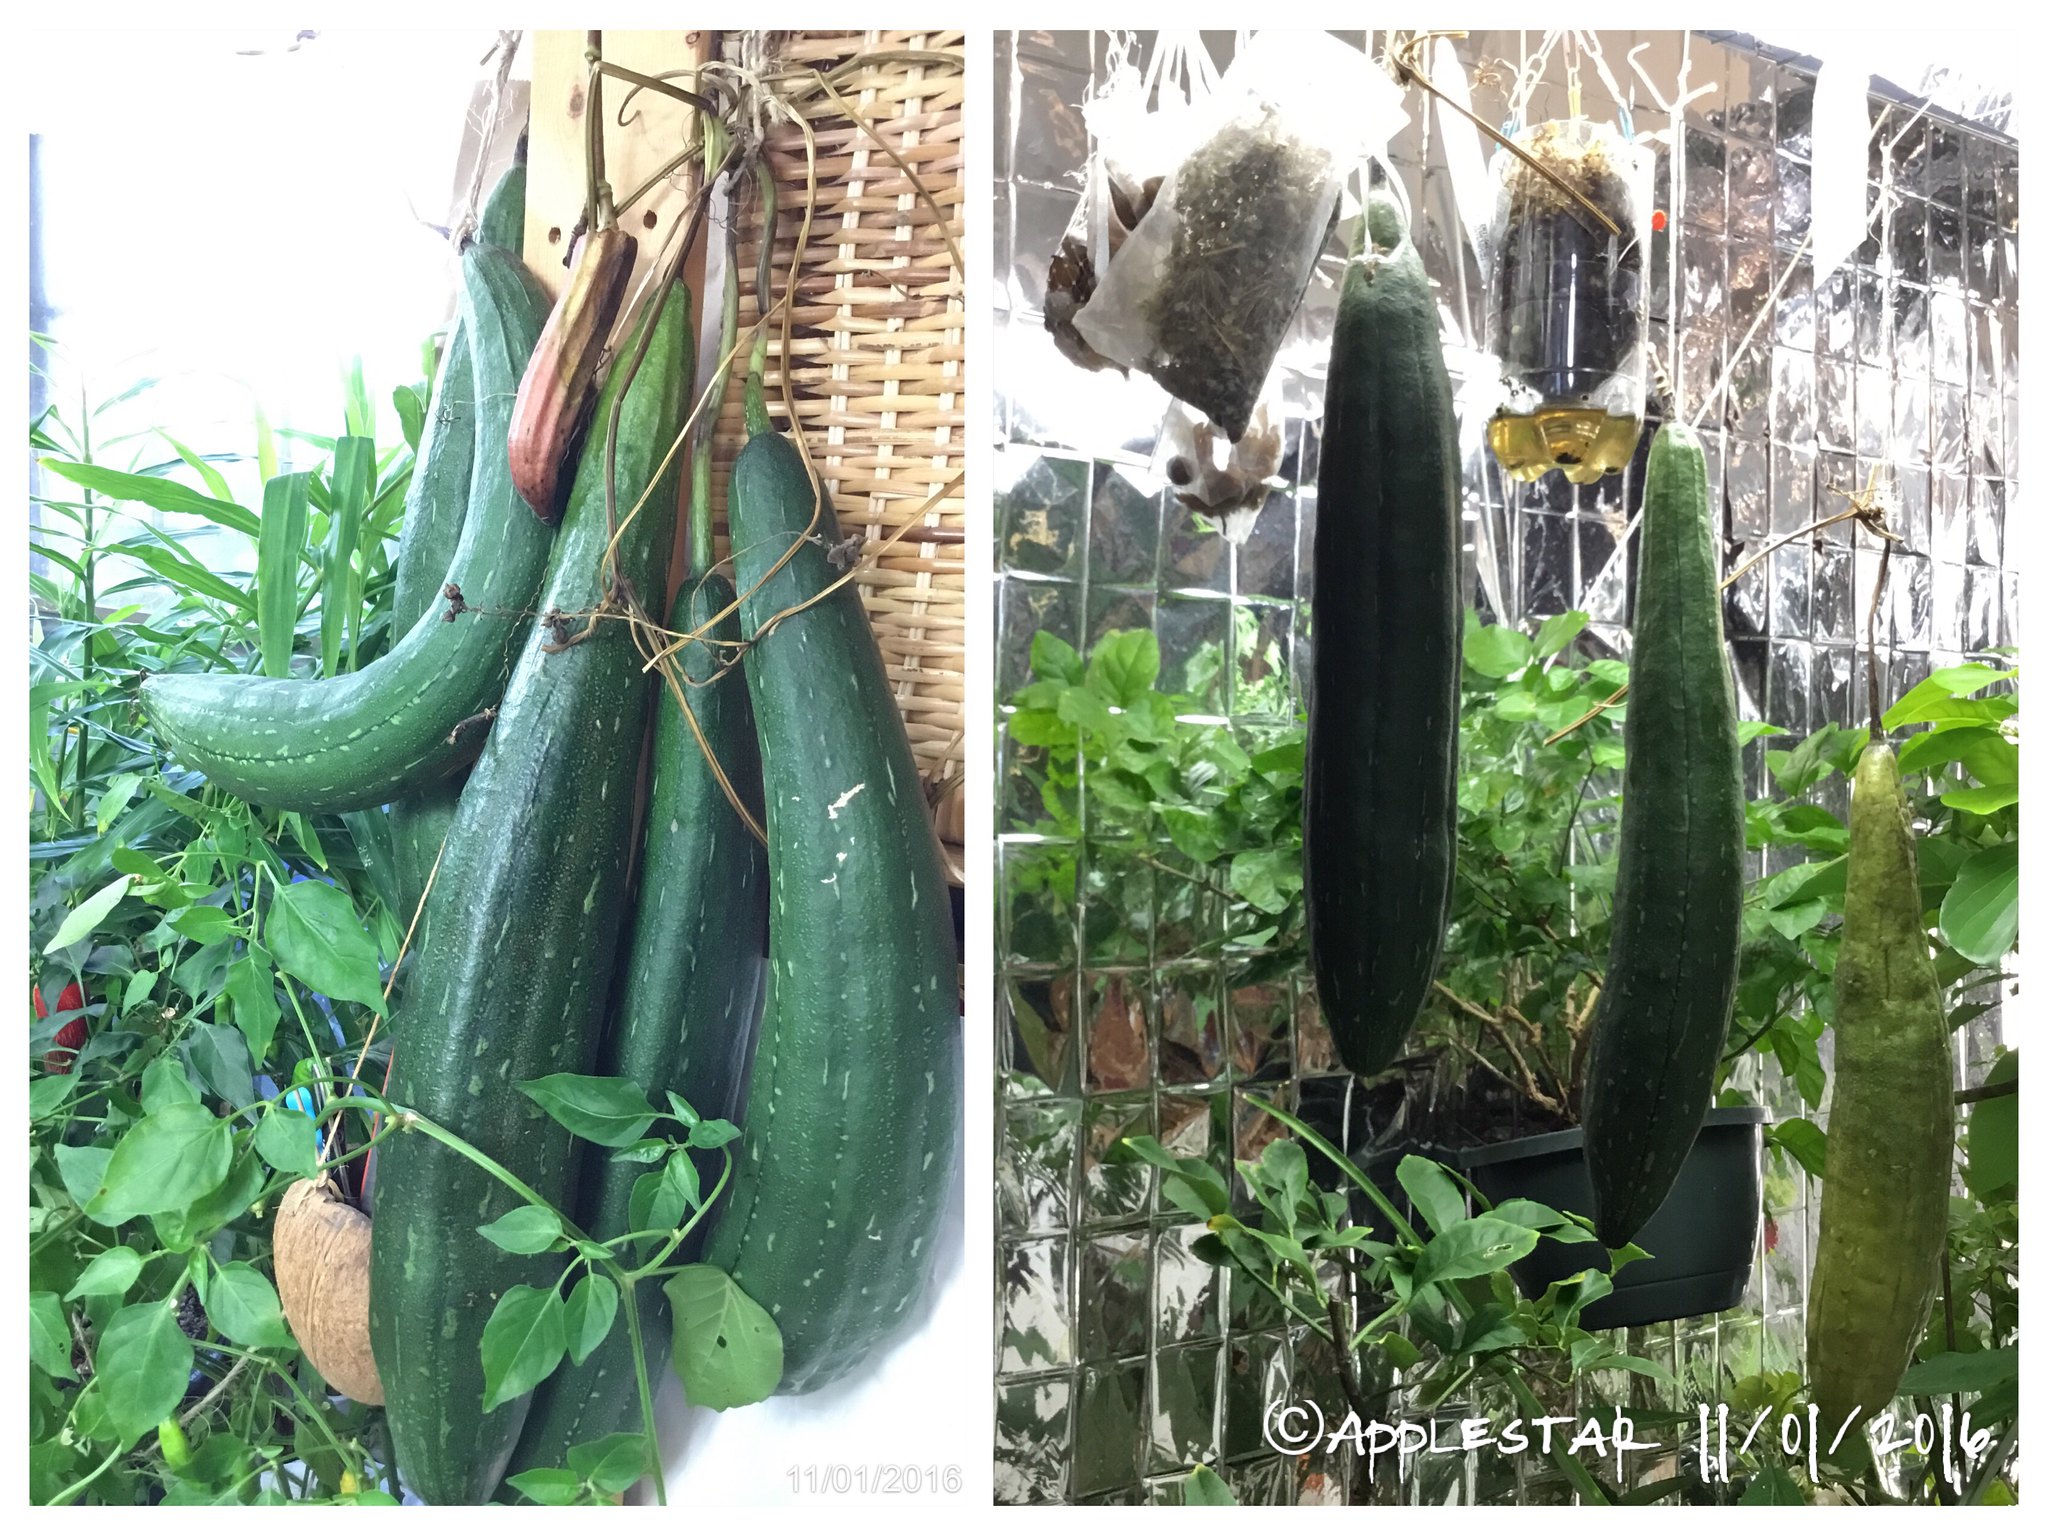
Well, that's part of the reason for growing a fairly solid growth, non-critical crops along this fence -- to catch the stray air-borne spray particles so they don't make their way past the gaps in the fence. So I decided I wasn't going to try eating any of the immature luffah fruits on this side of the fence. There are two really big fruits and one medium fruit on this side that I hope will continue to grow for a little while longer to harvest for sponges and seeds (I suspect the luffah vines are probably benefitting from their lawn fertilizer :P)

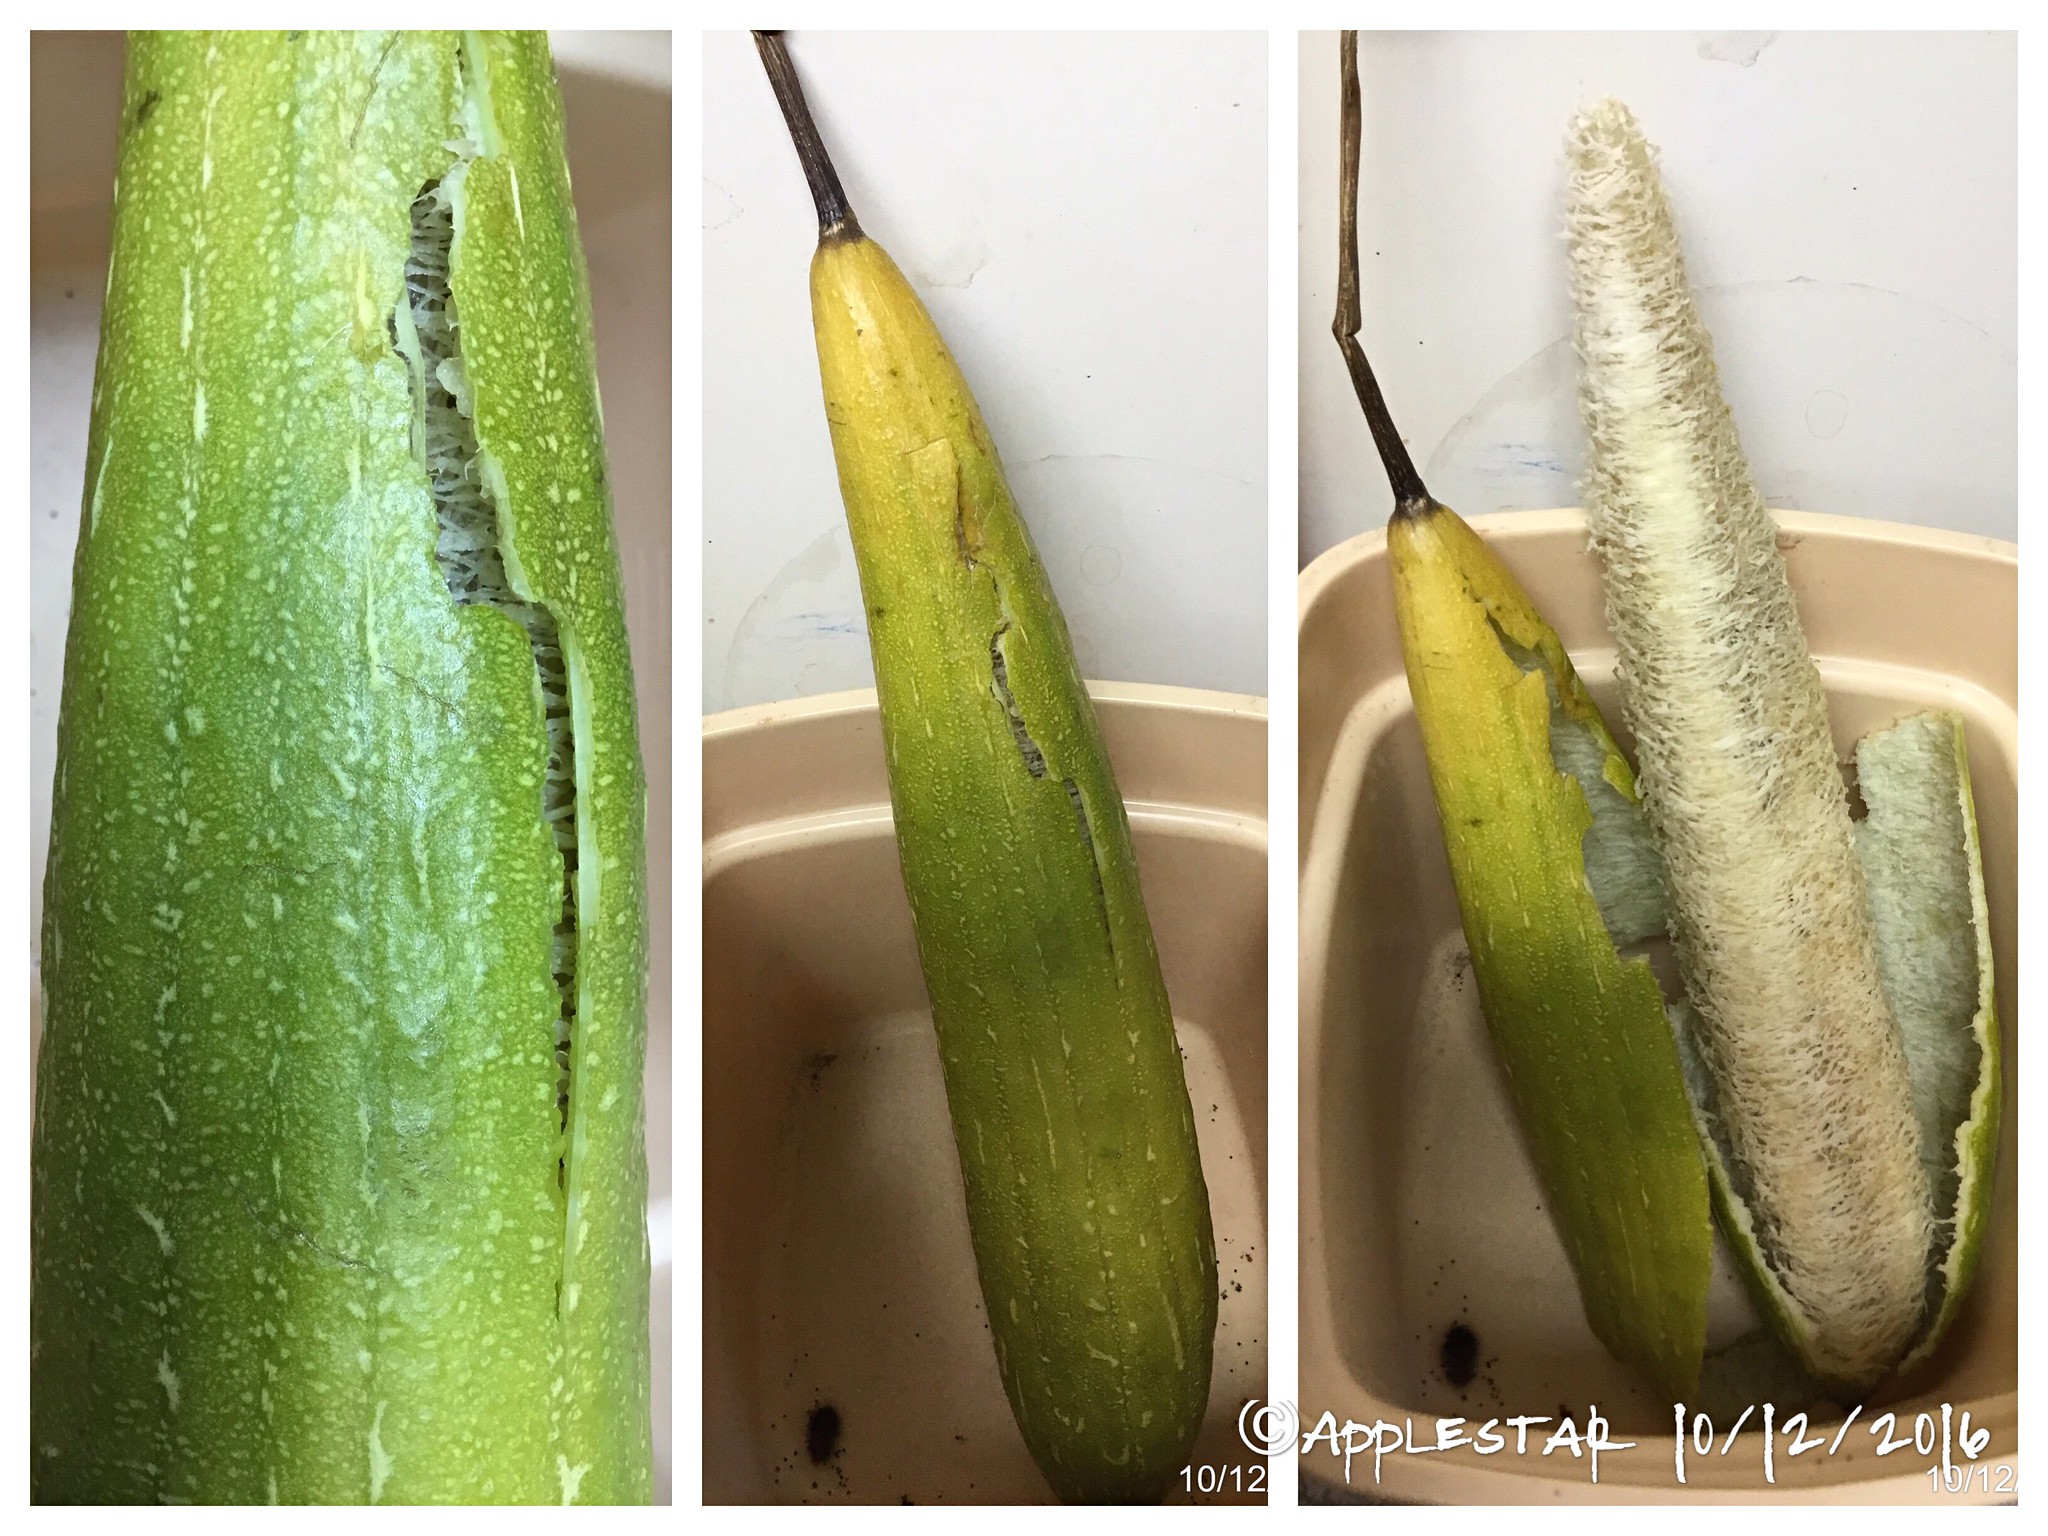
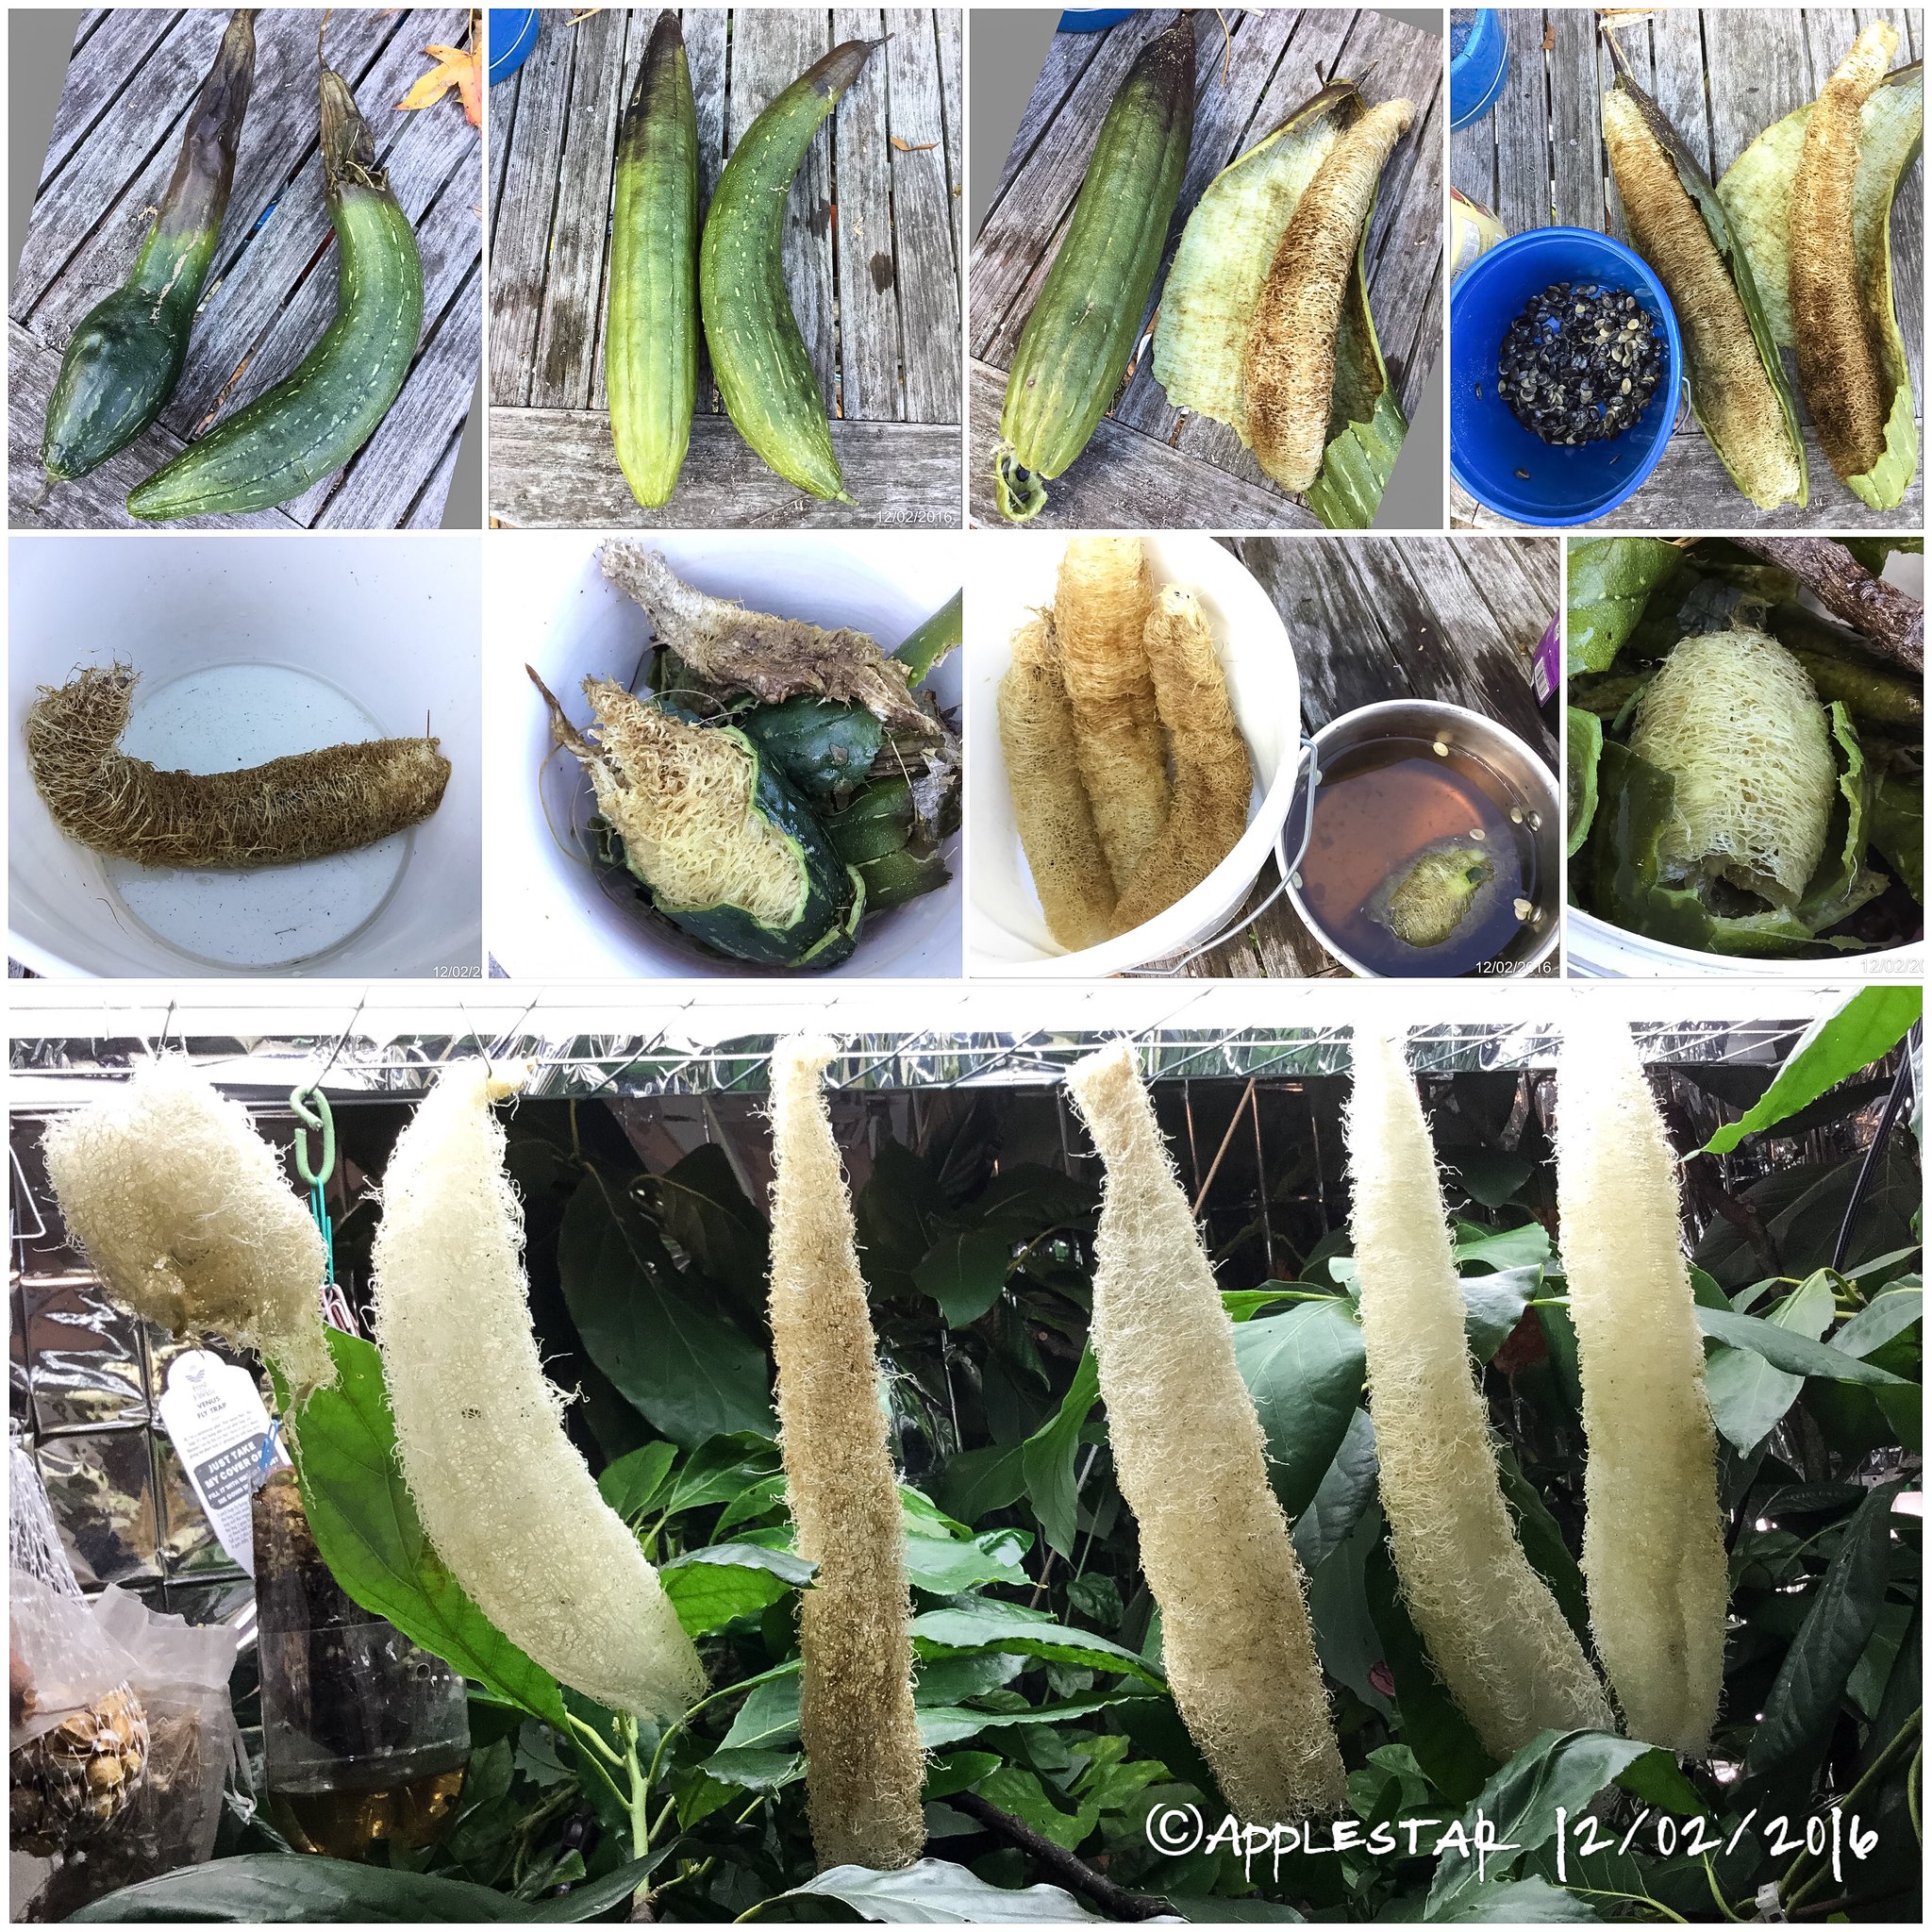
If I wasn't eating them, what to do with the not quite mature luffah.... then I came across instructions for processing luffah that are still green yet sufficiently matured for sponges but not for seeds.

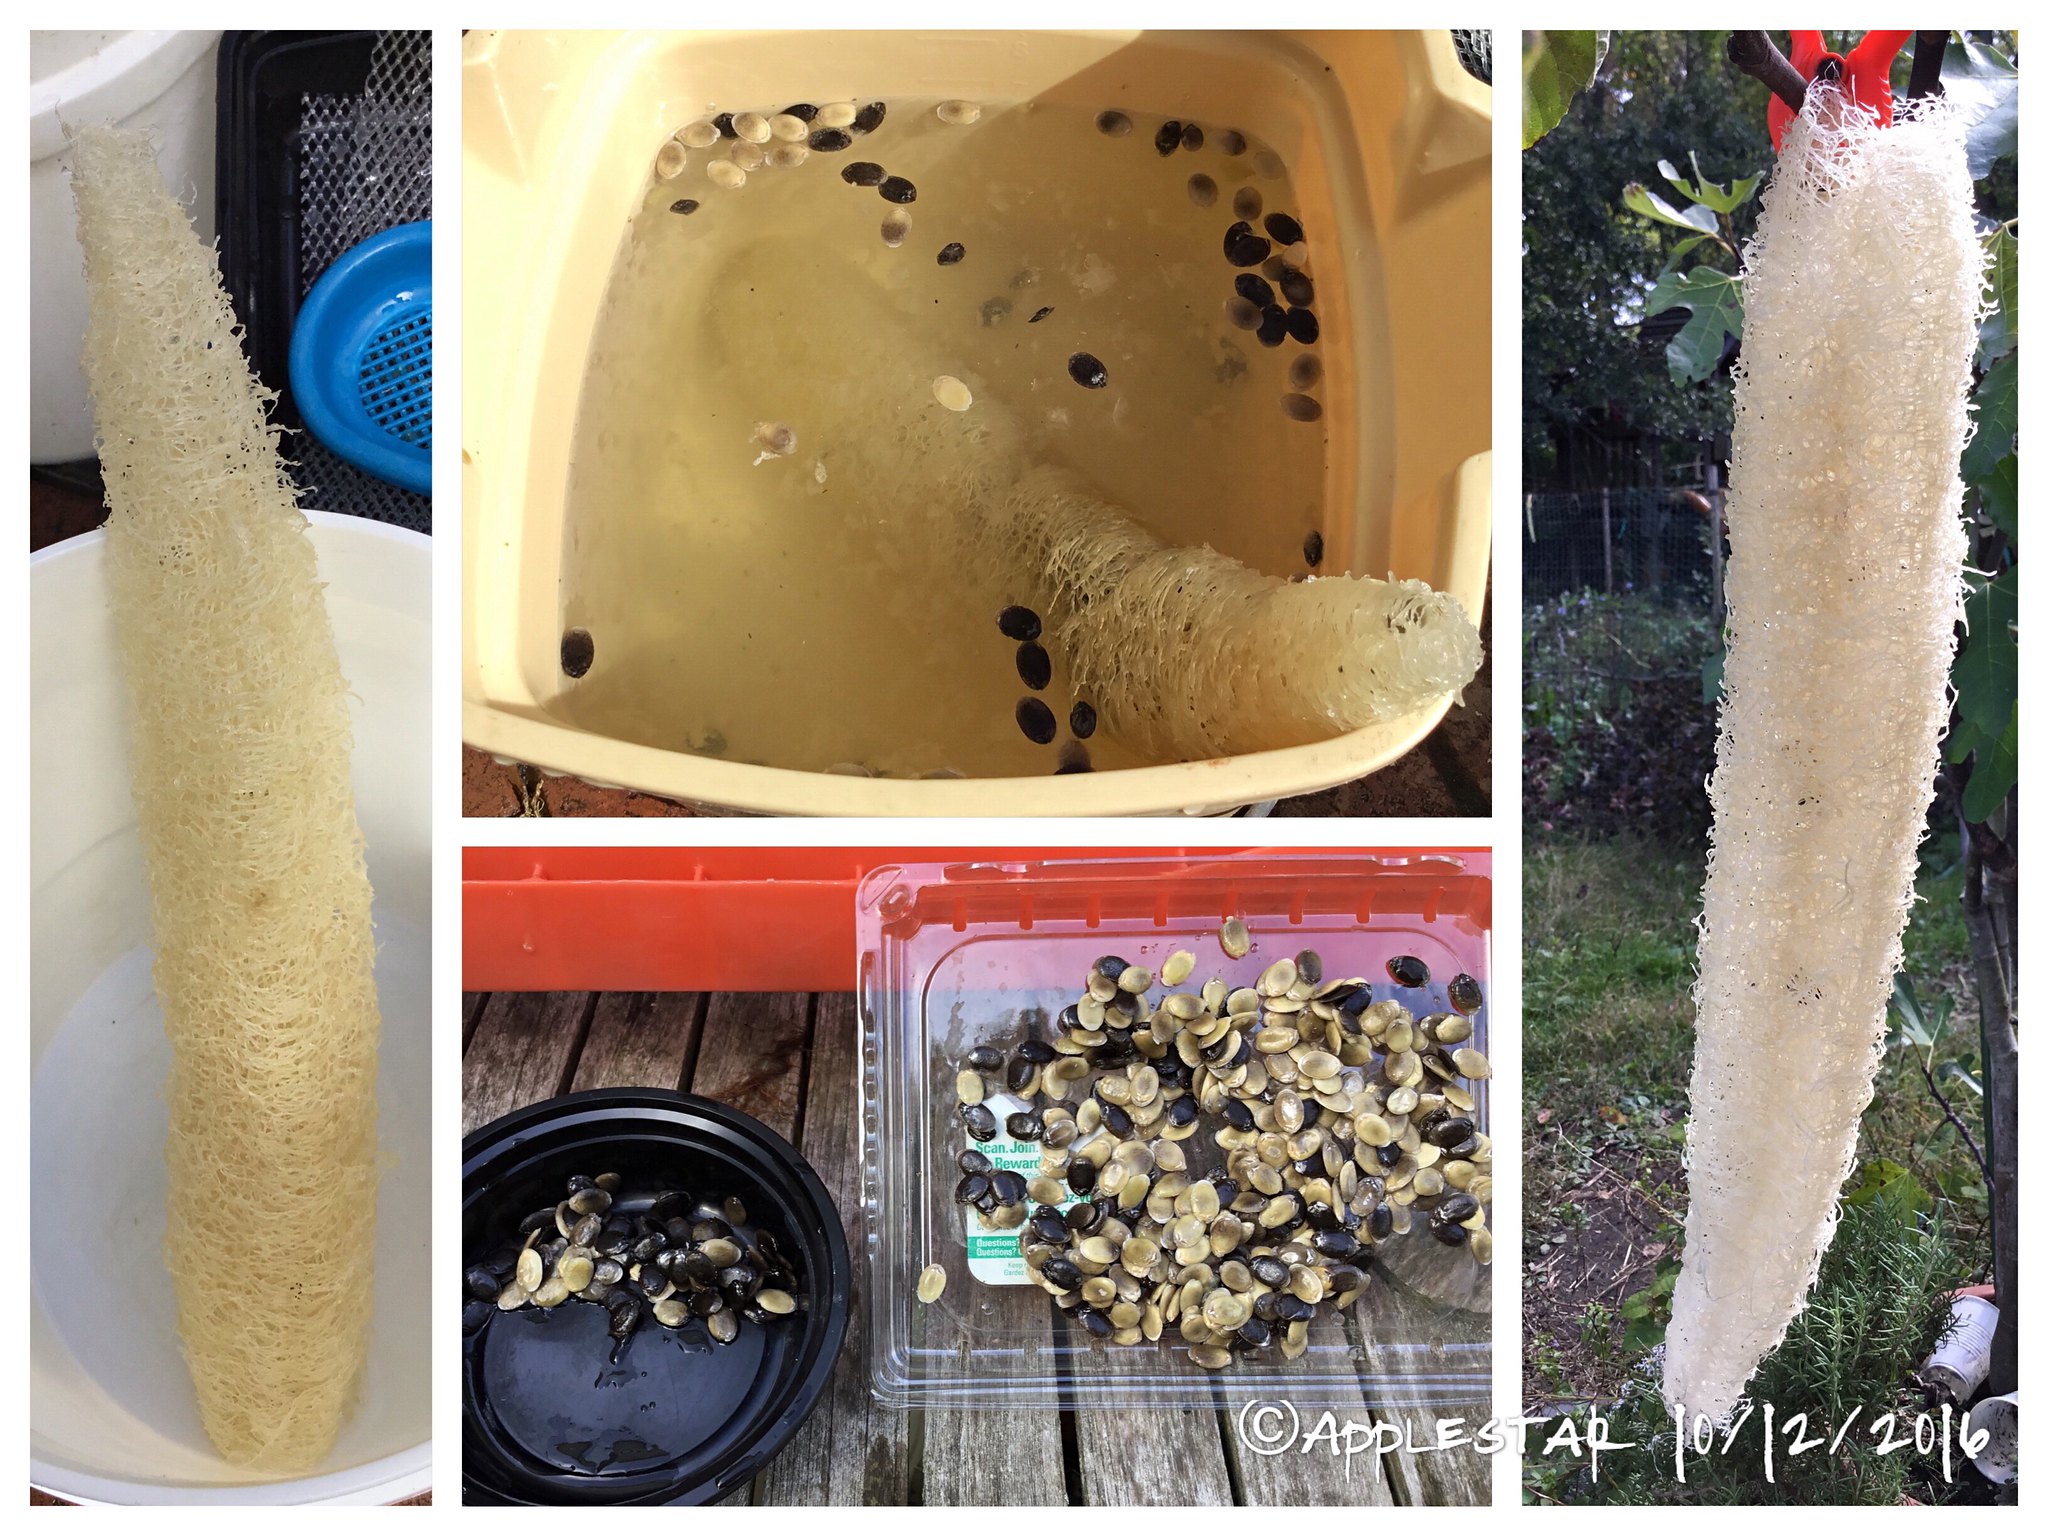
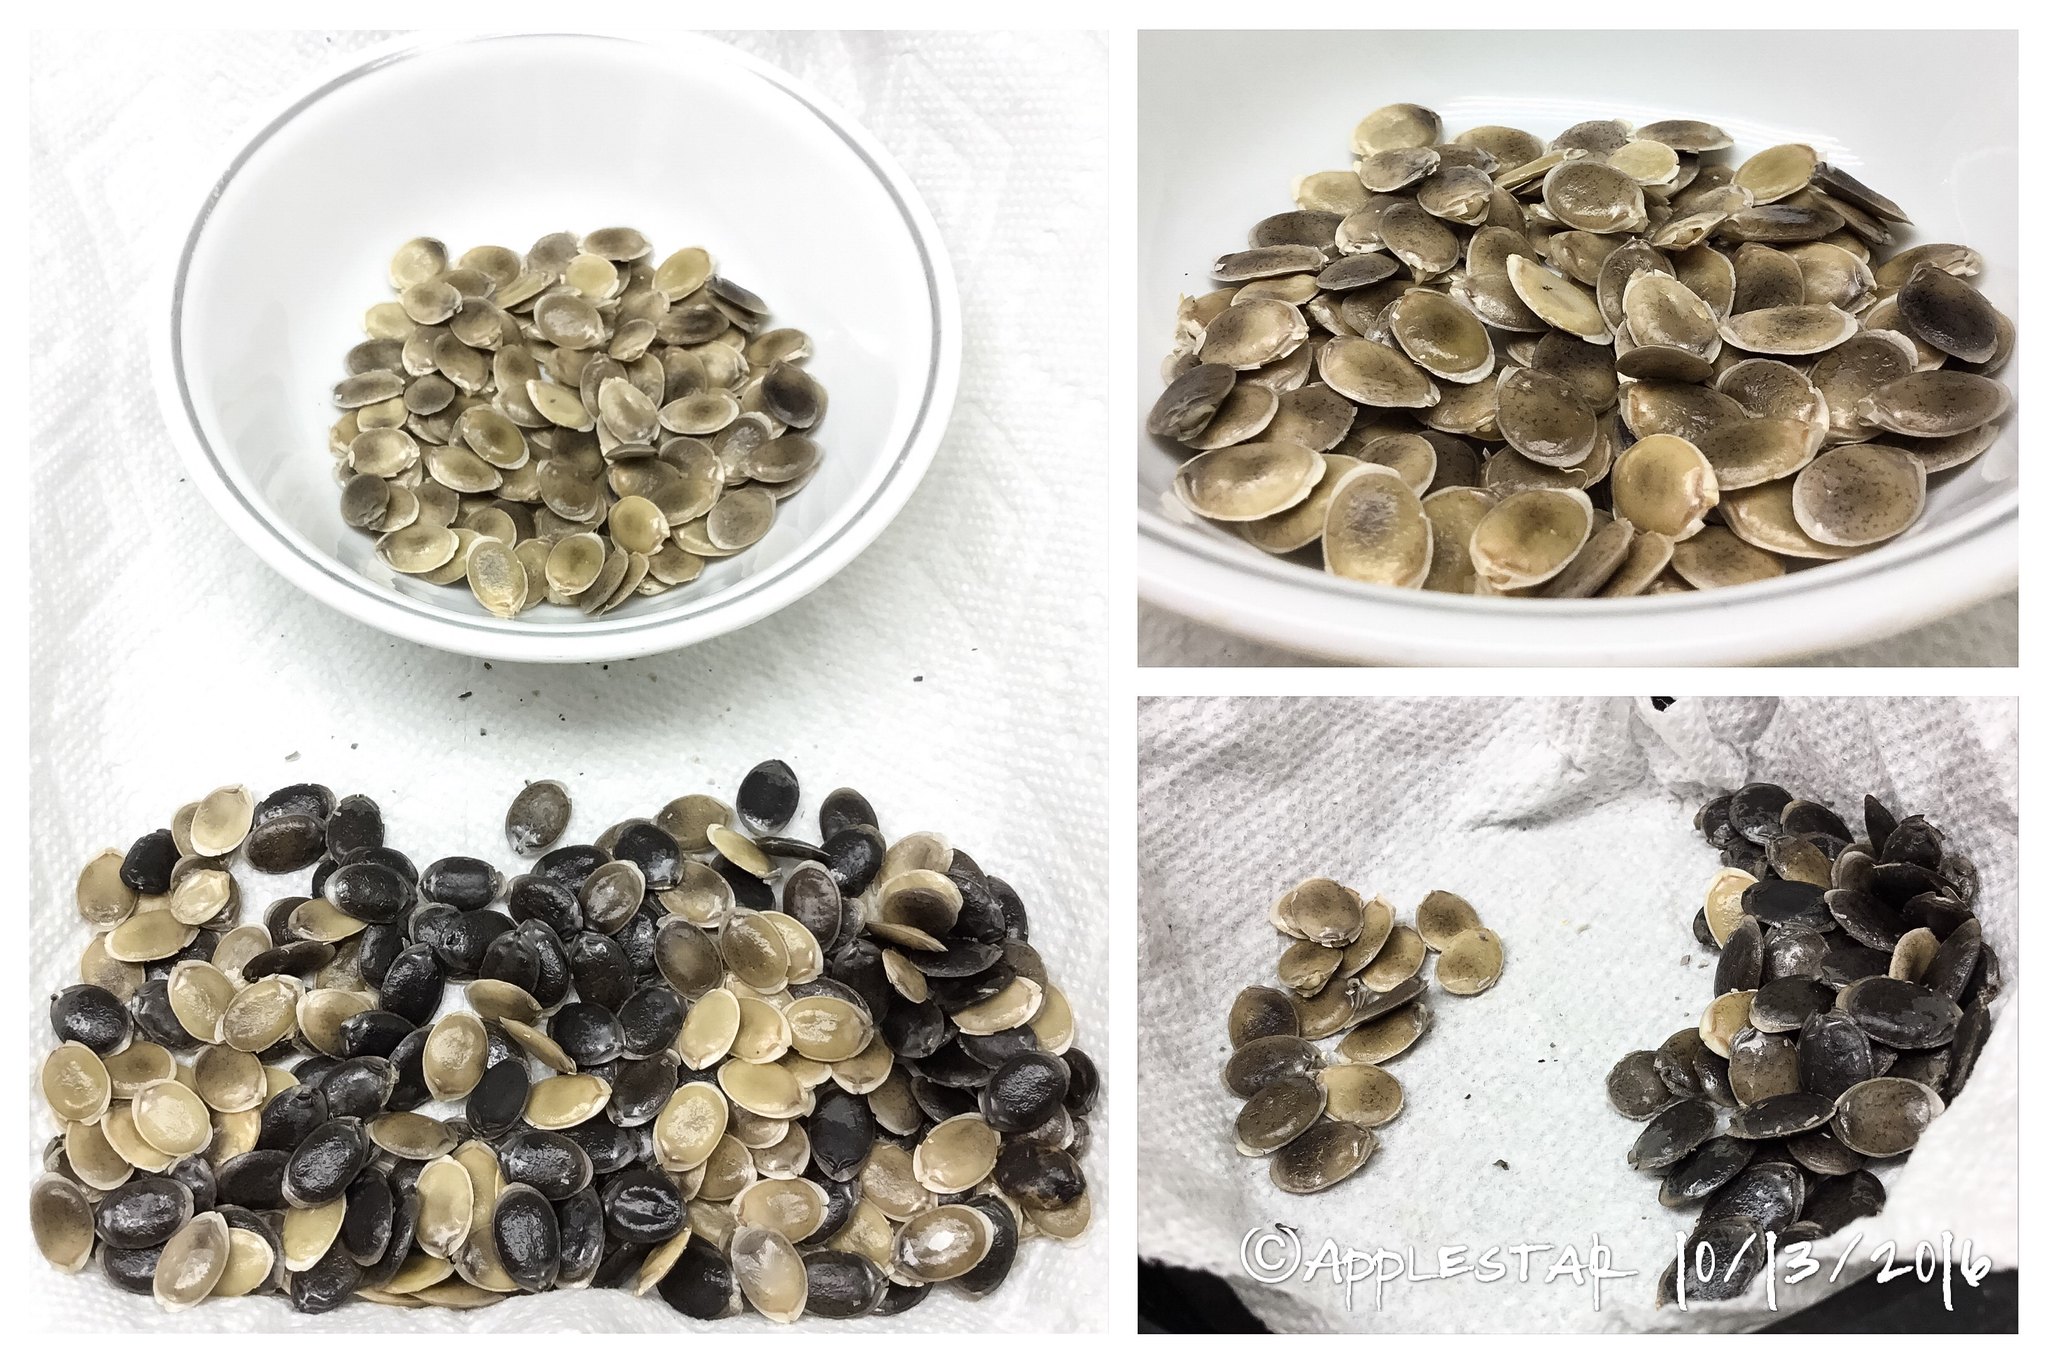
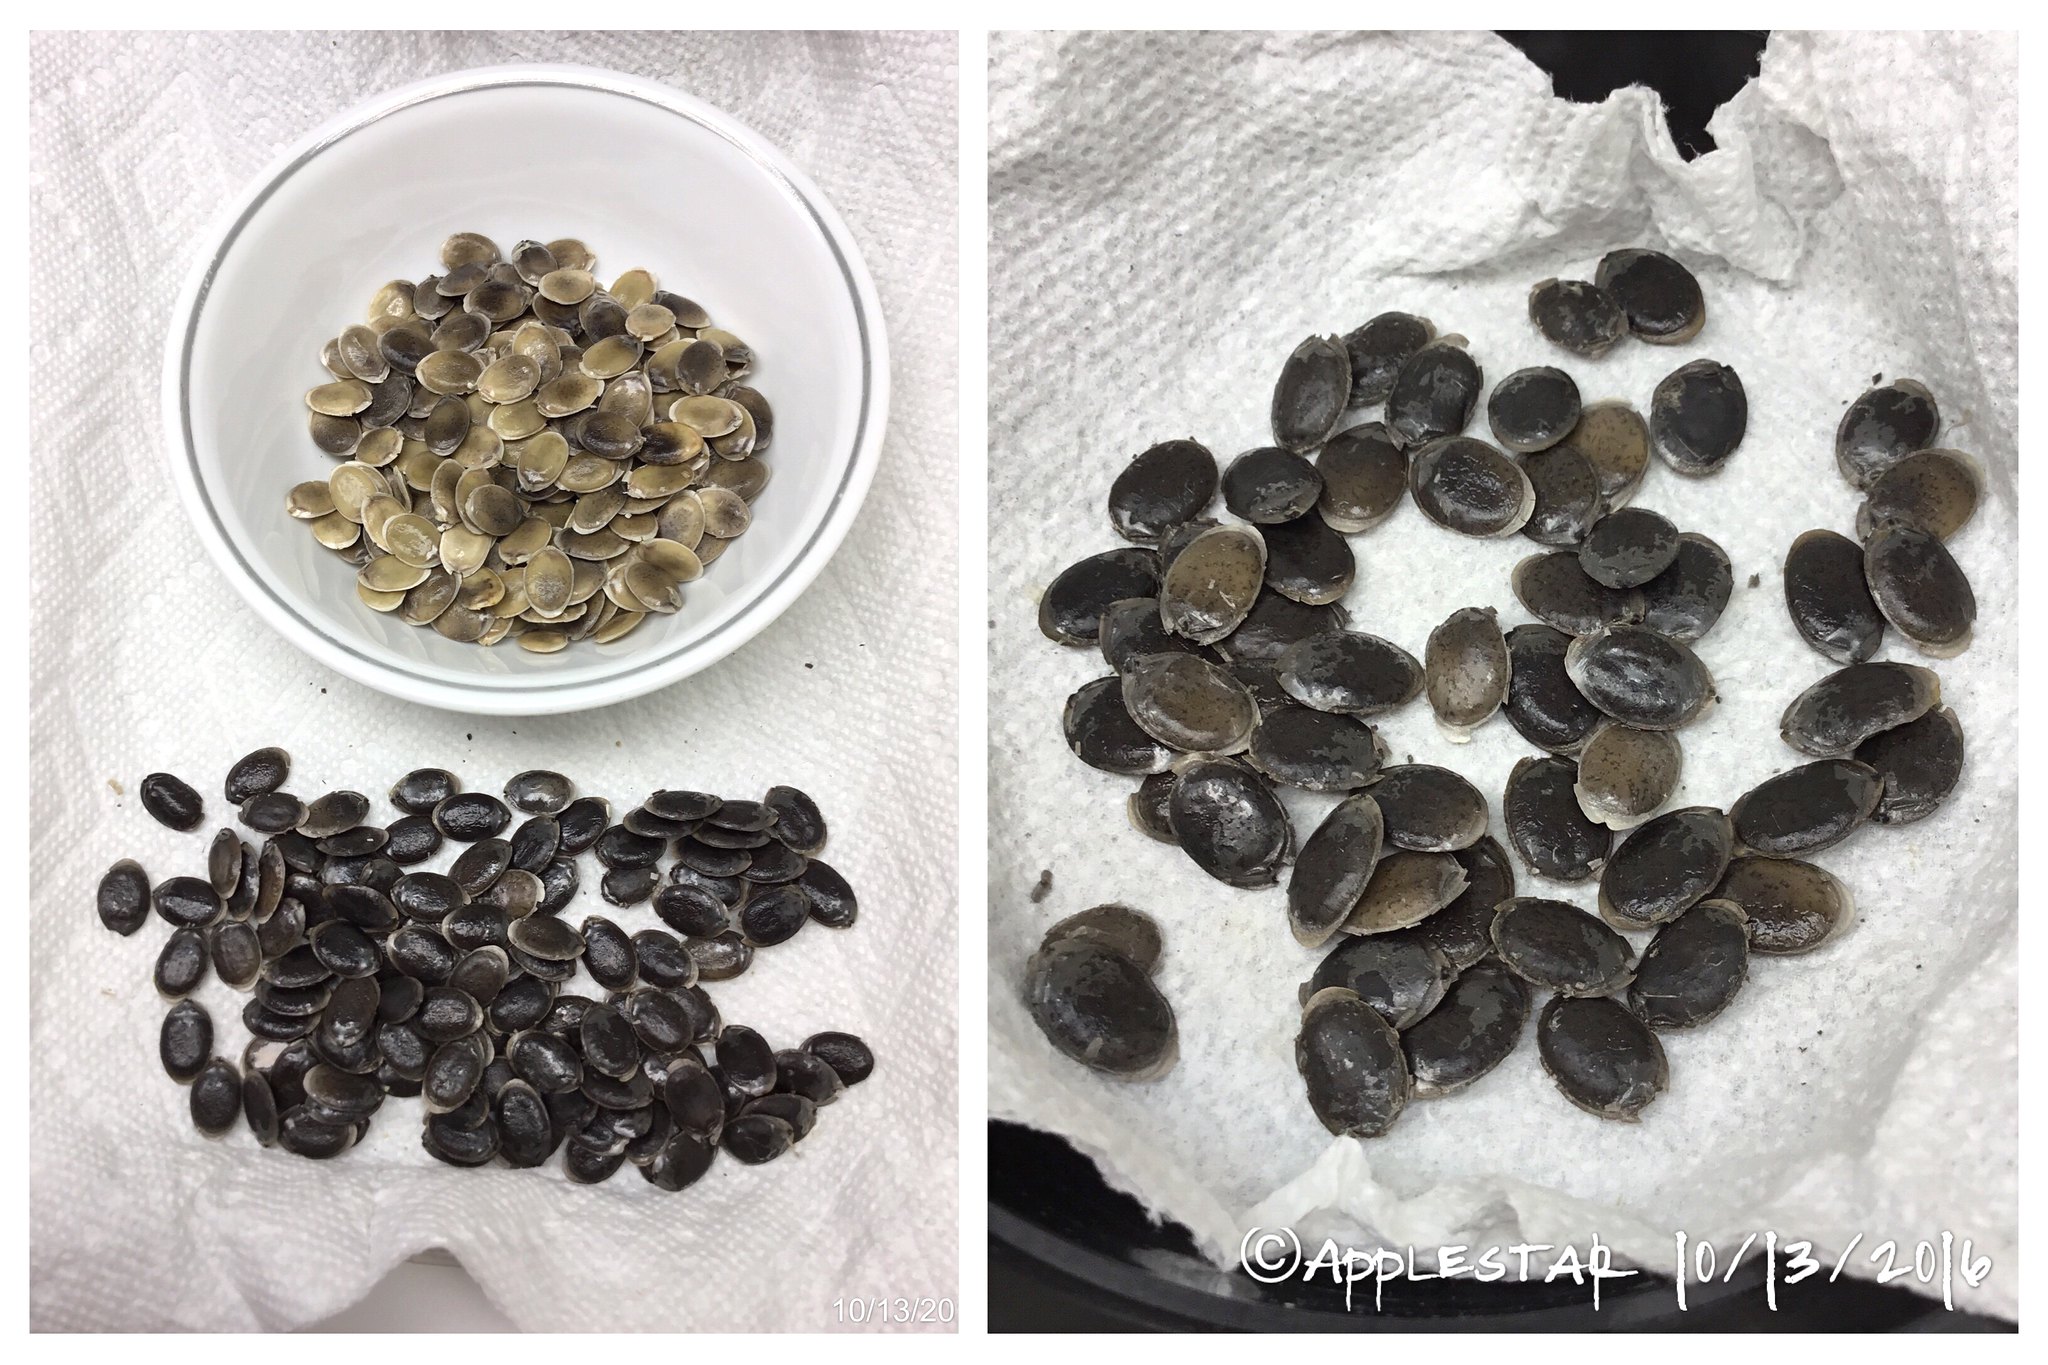
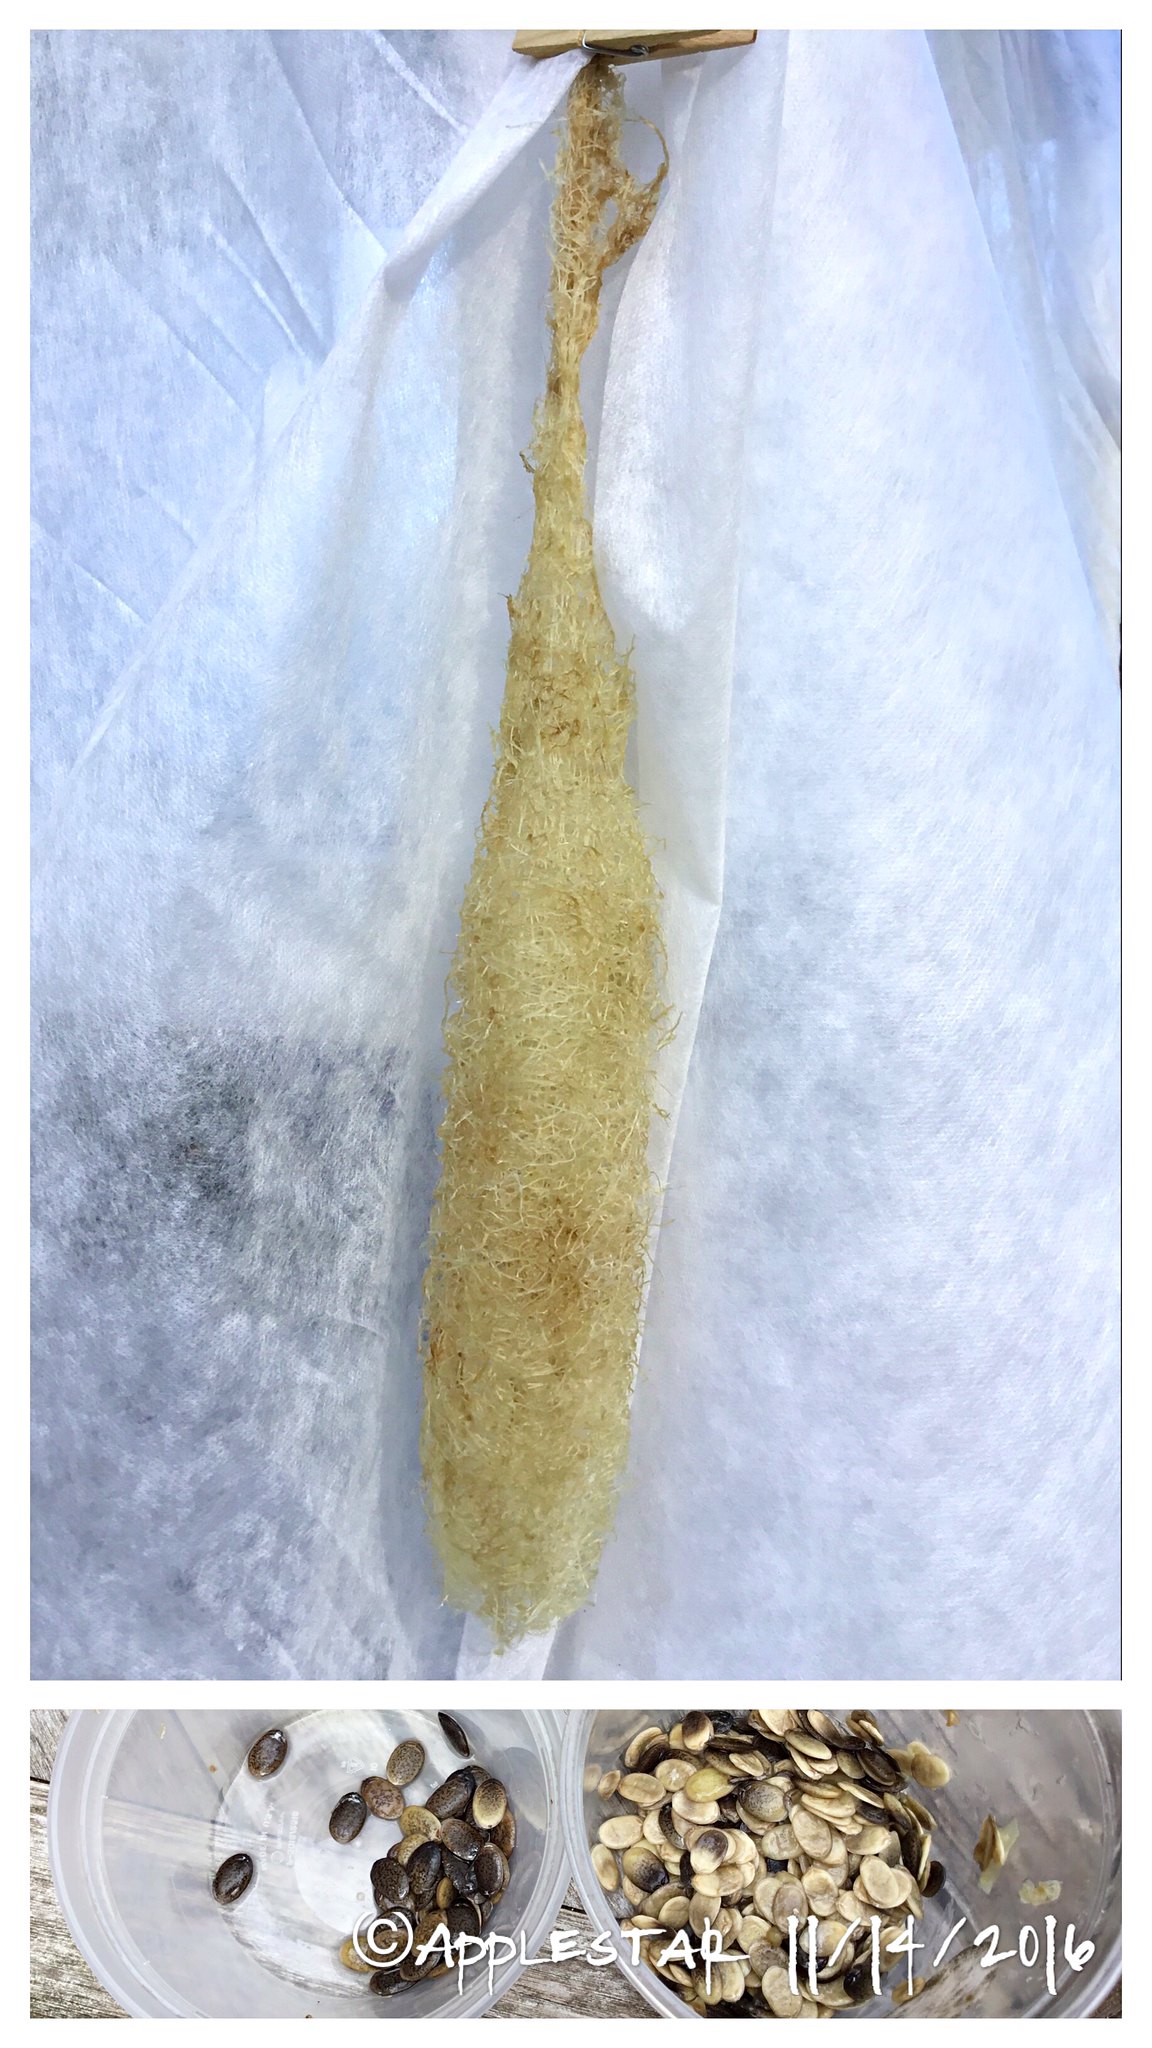
(This one is in Japanese -- use Chrome or other browser that will translate for you if you need the words, but the pictures explain most of the process.) Most of this type of instructions say to boil for few minutes to 20 minutes until the thick skin and flesh come off easily. Obviously boiling would kill the seeds even if any of them are mature enough to grow. But usually, the seeds shown are white and immature like these.
https://mango.main.jp/kurasihetima1.html

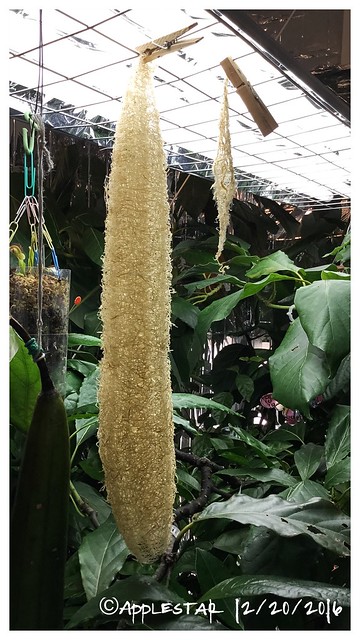
I tried with my immature fruits and one not quite mature medium-large fruit (previously harvested or fallen). Most of them were completely useless for sponges as I suspected but produced some soft fibers. don't know if there are any use for them, but I'm drying them.

Image

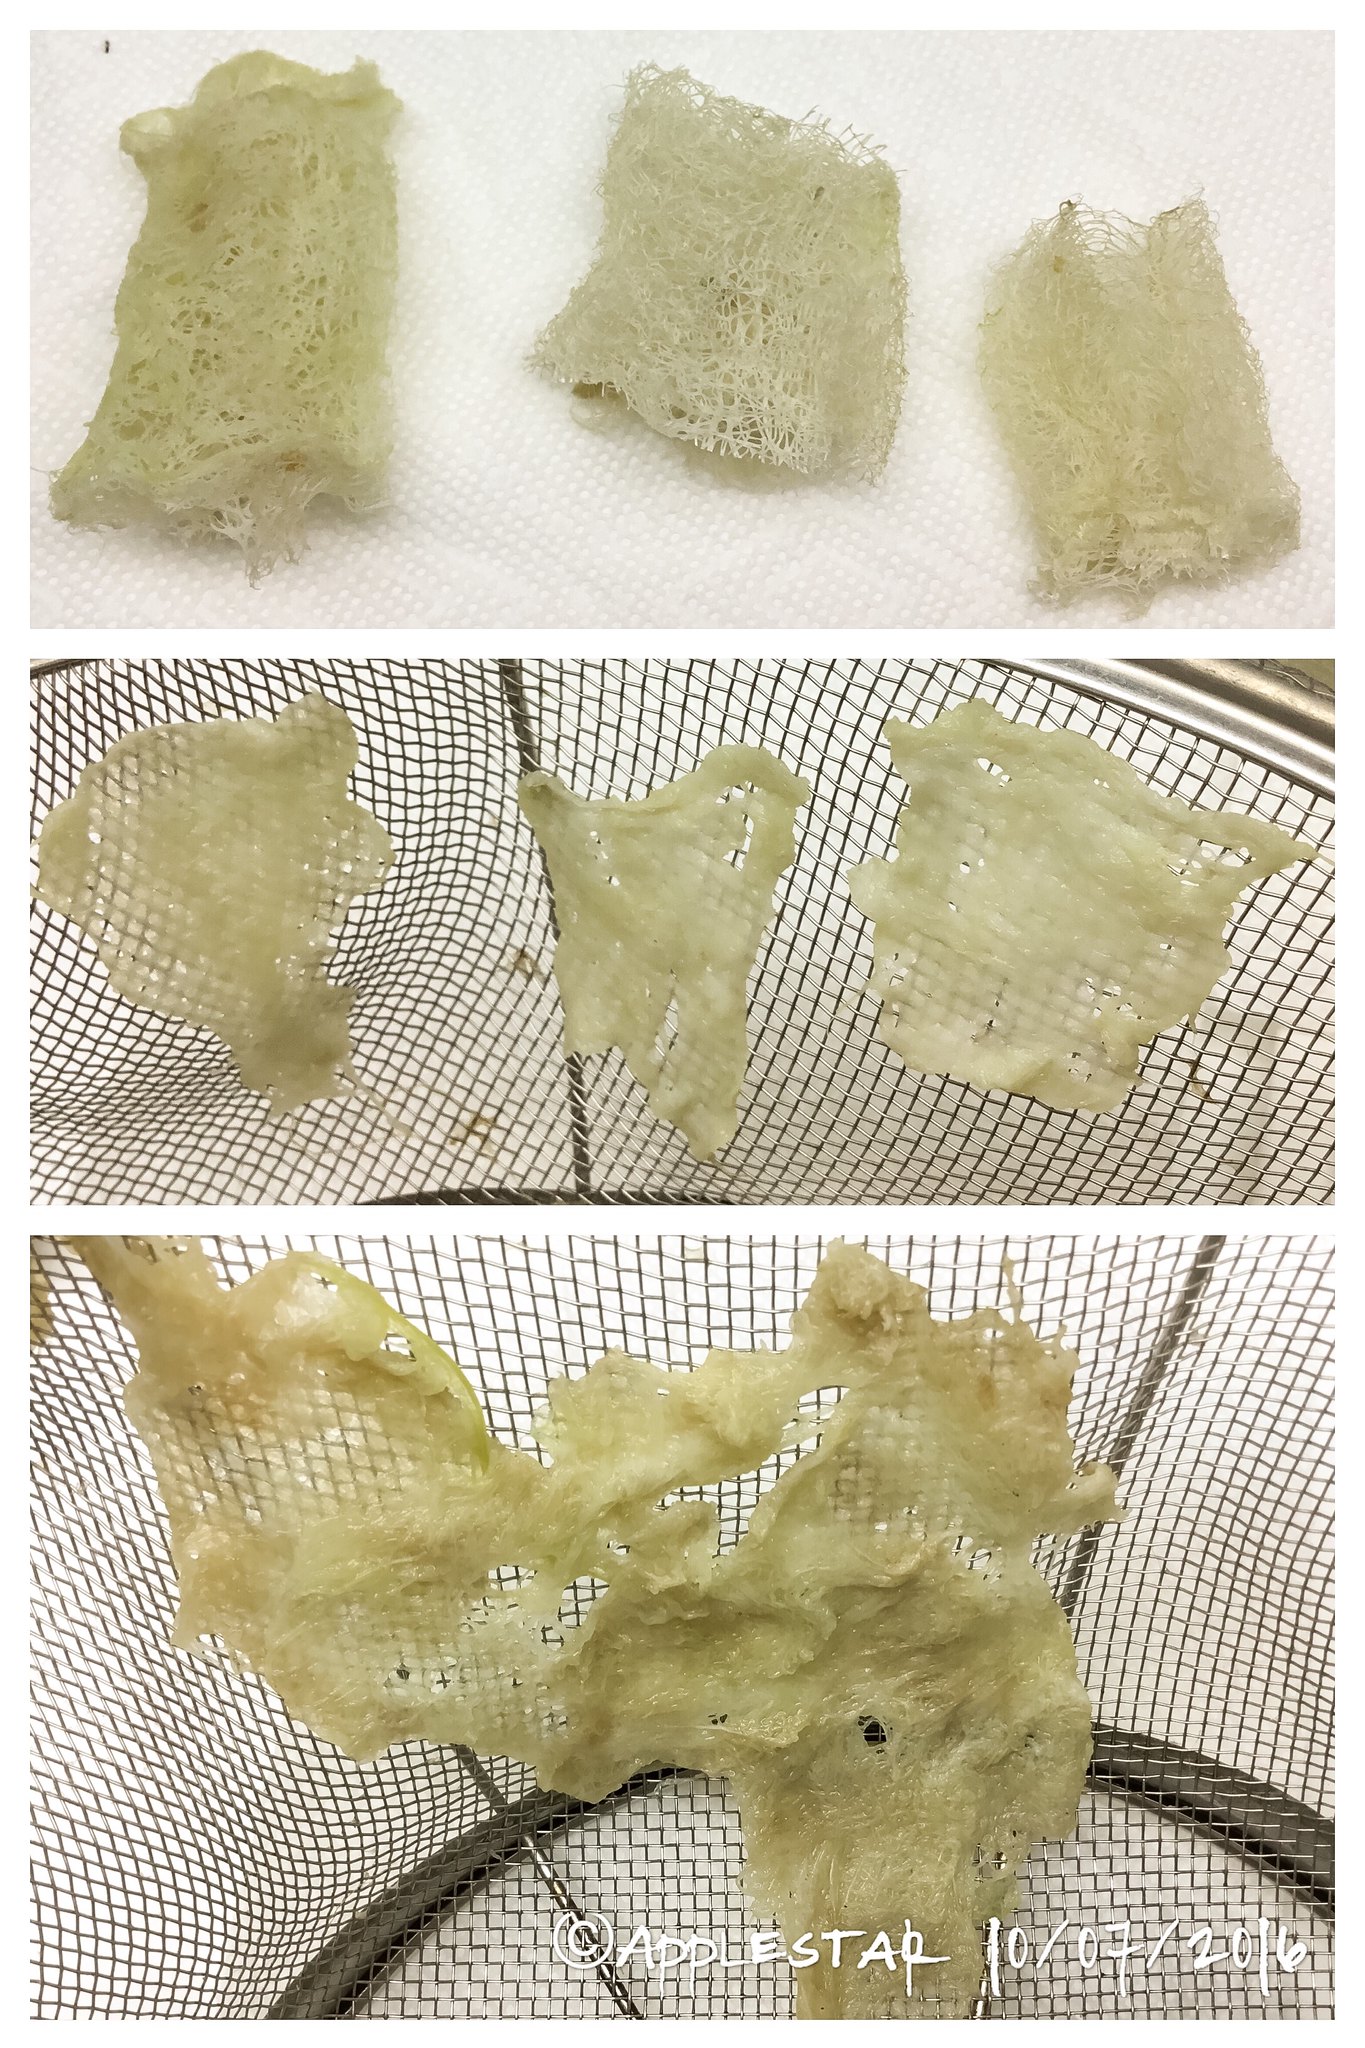
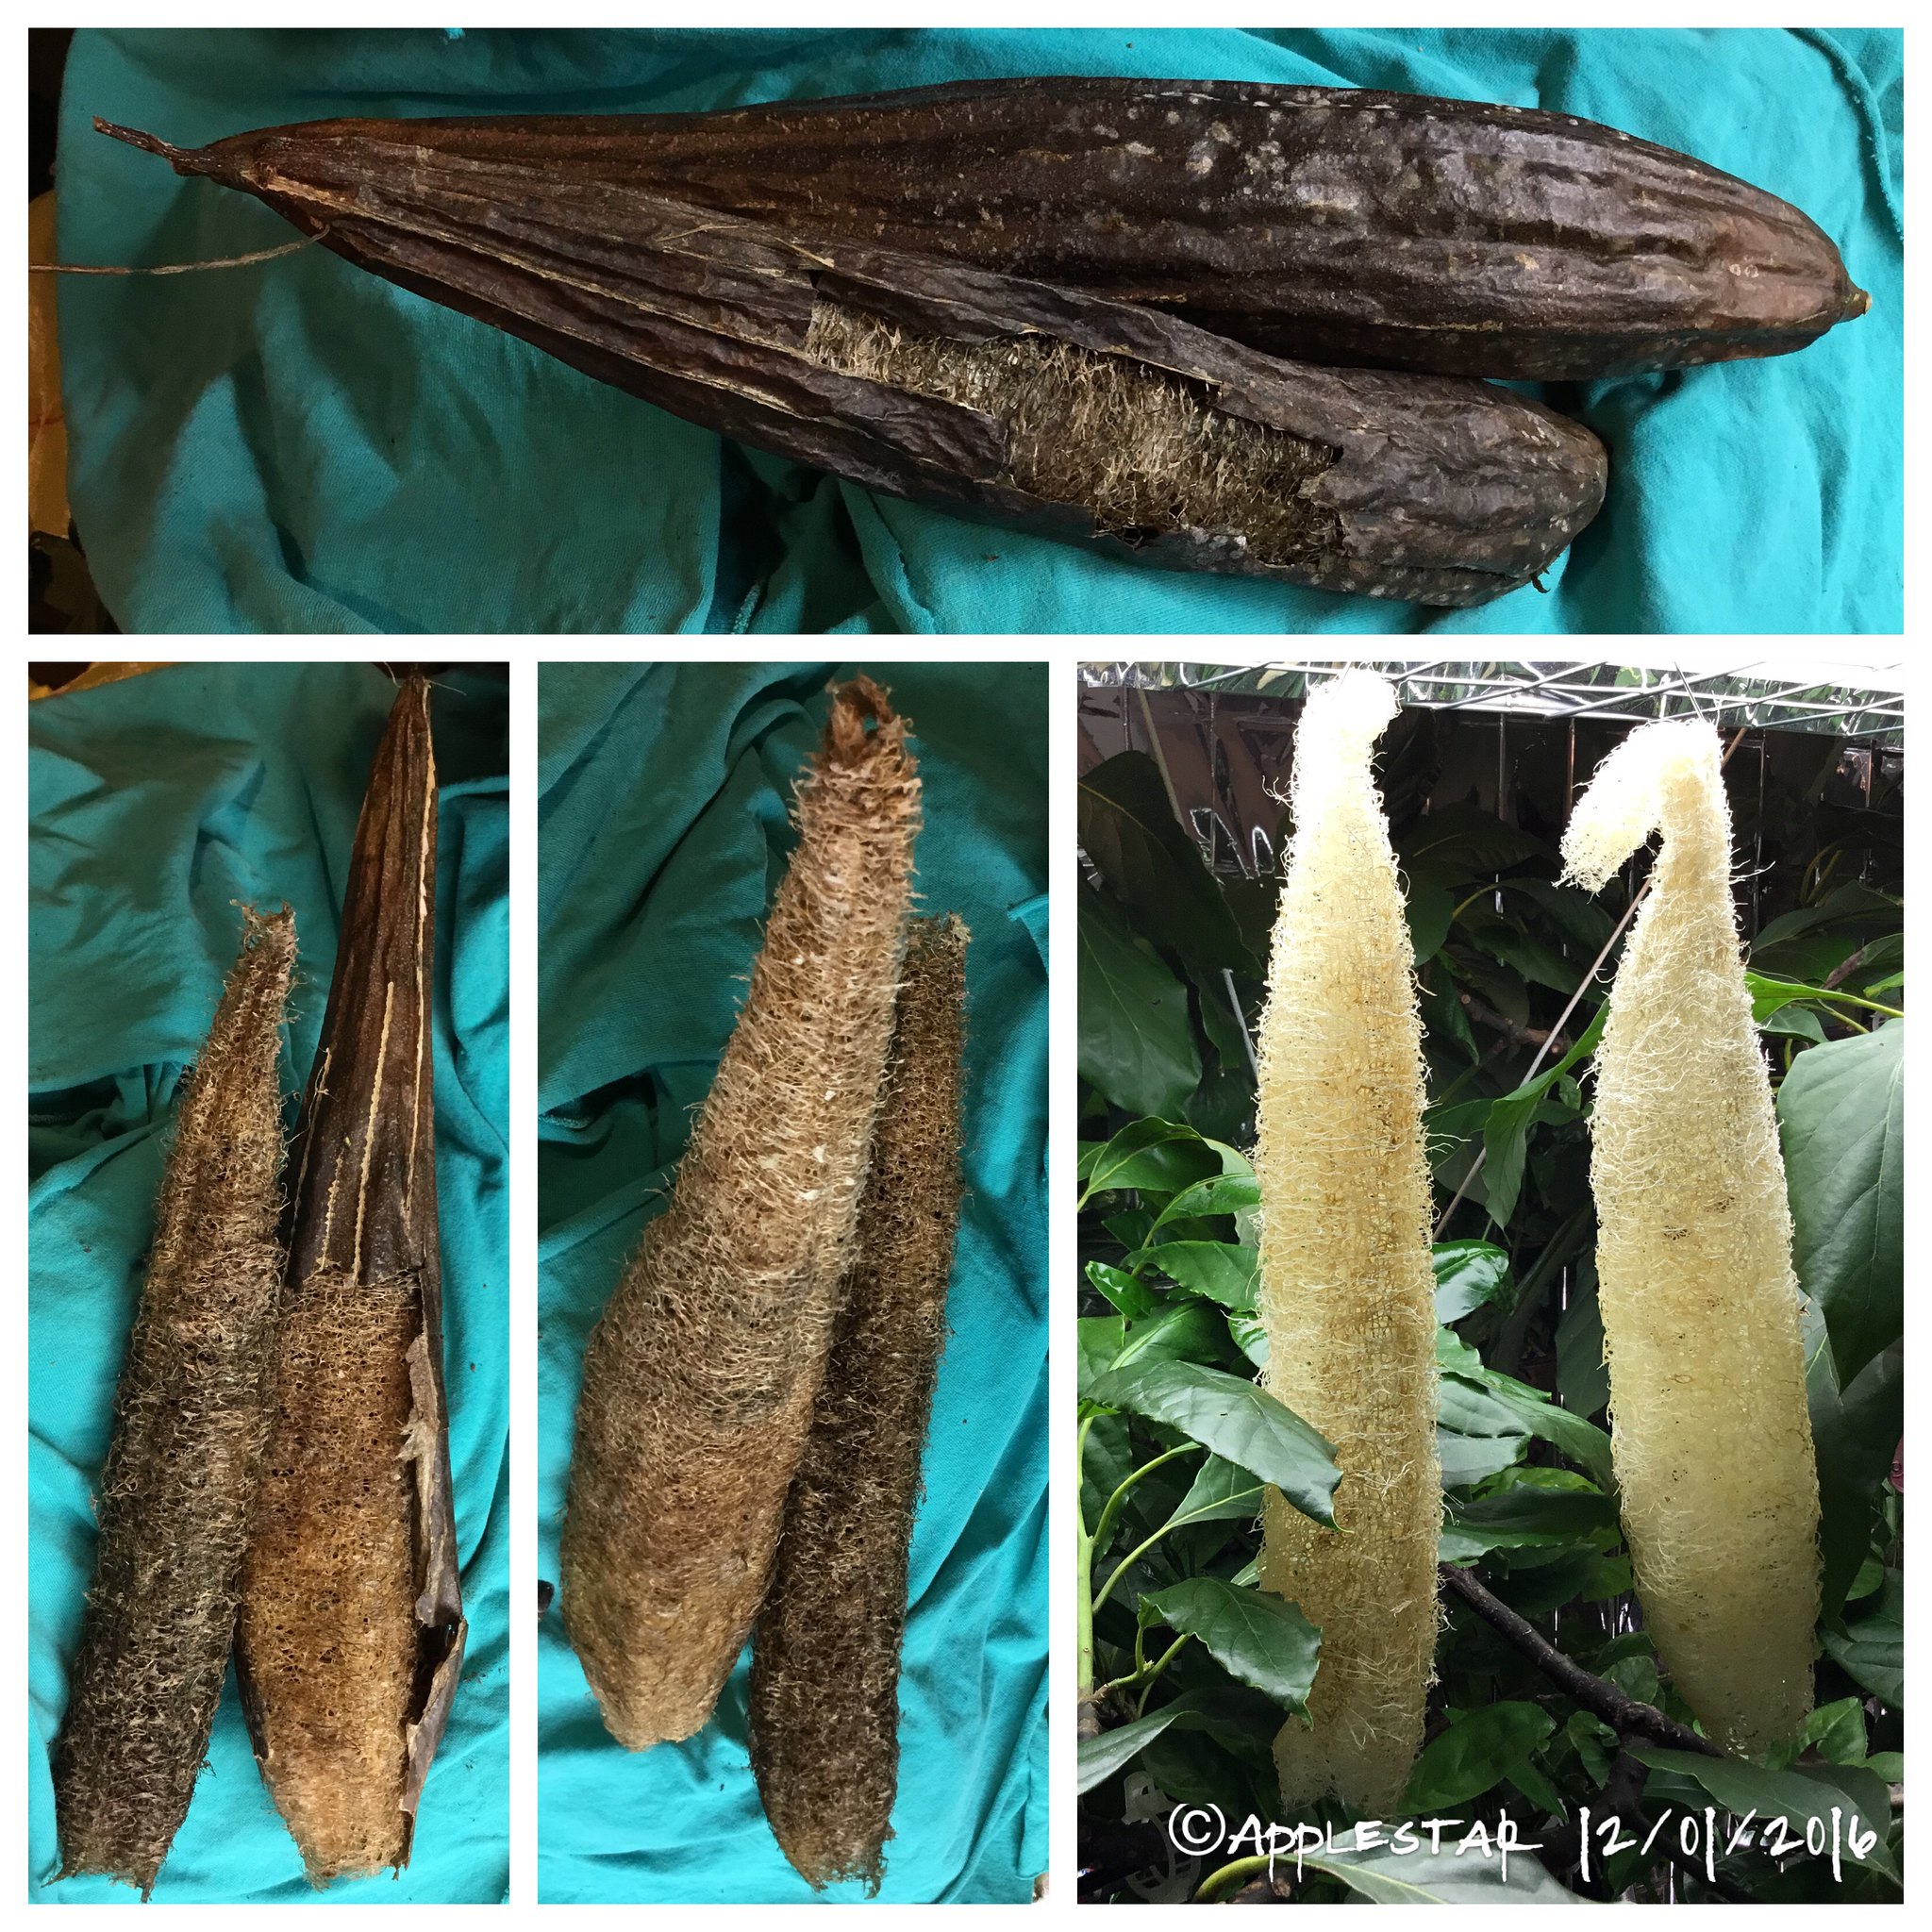
Apparently, you can get softer, not as coarse sponges from not quite completely mature fruits which some people say are better for skin care than the rough, hard fibers of the fully mature fruits which are better relegated to kitchen and other scrubbing/cleaning duty. "Starting to yellow" seem to be the key level of maturity -- my one almost mature fruit that yielded those sponges still had the really soft fibers near the stem end.

User avatar
applestar
Mod
Posts: 30550
Joined: Thu May 01, 2008 7:21 pm
Location: Zone 6, NJ (3/M)4/E ~ 10/M(11/B)

On the INSIDE/VG Garden side of the fence, there are 4 big but still very green fruits and 1 biggest, almost completely yellowed fruit that I'm hoping will yield mature, viable seeds. Image

User avatar
applestar
Mod
Posts: 30550
Joined: Thu May 01, 2008 7:21 pm
Location: Zone 6, NJ (3/M)4/E ~ 10/M(11/B)

One of the two my neighbor picked up and left by the front porch -- I've had it hanging in the house to finish ripening and decided today might be the day. Test rip in the side looked good, so I dug in, and the skin slipped right off -- just like they said. :-()

Image

Since this was only the one, I opted to wash by hand -- and after changes of about 5 buckets of water, I said enough.

Image

...lots of seeds came out -- ones in the black bowl sank and all the others floated. Saving them separately in case of germination quality. The cleaned sponge is drying in the sun.....

User avatar
applestar
Mod
Posts: 30550
Joined: Thu May 01, 2008 7:21 pm
Location: Zone 6, NJ (3/M)4/E ~ 10/M(11/B)

Image

Taiji
Greener Thumb
Posts: 921
Joined: Fri Oct 05, 2012 3:19 am
Location: Gardening in western U.P. of MI. 46+ N. lat. elev 1540. zone 3; state bird: mosquito

I've seen those sponge like things in the health stores for years, but never really knew what they were for. :) Looks like fun!

pepperhead212
Super Green Thumb
Posts: 2886
Joined: Wed Oct 15, 2014 1:52 pm
Location: Woodbury NJ Zone 7a/7b

Looks great apple! I tried growing this years ago - the Chinese Okra vatiety - but it got SVBs. I simply can't grow any squash here, unless it is a moschata variety.

User avatar
applestar
Mod
Posts: 30550
Joined: Thu May 01, 2008 7:21 pm
Location: Zone 6, NJ (3/M)4/E ~ 10/M(11/B)

Hm I'm surprised that the Chinese Okra - angled loofah -- got SVB's. Maybe they are more tender (and possibly better for eating?) than the smooth species? Good to know in case I want to try growing the angled varieties in the future.

I wish I had a longer stretch of fence in a sunny area that isn't already occupied (my apple/pear/persimmon espaliers have the VIP fenceline) -- I might have to build one in the middle of the front lawn :lol:

I examined the seeds this morning, and it looks like germination -- as in are they mature enough to germinate -- isn't the issue here. MANY of the floaters seem to have been in the process of germinating ...maybe the gasses produced in those initial stages make them float? This appears to have happened mostly to the intermediate grey seeds that you might think are mature enough to save. There were some that had germinated among the sunken seeds, too. But the black seeds, which you would assume ARE mature, seem to have not tried to germinate. Maybe their seed coat has hardened sufficiently to resist soaking from the relatively short dip they had yesterday.

Image

I decided to make what would be the typical common gardening sense•call to save only the black and nearly black seeds. I've sorted out all the lighter colored seeds -- rest of the dark greys and most likely immature light greys and am currently "toasting" them in a 160°F dehydrator for eating. :wink:

Image

...I still have this much black seeds for saving and I'm hoping for more fully matured seeds from that big yellowing fruit that is still on the vine. :()

User avatar
applestar
Mod
Posts: 30550
Joined: Thu May 01, 2008 7:21 pm
Location: Zone 6, NJ (3/M)4/E ~ 10/M(11/B)

As an aside -- I was thinking that I readily recognize signs of germinating in these seeds because I have been pre-germinating cucurbit seeds for planting in the spring. THEN, I'm examining them twice a day for signs OF germinating. Ha. Image

User avatar
applestar
Mod
Posts: 30550
Joined: Thu May 01, 2008 7:21 pm
Location: Zone 6, NJ (3/M)4/E ~ 10/M(11/B)

Image

ButterflyLady29
Greener Thumb
Posts: 1030
Joined: Mon Oct 19, 2015 9:12 pm
Location: central Ohio

Yes, they look like they got hit with an herbicide. It's a shame. But those are some beautiful and healthy looking vines.

My mom tried them for several years running and only once produced a usable "sponge". We just don't have a long enough growing season to get much out of them except a wall of lush growth. She never started hers inside because we had such little room for babying plants then.

Hopefully your cold temps will be delayed a few more weeks so you can get a few more mature fruits.

User avatar
applestar
Mod
Posts: 30550
Joined: Thu May 01, 2008 7:21 pm
Location: Zone 6, NJ (3/M)4/E ~ 10/M(11/B)

Thanks! I'm excited for this year's possible harvest. Definitely one has yellowed and is ready for sponge harvest, but I'm going to count on that one for seeds so I'll wait until the last minute. Pretty sure there is at least one or two more that is about same stage as the last one that yielded a sponge.

At this point, I have to watch the weather and make sure to cut and bring the big ones in in so they won't be frost damaged and can be sured a little longer in the house. At least half dozen zucchini harvest sized ones for eating from vines climbing the VG trellis -- I'll have to be sure to harvest them in time, too.

User avatar
applestar
Mod
Posts: 30550
Joined: Thu May 01, 2008 7:21 pm
Location: Zone 6, NJ (3/M)4/E ~ 10/M(11/B)

Update:

Image
...harvested the three biggest ones. You can see the vines for the ones that were on the exposed side of the fence (protected with the cut off jammy legs) had completely browned. One feels light-ish, the other is still a bit heavy. The yellowed one feels light, so I think that one is definitely ready.

4 more big ones plus a good half dozen or so that are eating size are still on the vines. (I should go check the temperature forecast again....)

User avatar
applestar
Mod
Posts: 30550
Joined: Thu May 01, 2008 7:21 pm
Location: Zone 6, NJ (3/M)4/E ~ 10/M(11/B)

I'm not sure if I mentioned earlier -- I've been referencing luffa.info. He's definitely spot-on about there being a window between green and dried fruits when it's easy to peel/slip off the skin.

Durgan had posted on helpfulgardener forum years ago.
Subject: Growing Luffah and making sponges. Zone 5
The links durgan had given us had become broken somehow, but I discovered the blog is still up.
https://www.durgan.org/2010/November%202 ... /index.htm

I've been hanging mine up in the house and testing by hefting and squeezing - the first one turned into what felt like a water balloon. I now know that was a wrong sign and indication that it wasn't mature enough. The second one became sort of crackly as the skin toughened, semi-dried and pulled away from the fibers inside.

Though yellowed, I was a bit disappointed to realize AFTER cutting it off that its stem was a lot healthier than I had originally thought -- only one direction of the vine that the stem was on was dried out -- you can sort of see in the bucket photo. I will wait until the fruit stems blacken and dry out like I did with the one I successfully harvested a sponge from.

If the fruits don't mature to "easily peel off" stage, I'll use the boiling method to get at the softer semi-immature sponges.

User avatar
applestar
Mod
Posts: 30550
Joined: Thu May 01, 2008 7:21 pm
Location: Zone 6, NJ (3/M)4/E ~ 10/M(11/B)

In addition to 4-6" smaller ones that are not pictured, I harvested the top four -- about size of large zucchini -- yesterday before the freeze for eating... and left the 5 largest remaining fruits on the vines. Two are protected with cut off jammy pant-legs, and three were left to the elements, but this area is a bit more protected and it seemed like the last night's frost/freeze didnt get to them when I checked on them today.

Image

We had some of the smallest fruits -- peeled -- in a pasta sauce for lunch. I added two finger thick tiny ones unpeeled -- there was a bit of strong flavor with those that reminded me of eggplant. 8)

imafan26
Mod
Posts: 13997
Joined: Tue Jan 01, 2013 8:32 am
Location: Hawaii, zone 12a 587 ft elev.

Looks good. Loofah is called CeeGwa or Chinese Okra. It is grown here mostly for eating and not making sponges. There is a ribbed and a smooth variety. I usually have access to the ribbed variety. The plants are very productive but it is hard to find takers for the fruit. It is usually used in soups and like Okra it has a bit of sliminess and a slight bitterness that can be off putting.

User avatar
applestar
Mod
Posts: 30550
Joined: Thu May 01, 2008 7:21 pm
Location: Zone 6, NJ (3/M)4/E ~ 10/M(11/B)

Thanks @imafan -- it really sounds like the angled•ribbed ones are more of the eating kind? I should try growing those, too. 8) Do the ribbed ones NOT make good sponges?

If mine yields good enough sponges, I'm going to have fun experimenting with how to use them this winter. I have a couple of REALLY long, hard sponges that DH was gifted by visitors from Brazil. (I tried growing seeds that were still in them, but they didn't germinate). It will be interesting to compare them with my sponges which will likely be softer from being slightly immature. That first one I cleaned look tiny and wimpy next to the ones from Brazil.


Harvested 4 out of the 5 remaining loofah -- the vines for the ones on the fence had shriveled and the fruit stems were starting to darken. (The vine for the one hanging from the overhead VG trellis was still green so I left it for now.)

Image

...these have joined the three FOUR others hanging in the house to finish ripening. I have one that is ready to peel and wash, too. The curved one from next to the birdhouse already feels a bit light and making crackly noises that seem to indicate the skin separating from the sponge when pressed from the outside, but I'll wait until the skin yellows -- the sponge inside seem to shrink away from the skin then.

Image

User avatar
applestar
Mod
Posts: 30550
Joined: Thu May 01, 2008 7:21 pm
Location: Zone 6, NJ (3/M)4/E ~ 10/M(11/B)

...thinking about this, it seems to stand to reason that, in addition to flavor, eating varieties would be selected for NOT developing fibrous sponge for a long time, thus allowing the fruits to keep eating quality for an extended time. Whereas, to grow for sponges, it would be desirable, especially in my northern climate, that they hurry up and develop the fibers into hard/inedible sponges....

User avatar
applestar
Mod
Posts: 30550
Joined: Thu May 01, 2008 7:21 pm
Location: Zone 6, NJ (3/M)4/E ~ 10/M(11/B)

Cleaned another one. This is the one that had started to yellow outside, then was hung to finish inside, so it was quite a bit yellowed, and when I ripped a small hole and peeked, the sponge had shrunken as much as 1/4" away inside the skin.

But it had some flesh in the neck part that had not broken down and had become browned --MAJOR pain to work out of the sponge, and I had to rip it a bit. Darker than the last one for sure, which measured 15 inches after drying. This one is still wet and is 14 inches long measured from the clothespin. More sinker seeds than floaters this time, but NONE was completely black -- what's that about?

Image

...I don't know if it will be good for anything, but I saved the first and 2nd rinse water. IF I get around to it, I'm going to simmer them to pasteurize, and try making some relatively harmless/easy body products with them like shampoo and conditioner or add to handsoap, etc.

...otherwise, I'll just water some container plants with them. Last time, I watered the peppers and figs that were fruiting. :()

User avatar
applestar
Mod
Posts: 30550
Joined: Thu May 01, 2008 7:21 pm
Location: Zone 6, NJ (3/M)4/E ~ 10/M(11/B)

Luffah #3 -- this one was still mostly green, but I accidentally cracked the skin while kneading it, then it started to leak (still too juicy inside), then I was forced to process it because some ants that managed to find their way in to escape from the last couple of morning's freeze found it this morning. :x

Since the rind was still pretty green and juicy, I gave the pieces -- which generally peeled off, though not quite releasing as easily as I've gotten used to -- to the worms in the vermicompost bin. They tend to like squash, so maybe they will like luffah as well. 8)

You can see the neck was not well developed -- very soft fibers, and there were only a small amount of sinker seeds:

Image

User avatar
applestar
Mod
Posts: 30550
Joined: Thu May 01, 2008 7:21 pm
Location: Zone 6, NJ (3/M)4/E ~ 10/M(11/B)

So, Thnaksgiving, etc. schtuff kept me from getting around to processing the next two luffah until they were externally dried out. Then they started to bloom with spots of white mold, forcing me to wipe them down with rubbing alcohol and tossing them in the garage... :shock:

...I FINALLY got the chance to work on them today and they were in sorry state -- I thought they were completely ruined. But after two soaking in Oxy-clean, changing the solution once, they came out OK. whew!

Image

User avatar
applestar
Mod
Posts: 30550
Joined: Thu May 01, 2008 7:21 pm
Location: Zone 6, NJ (3/M)4/E ~ 10/M(11/B)

After dealing with the condition of the two yesterday, I decided to process 4 more luffah today. One was starting to spoil at the neck but the lower portion was still very green and hard (this was the last one harvested) -- the interior sponge had not started to shrink away and skin had not started crackle when pressed -- and the skin would not peel off like the others. I decided this one needed to be boiled. I did oxyclean them all but only one soaking was needed.

Image
...middle two are the ones from yesterday.

User avatar
applestar
Mod
Posts: 30550
Joined: Thu May 01, 2008 7:21 pm
Location: Zone 6, NJ (3/M)4/E ~ 10/M(11/B)

Cleaned the last of the big luffah today.

Image

Now, I just have two medium and one medium-small green ones left. None are as well developed and probably only have smallish usable fibrous sponge in the lower half of the fruits. But I'm hoping they will be softer and perhaps even suitable for face use.


Return to “Vegetable Gardening Forum”