User avatar
applestar
Mod
Posts: 30541
Joined: Thu May 01, 2008 7:21 pm
Location: Zone 6, NJ (3/M)4/E ~ 10/M(11/B)

I started some too :) -- experimenting with soil blocks

This year, I'm trying soil blockers again. 8)

Yesterday, the onions and broccoli were up...blocked? :lol: (they were started 1/26)
Image
Image
Image
-- the broccoli look sad because I used corrugated cardboard under the micro-blocks, and I procrastinated too long to up-block.... I think that caused N deficiency. Also, I think they are too warm in my indoor setup.

I still have to get the garage seed starting area ready. They will move out by the end of this week because I went ahead and started some very late maturing tomatoes and peppers and intend to start the winter indoor trial varieties.

Upper 20 microblocks -- Late and Very Late tomatoes: 4@ Kamatis Tagalog, Wes, Grandma Viney's Pink and Yellow, Pineapple Pig and Stump of the World.
Bottom 20 microblocks -- Eric's true potato seeds
Image

Another 40 microblocks of hot and mild peppers -- 4@ Corno di Toro Red, Trinidad Perfum, Fish, Peru White Hab, Etkezi Paprika, de Arbol, unknown specialty pepper, Scotch Bonnet, and 8 Golden Summer Hybrid
And better late than never --
20 microblocks of celery -- 10@ Tango and Ventura
20 microblocks of cauliflower -- 10@ Snow Crown Hybrid and Early Snowball

Image

...they take up so little room at this stage... (sigh). I have NO IDEA if I can accommodate them all later on. nutz:
Last edited by applestar on Mon Feb 18, 2013 1:50 pm, edited 7 times in total.

User avatar
applestar
Mod
Posts: 30541
Joined: Thu May 01, 2008 7:21 pm
Location: Zone 6, NJ (3/M)4/E ~ 10/M(11/B)

This indoor seed starting/grow area is essentially for cold season use only. It's used for smaller tender, humidity loving plants.

It sits in front of a triple WNW window, which doesn't get any sunlight during the winter months. In the longer daylight season, the westering sun POURS in and cooks anything inside. I keep the blinds closed in the summer to keep the room/house from heating up. It sat empty during the summer last year (while I was sick) -- I want to try to dismantle it once all the plants go outside to be planted or on vacation this year.

Image

I don't close the front flap all the way because it gets too hot/humid. It's folded 1/2 way up, but I clamp a Mylar covered windshield sun shield across the opening.

Image

This way, the dark side away from the window gets some reflected light:

Image

The orchids that were nearly dead last summer due to neglect are coming back and looking very happy :D
Image
One more in the broccoli seedling photo above... and you may have noticed the Pineapple pups :wink:

This geranium cutting I took in the fall to preserve/overwinter it likes it here too:
Image

The way-too-early to start Japanese Purple Sweet potato shoots are starting to vine and is already looking to take over the entire area. (I calculated that there are another 90 days to go before they can be planted in the garden and at least 75 days before I can move them out with protection.:shock:) It really likes sitting above the light fixture:
Image

User avatar
applestar
Mod
Posts: 30541
Joined: Thu May 01, 2008 7:21 pm
Location: Zone 6, NJ (3/M)4/E ~ 10/M(11/B)

Today,

- 20 micro-blocks: 10@ Royal Carpet and Carpet of Snow sweet alyssums
- 15 micro-blocks: 5@ Apple Mint, Summer Savory, and Mexican Mint Marigold. I plan to sow more MMM later on when I sow the regular Marigolds but I wasn't sure if that would be too late.
- 41 micro-blocks: 1@ 33 varieties + 8 duplicates Winter Indoor Tomato candidate trial varieties

:!: A few cauliflower seedlings are lifting their hypocotyl -- they may sprout tomorrow :D

User avatar
IndyGerdener
Green Thumb
Posts: 392
Joined: Thu Jun 21, 2012 12:32 pm
Location: Greenwood, Indiana

So.... what is a micro block? do you make them? How? This guy is intrigued!!

User avatar
applestar
Mod
Posts: 30541
Joined: Thu May 01, 2008 7:21 pm
Location: Zone 6, NJ (3/M)4/E ~ 10/M(11/B)

Soil block makers (or "soil blockers") -- I got a set for Christmas. :()
Small seeds can be started inthe micro-blocks, then the insert for mini-blocks pokes a micro-block sized hole in each block where you can pop in the microblock.
Here's a picture from when I was trying to find right size containers to use for their trays:
Image

Yesterday, Stump of the World tomato seedlings started to sprout.
Image
Royal Carpet and Carpet of Snow sweet alyssums in the back and Snow Crown hybrid cauliflower in the front. Early Snowball havent sprouted -- 2009 seeds germination failure?

Today, three out of four blocks are up, one with double. I don't know if I somehow missed the 4th block and ended up sowing two seeds in the one block. :?
Image

Rotated the alyssums and cauliflowers for even light coverage:
Image

Mexican Mint Marigold and Summer Savory were also up yesterday (yeah not easy to see in this picture, but I wanted to show the microblocks in this chocolate covered cherry tray :wink: :wink:
Image

I just peeked at the seeds and, to my surprise, some of the Winter trial tomatoes that we're started on Tuesday are up: Sophie's Choice, Yellow Bell, Sinister Minister F4, Cherokee Tiger Large Red, and Jaune Flamme.

Also Ventura celery but none of the Tango yet.

I had to move out the upblocked broccoli hybrid seedlings and Eary Purple Sprouting broccoli seedlings out in the garage where the Bucket-o-Greens used to be. It's cold out there, but they should be OK. :twisted:
Image
Anyway, I found a detailed description for Early Purple Sprouting broccoli that said they need to be overwintered to make lots of side-shoots, so this is actually for their own good. :wink:

User avatar
rainbowgardener
Super Green Thumb
Posts: 25279
Joined: Sun Feb 15, 2009 6:04 pm
Location: TN/GA 7b

Looking good!

Did you say somewhere what the soil mix in your blocks is? I tried to search but couldn't find it.

I do wish I could show you how beautiful my little cabbage and broccoli plants are right now, but currently I don't have the computer set up for it. Hopefully getting a new computer soon!

User avatar
applestar
Mod
Posts: 30541
Joined: Thu May 01, 2008 7:21 pm
Location: Zone 6, NJ (3/M)4/E ~ 10/M(11/B)

I'm looking forward to seeing your lush basement jungle. 8)
I started out from the basic soil block seed starter recipe originally by Eliot Coleman and copied everywhere, substituting coir for black and brown peat moss and reducing the lime, and using sand and pumice stone. But when I finished that batch, instead of making a new batch of the same, I have been casually blending Dr. Earth orange bag potting mix, coir, sand and pumice. For mini blocks I don't even shift the pumice and potting mix, though I need to for micro blocks.

Now, I'm posting a bunch more photos. I promise I'll taper off but I love these initial days when the seedlings start to sprout and visibly grow :()

Image
(R) Late-Very Late tomatoes are sprouting! All 4 Stump of the World, a couple of Wes, Pineapple Pig and Kamatis Tagalog. Grandma Viney is taking her time. You probably can't see them but two of Eric's TPS microblocks have sprouted too. 8)
(L) Winter Indoor variety trial. A few more sprouted today. Sinister Minister F4 was first to unfurl its seed leaves.

Image
(I forgot these were last years new seeds and sowed multiple.... :roll:)

Image
Mexican Mint Marigold turned out to be very easy to sprout.

Image
For some reason, onions seedlings started in microblocks, then upblocked to miniblocks are doing better than once started directly in the larger mini blocks.

Almost all of Ventura celery are up and a few Tango celery have started to sprout.
Last edited by applestar on Sat Mar 09, 2013 5:53 am, edited 1 time in total.

MObeek
Cool Member
Posts: 88
Joined: Wed Jan 23, 2013 12:22 pm
Location: Northwest Missouri

You've been busy!

Off the subject. Did you get your aquaponics experiment started?

User avatar
gixxerific
Super Green Thumb
Posts: 5889
Joined: Fri Jun 26, 2009 5:42 pm
Location: Wentzville, MO (Just West oF St. Louis) Zone 5B

You girls are making me look bad. :wink:

I am slacking but it will all work out in the end.

User avatar
applestar
Mod
Posts: 30541
Joined: Thu May 01, 2008 7:21 pm
Location: Zone 6, NJ (3/M)4/E ~ 10/M(11/B)

Winter Indoor Trial seeds sprouted to date --
2/23 Sophie's Choice, Yellow Bell, Sinister Minister F4, Cherokee Tiger Large Red-1, Jaune Flamme, Snow White;
2/24 (CTLR-1 failed overnight :shock:. Sowed another soaked in oolong tea, Snow White also missing but may have mistook for Native Sun. Sowed another soaked in oolong anyway) Grub's Mystery Green, Tigerella, Native Sun, CT Lg. Red-2, Earl's Green Cherry-2, Urbikany

User avatar
IndyGerdener
Green Thumb
Posts: 392
Joined: Thu Jun 21, 2012 12:32 pm
Location: Greenwood, Indiana

That is pretty cool. one into the other into the other.... like the stackable toys!!

I love it

User avatar
applestar
Mod
Posts: 30541
Joined: Thu May 01, 2008 7:21 pm
Location: Zone 6, NJ (3/M)4/E ~ 10/M(11/B)

I thought I would share with y'all my crazy seed planting plans (...still not completely finalized) nutz:

Image
ImageImage

User avatar
applestar
Mod
Posts: 30541
Joined: Thu May 01, 2008 7:21 pm
Location: Zone 6, NJ (3/M)4/E ~ 10/M(11/B)

I've gone over the edge... Have started or will have started when all is done total of 96 tomato varieties (mostly single seeds/plants)

Amish Salad
Amos Coli
Anna Banana Russian
Backfield
Beauty King
Beaverlodge Slicer
Belyi Naliv
Berkeley Tie-Dye
Big Cheef
Blondköfchen
Bloody Butcher
Blue Ridge Mountain
Bursztyn
Canabec Super
Casey's Pure Yellow
Chalk’s Early Jewel
Cherokee Green
Cherokee Tiger Large Red
Coyote
Cream Sausage
Donomater F3 (#4 LgSw)
Dr. Lyle
Dwarf Emerald Giant
Earl's Green Cherry
Earl’s First Early
Extreme bush
Ferguson
Gajo de Melon
Grandfather Ashlock
Grandma Viney's Pink and Yellow
Grub's Mystery Green
Indigo Apple
Italian Red Cherry
Jackass Yellow
Jaune Flamme
Jersey Devil
Kamatis Tagalog
Kellog's Breakfast PL "KBX"
Kootenai
Leadbeatter's Lunker
Lime Green Salad
Liz Birt
Lucky Cross
Lucky Leprechaun
Ludmilla's Yellow Giant
Lush Queen
Malkhitovaya Shkatulka "Malachite Box"
Mano
Melon Ball
Monomahk's Hat
MoosoliniF3
Native Sun
Northern Lights
Not Purple Strawberry
O'Sena Green
Opalka
Orange Banana
Orange Icicle
Orange Minsk
Orange Strawberry
Pineapple Pig
Pink Berkeley Tie-Dye
Punta Banda
Rebel Yell F6
Red Barn
Riesentraub
Risista
Rose
Rosella Purple
Russo Sicilian Togetta
Sinister Minister F4
Snow White
Soldacki
Sophie's Choice
Spudatula
Stump of the World
Sweet Beverley
Sweet n Neat
Tasmanian Chocolate
Terhune
Tigerella
Trip-L-Crop
Urbikany
Variegated RL
Victoria
Victorian Dwarf
Virginia Sweets
Vorlon
Wapsipinicon Peach
Wes
White Queen
White Tomesol
White Zebra
Yellow Bell
Zagadka Prirody "Nature's Riddle"
Zarnitsa

:roll: I've decided if any of these seeds don't sprout, I am NOT going to reseed. I have yet to determine if all of these are even going to fit in my garden or even if I have enough room in the house to grow them all to transplant size :lol: I'm afraid to.... :oops:

User avatar
rainbowgardener
Super Green Thumb
Posts: 25279
Joined: Sun Feb 15, 2009 6:04 pm
Location: TN/GA 7b

You and gixx have gone over the edge together !! :) Have a nice trip on the way down! I am still figuring out how I am going to have space under my lights for my 7 varieties.

But it is so nice that you are out there pioneering to report back to the rest of us.

User avatar
applestar
Mod
Posts: 30541
Joined: Thu May 01, 2008 7:21 pm
Location: Zone 6, NJ (3/M)4/E ~ 10/M(11/B)

I am really liking these soil blocks for the space saving wonder they are.

3/4" Microblocks of of sprouted tomato seedlings ready to be Upblocked into 3/4" holes in 2" miniblocks (this is the Winter trial tray):
Image

Now supposedly, a 2" soilblock -- which is packed -- is dense enough to hold 3"-3.5" pots of soil and are capable of supporting plants that would normally be supported by them. The plant density in a given area is another issue though, so we will see.

I love it that these rice milk cartons is turning out to be the just right size for holding eight 2" miniblocks, and with their straight sided profile, are saving even more space.
Image

A square bakery container can hold exactly 16
(eh, ignore that extra home made microblock sitting on top there, it's there temporarily because I couldn't find another well lit place for the little one just sprouting :lol:)
Image

...my windowless unheated garage seed starting area (I need a fun name for this area 8)) is now on-line :D
Image
-- actually it's not fully operational. The tubes need to be replaced with fresh ones, but I bought the wrong kind today, so I will have to go exchange them tomorrow. I also need to install a new light fixture for the lower shelf since I took that for the Cool Gang area indoors. I bought the fixture -- an upgrade to a 4 tube T-8 like the Winter Wonderland, but ...yeah wrong tubes. :roll:

Once that fixture is running, it will provide a little extra warmth for the upper shelf. :D

User avatar
rainbowgardener
Super Green Thumb
Posts: 25279
Joined: Sun Feb 15, 2009 6:04 pm
Location: TN/GA 7b

OK talk to me about replacing fluorescent light tubes. I never have. My set up has been expanded over time, so some are newer, but some of the original ones are over a decade old. How do you know when they need to be replaced? I've been worrying about it this year, because in some ways I'm not getting as good of results as I'm used to. But there are several variables, seeds I bought cheap in bulk from a company I've never tried before (I'm suspecting the seed for some low germination rate issues), homemade potting soil, and aging light tubes.

But you can't recycle the tubes and I hate to be throwing them out, it seems so wasteful. They still light up and look the same.

User avatar
applestar
Mod
Posts: 30541
Joined: Thu May 01, 2008 7:21 pm
Location: Zone 6, NJ (3/M)4/E ~ 10/M(11/B)

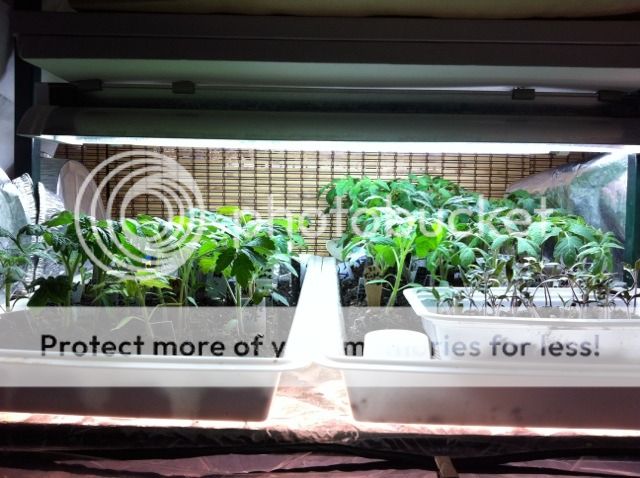
I base my need to replace decision on dark shadows developing at the ends of the tubes, but dedicated people replace them every year or after each "run" regardless. New tubes definitely are brighter, so you may want to keep a "test tube" to compare against existing ones.

FIY I bought wrong tubes -- a 10 tube pack of Phillips "Natural Light" (5000K) T-8. I don't know what was going through my head except that I was concentrating on lumens for brightness for some reason and these are marked 2850 lumens
Life: 30,000 hrs
Color Rendering Index: 82

I did become concerned that I was mistaken and also picked up a 2-tube pack of
"Daylight Deluxe" which is marked 6500K and 2750 lumens.
Life: 36,000 hrs
Color Rendering Index: 78

But they also sell "Daylight" which I believe was 6000K.

Standing in front the huge aisle of f. Tubes, I got confused. :oops:

After coming home, I reviewed my notes and asked around, and you do definitely want 6500K or higher for starting seeds (blue lights) for good foliage growth. I also mistakenly thought 5000K would be good enough for the "warm" range for blooming/fruiting, but I was told that this color range doesn't do much/as well for plants and they need the 4100K (red lights) -- Actualy called "Cool White".


In addition, last time I was poking around the web, I read that you could put T-8 tubes in T-12 fixtures and still have them work. But last night, I dug a little further and stumbled on an electrical contractor's forum. In a discussion there, consensus was that T-8 tubes/bulbs used with T-12 ballasts shorten the bulb life (and T-12 tubes/bulbs used with T-8 ballasts shorten the ballast life) -- uh oh. :shock: One contractor cleverly remarked that mistakes like this by maintenance crew means more extra work orders for them. :o

In addition, one person commented that T-12 ballasts last forever (longer than T-8) so one idea wod be to stock up on T-12 tubes before they stop selling them.... But another idea would be to replace the T-12 ballasts with T-8 ballasts which I read once before elsewhere that it is not difficult to do :?: ...then again, T-12's are not as bright as T-8's nor as energy saving. So what to do?

Anyhow, back to the store I go to exchange the T-8's and get some T-12's also. I wonder if you can exchange/return items bought at another Home Depot store at a store closer to my house?

P.S. recycling -- I suppose you could offer them for freecycle/Craig's as used but still usable tubes? Mean they'd be fine for general lighting until they burn out (tube ends turn black and they don't turn on, start flickering or tracering). When they do burn out I take them to my township's hazardous collection site. I did mean to ask if they had a collection box for the tubes at Home Depot (or other big box stores) like they do for CFL bulbs. I'll do that when I go back.

P.P.S. Maybe you could have a sun-loving seed starting section where you would keep replacing the tubes, and shade-loving seed starting section where you can keep using the older tubes.

User avatar
IndyGerdener
Green Thumb
Posts: 392
Joined: Thu Jun 21, 2012 12:32 pm
Location: Greenwood, Indiana

I have T-5's in my 24" section and T-12's in my 48" section. I am running 2700k and 6500k bulbs in each set. There is not much growth difference between the sides.

prob just a fluke, but it is what I have noticed

User avatar
applestar
Mod
Posts: 30541
Joined: Thu May 01, 2008 7:21 pm
Location: Zone 6, NJ (3/M)4/E ~ 10/M(11/B)

Wow that's difficult to compare --

- 48" tubes are brighter than 24" tubes
- T-5's are brighter than T-12's
- 6500K is supposed to be significantly better/ideal for leaf and root growth and I'm not sure how much 2700K color range benefits plants (I was told to choose 4100K for blooming/fruiting) I'll see if I can find an appropriate graph to link to.

User avatar
IndyGerdener
Green Thumb
Posts: 392
Joined: Thu Jun 21, 2012 12:32 pm
Location: Greenwood, Indiana

I think we are both wrong. I think "Optimum" is 6500k for growth and 3000k for bloom

User avatar
applestar
Mod
Posts: 30541
Joined: Thu May 01, 2008 7:21 pm
Location: Zone 6, NJ (3/M)4/E ~ 10/M(11/B)

Finally made room and upblocked 24 more:
Here are some of them:
Image
Right now, there are 32 in the tray, but if I take them out of the square bakery containers, the tray would hold more.

Here's a microblock being snuggled into the square hole in the miniblock:
Image

...and it's in:
Image

...this is weird to me because I usually bury up to the base of seed leaves, but the soilblocks are supposed to encourage dense root systems so I'm going to follow through and see how they do.

User avatar
applestar
Mod
Posts: 30541
Joined: Thu May 01, 2008 7:21 pm
Location: Zone 6, NJ (3/M)4/E ~ 10/M(11/B)

One fun aspect of growing so many different varieties is in noticing the differences in the seedlings:

Victorian Dwarf (right) -- looks like it has mitten potato leaf:
Image

Wes (left two) -- wispy leaf stands out
Cherokee Tiger Lrge Red (back right) -- chartreuse foliage
Grub's Mystery Green (front right) -- potato leaf
Image

User avatar
gixxerific
Super Green Thumb
Posts: 5889
Joined: Fri Jun 26, 2009 5:42 pm
Location: Wentzville, MO (Just West oF St. Louis) Zone 5B

Looking good Apple.

Those Cherokee Tigers sure stand out don't they. :wink:

User avatar
Jardin du Fort
Senior Member
Posts: 243
Joined: Thu Dec 13, 2012 2:59 pm
Location: Fort Wayne, IN

applestar wrote:...my windowless unheated garage seed starting area (I need a fun name for this area 8)) is now on-line :D
V8 nursery? V8 for the auto connection AND the vegetable connection.....

:lol:

User avatar
rainbowgardener
Super Green Thumb
Posts: 25279
Joined: Sun Feb 15, 2009 6:04 pm
Location: TN/GA 7b

So, if I'm reading your thread right, you planted tomato seeds on 2/18 and 2/20?

I planted mine on 2/22 and yours are visibly ahead of mine, possibly more than 4 days can account for.

Most of them are putting out their first true leaves now. I moved the first ones from crowded in cells on heat mat to one/cell off mat. Those were Wayaheads and they are noticeably ahead. They were also seeds from 2007 and had a better germ. rate than some of the new seeds.

The next to get moved off the mat will be the Sophie's choice, another early variety. So even at this stage the early varieties are getting off to a quicker start.

User avatar
applestar
Mod
Posts: 30541
Joined: Thu May 01, 2008 7:21 pm
Location: Zone 6, NJ (3/M)4/E ~ 10/M(11/B)

Huh, there's a discrepancy in my notes -- 4 Late/Very Late varieties (Kamatis Tagalog, Grandma Viney,s Pink and Yellow, Pineapple Pig, and Wes) were started on either 2/16 or 2/17. Winter Indoor Trial varieties were started on 2/19. More varieties were started as microblocks were Upblocked.

I started the main garden varieties on 2/26 (did I not mention that?) and the last batch (I think!) of tomatoes yesterday.
Image

Temperature may explain it too -- many early varieties grow well at lower temps. On the other hand, the middle shelf of the "Tropical Paradise" (inside the pvc covered shelves) is upper 60’s to low 70's during the day and low-mid 60's overnight. -- this is a temp range in which tomatoes grow very well, sometimes too lanky. Humidity level is higher.

I prefer to grow them somewhat slower and stockier, so the Upblocked seedlings in 2" microblocks are moved to the top of the Tropical Paradise -- no more cozy indoor "greenhouse" and temps will be upper 60's by day and low 60's by night with occasional drop down to upper 50's.

:() :() :() @Jardin du Fort -- V8 NURSERY :D -- I LOVE it!! :() :() :()

I haven't been able to re-configured the V8 Nursery with the new lights and replaced the bulbs yet, but once that's done and if overnight temps stay above 50, upper 40's at lowest, then these older Upblocked tomato seedlings -- especially the Winter Indoor Trial varieties will start moving out. Tough love :twisted:

User avatar
Jardin du Fort
Senior Member
Posts: 243
Joined: Thu Dec 13, 2012 2:59 pm
Location: Fort Wayne, IN

Applestar,

A question: I assume you are saving the seed from at least some of your many varieties of tomatoes. You said that for many of those varieties you only grow one plant. So, here's the Q: how do you prevent all these tomatoes from cross-pollinating? Do you use a cover for each plant, and if so what kind of cover? When do you put the cover(s) on? Do you have to hand pollinate? I assume you also save last year's seeds just in case this year's tomato plant has a casualty....

OK, so that's more than just one question, but hey, who's counting anyway!

:lol:

User avatar
applestar
Mod
Posts: 30541
Joined: Thu May 01, 2008 7:21 pm
Location: Zone 6, NJ (3/M)4/E ~ 10/M(11/B)

Tomato flowers have conical structure of fused anthers called an "anther cone." The pollen is released INSIDE this structure. Excess pollen comes out of the opening at the point of the cone. Most tomato flower's pistil (female receptive part which catches the pollen) does not grow longer than the cone and does not emerge, so that when the flower releases the pollen, it's own pistil catches the pollen and are pollinated.

This means that most of the time, a non-hybrid genetically stable open pollinated or heirloom tomato plant can make uncrossed seeds that are true to type.

Some varieties do have protruding pistil that are more susceptible to cross pollination by wind as well as by insect activity. And insects, especially ones that tear open the anther cone to get to the pollen and maybe nectar too, can introduce pollen from other flowers. I suspect hummingbirds may also have a hand -- beak -- in the process since they visit tomato flowers while visiting my garden.

To be completely sure, I should BAG the blossoms, and I may bag some, but probably not all. Last time I tried bagging tomato blossoms, it was an exercise in frustration. The nylon bags (drawstring wedding/party favor bags) tended to overheat the trusses and/or caused excess moisture humidity, resulting in every truss BUT the bagged ones to set fruit. :evil: I'll try again since obviously, I don't have the technique down. Also, I want to try intentionaly crossing some of these myself by hand pollinating -- and those will need to be bagged to prevent unwanted help by outside sources.

User avatar
applestar
Mod
Posts: 30541
Joined: Thu May 01, 2008 7:21 pm
Location: Zone 6, NJ (3/M)4/E ~ 10/M(11/B)

OK those weren't the last tomato seeds, THESE are :>
Image

Broccoli seedlings in the garage. Forecast still calls for windchills of 19°F then 20's so not quite ready for them to go out, though I'll set them out to harden off again once this gusty weather passes.
Image

Need to get working on that coldframe....

User avatar
applestar
Mod
Posts: 30541
Joined: Thu May 01, 2008 7:21 pm
Location: Zone 6, NJ (3/M)4/E ~ 10/M(11/B)

One more --

We're looking at Eric's True Potato Seeds on the right side of the tray:
Image
Image

They took longer to sprout and to grow, although if you look close almost all of the microblocks have sprouted now. I think next time, I'll start these earlier with the onions in January. I'll upblock those bigger ones within the next couple of days when I upblock those bigger tomato seedlings.

User avatar
applestar
Mod
Posts: 30541
Joined: Thu May 01, 2008 7:21 pm
Location: Zone 6, NJ (3/M)4/E ~ 10/M(11/B)

:roll: Another discovery :roll:

I sowed 9 microblocks of Irene's Green Cotton two days ago on 3/5 and four of them have sprouted already! :shock:
Image

Yeah, definitely need to start these in 2" miniblocks instead or try to upblock immediately.

User avatar
applestar
Mod
Posts: 30541
Joined: Thu May 01, 2008 7:21 pm
Location: Zone 6, NJ (3/M)4/E ~ 10/M(11/B)

Still :roll: and wondering what I've gotten myself into.... :shock:

Started re-organizing the 2" miniblocks. A 1020 tray holds 50 blocks each.
Image

...on my way to 100 tomato plants...

Re-organized the microblocks into not quite ready to upblock seedlings (cooler top of the Tropical Paradise) and unsprouted tomatoes seeds started earlier plus the last bunch that were just started (middle shelf 83-5°F inside Tropical Paradise) -- will ultimately total more than 100 (but I have one more tray so we're OK :>) also upblocked some of Eric's TPS:

Image Image Image

...Upblocked sprouted cotton. Reseeded basils and marigolds that didn't sprout.

BTW, found another perfect container for the microblocks :()
ImageImage
Last edited by applestar on Sat Mar 09, 2013 6:50 am, edited 1 time in total.

User avatar
applestar
Mod
Posts: 30541
Joined: Thu May 01, 2008 7:21 pm
Location: Zone 6, NJ (3/M)4/E ~ 10/M(11/B)

Tomato jungle -- 46 miniblocks in the left tray.
Image
View from the other end:
Image
(Yeah, when I get the chance, I'm going to turn those labels around :oops:)

More upblocked tomatoes -- you can see the side of the block in the front... By next week, there will be roots peeking out 8):
Image

Roots about to be air-pruned:
Image Image

Upblocked True Potato Seeds... My experience from last time I grew them is that they take longer to get going compared to tomatoes, but they do grow into sturdy seedlings much like tomato seedlings:
Image

Winter Indoor/Late-Very Late/TPS consolidated microblocks tray:
Image

Celery microblocks:
Image

Sweet alyssum microblocks:
Image

...finding some aphids in celery and alyssum :x

User avatar
applestar
Mod
Posts: 30541
Joined: Thu May 01, 2008 7:21 pm
Location: Zone 6, NJ (3/M)4/E ~ 10/M(11/B)

...so far, the healthy seedlings reminds me of my impression that seedlings grown in traditional clay pots exhibited much more vigorous and sturdy growth compared to plastic pots, containers, or drink cups a couple of years ago when I compared, and concluding then that it must be the "breathable" clay walls and that I would like to switch over completely to clay pots.

That particular ambition kind of dwindled due to excessive weight of a tray of little clay pot seedlings, the tedium of cleaning them, and easy loss to frost and freeze when accidentally left out. So I'm finding that the soilblocks are ideal alternative so far.

I'm quick to notice faulty design so when a set of tools is well thought out and designed, I'm very happy. What I received was a "set" with 3/4" and 2" blockers, replacement nubs and cube imprints for the 2" blockers, and 2 pairs of flat-faced serving tongs exactly 3/4" wide and 2" wide that really are perfect for the job. I added metal paint scrapers of various widths to help separate and push the blocks around, and am trying to decide if I want to "make" a block lifter out of a mason's trowel (Eliot Coleman design) or buy a manufactured one that is based on the modified mason's trowel deign.

User avatar
applestar
Mod
Posts: 30541
Joined: Thu May 01, 2008 7:21 pm
Location: Zone 6, NJ (3/M)4/E ~ 10/M(11/B)

I love the morning misting time right now. :D
When I mist the seed miniblocks, the bit of these little beauties just lifting their hypocotyl loop is revealed 8)

Image
The chart on the right includes this morning's update so you can see which ones are up :wink:
Image

User avatar
applestar
Mod
Posts: 30541
Joined: Thu May 01, 2008 7:21 pm
Location: Zone 6, NJ (3/M)4/E ~ 10/M(11/B)

Oh yeah, I just posted an update yesterday. :lol:

...well...
Upblocking these overgrown microblocks today:
Image
Image
Image

Sprouted tomato seeds and more seeds:
Image
Image

:flower:
Last edited by applestar on Thu Mar 14, 2013 4:21 am, edited 1 time in total.

User avatar
applestar
Mod
Posts: 30541
Joined: Thu May 01, 2008 7:21 pm
Location: Zone 6, NJ (3/M)4/E ~ 10/M(11/B)

Here's something new --

Can you see the incredible purple color of these De Arbol pepper seedlings?
Image

User avatar
applestar
Mod
Posts: 30541
Joined: Thu May 01, 2008 7:21 pm
Location: Zone 6, NJ (3/M)4/E ~ 10/M(11/B)

I ran out of room in the house. :roll:
Image

The garage is barely warm enough (mid-50's during the day and while the lights are on, mid- to low-40's and have dipped to 38°F and 39°F overnight) but I had to Uppot more tomatoes that were growing in 3/4" microblocks beyond the size that could be Upblocked to 2" mini-blocks.

So here is my -- hopefully viable -- solution:
Image

Since the outdoor temp can get higher in the sun, I'm going to try to set these outside as much as possible (an aspect of the "Dense Planting" technique) I also used the dry planting in loose potting mix method borrowed from "Dense Planting"

Since they are half way down the clear cut off clear bottles and beverage cups, when positioned under the lights like this, they have extra warmth. The clear plastic channels the light so I think it will work even though the lights are higher up than ideal. But if it seems like they need more ligh than these 3-tube T-12's, I'll move them to the lower shelf which has a 4-tube T-8 fixture.

I will have to guard against damping off, but I also borrowed another technique from a soilblock growing blog, which is to cut vertical slits in the sides of these containers. This iis intended to allow the soil to breath more and prevent roots from circling.

I think it was Ozark Lady who mentioned several years ago that she fills the cups with more soil mix as they grow -- I'll be doing that with these. 8)

Here's another picture. 18 of these cut off 1L and 1L 33 fl oz (?) bottles and 20 oz cups fit exactly in a Permanest Tray:
Image
Last edited by applestar on Fri Mar 22, 2013 10:32 pm, edited 5 times in total.

User avatar
applestar
Mod
Posts: 30541
Joined: Thu May 01, 2008 7:21 pm
Location: Zone 6, NJ (3/M)4/E ~ 10/M(11/B)

My onions are in the lower shelf right now. (32 miniblocks)
Image
Although they go outside every day, we're still not quite past the lows in the upper 20's. I'd like the lows to stay in the 30's before planting.

Eric's True Potato Seeds are also in the garage "V8 Nursery"
I uppotted two biggest seedlings that were growing in 2" miniblocks to 4" pots today:
Image
I have eight more smaller seedlings in miniblocks and tiny clay pots:
Image
And two more in-between size seedlings are in those other two 4" pots.

User avatar
applestar
Mod
Posts: 30541
Joined: Thu May 01, 2008 7:21 pm
Location: Zone 6, NJ (3/M)4/E ~ 10/M(11/B)

These broccoli seedlings -- "Outer Banks" ... Garage outpost near the door, lit 24/7 with two tube T-12 fixture standing sideways and reflected by the mylar windshield cover on opposite side and above -- need to be planted out. They also have been going outside every day, but coming back in at night.

I may wait until this weekend's upper 20's low forecast is past to finish hardening off since, typically, my garden is 2-3° colder than forecast, which may mean mid-20's.
Image
I'm harvesting from the other container of spinach and other greens. :D

Other seedlings that prefer minimum upper 50's to 60's and above temperatures are inside in the "Winter Paradise"

Peppers and Basil, etc.
Image
Misc.
Image
Image

I think the sweet alyssums and celery will be moving out to the V8 Nursery as soon as the onions move out.


Return to “Seed Starting Discussions”