User avatar
applestar
Mod
Posts: 30551
Joined: Thu May 01, 2008 7:21 pm
Location: Zone 6, NJ (3/M)4/E ~ 10/M(11/B)

Re: Starting pepper seeds >> spoon in zip bag germination

Adopting the idea for luffa seeds -- moistened paper towel-lined Nutella lid inside a zip bag:
image.jpg
...the first three germinated much more quickly than I had anticipated -- it took 10+ days last year and I think 2 - 3 weeks the year before. However, these are new seeds from Fedco.

I've planted the first seed which is already sprouting with seedleaves nearly out of the seed hull, and another seed with longer seed root than the one in the picture. I've put this one under the hot T-5 tubes and I'm planning to let it completely sprout out of the seed hulls before planting.

I'm probably going to run into problems with them getting too big too quickly, a Gardener's Murphy's Law in action, :roll:

User avatar
applestar
Mod
Posts: 30551
Joined: Thu May 01, 2008 7:21 pm
Location: Zone 6, NJ (3/M)4/E ~ 10/M(11/B)

Tomato seeds are not as reluctant to germinate, but using this method saves a lot of space initially, and I'll only be planting seeds that not only germinated but sprouted past the helmet-head stage. I lost at least a dozen seedlings that couldn't shed their seed hulls last year.
image.jpg
-- all of these spoons have at least one germinated seed on the spoon. The rest of them are in stacked, covered Chinese takeout trays lower down from the lights since they don't need to be up close yet. I was advised to use a piece of straw to lift the top of the zip bag up and away from the seeds that are trying to sprout as you see here. This also increases airflow to the little babies....

pepperhead212
Super Green Thumb
Posts: 2888
Joined: Wed Oct 15, 2014 1:52 pm
Location: Woodbury NJ Zone 7a/7b

I finally got a 7-pot jonah seed sprouted - the mustard and red savina habaneros that were started in the sprouter at the same time (2-7) have sets of true leaves already!

I also have some seedlings of the pea eggplants - I started those on 2-1, and got the first sprout on 2-18, and now there are about 10 or 12 very long sprouts still in the sprouter (I planted the first 10 or so, and they're up now) which will be wasted, but that's better than not getting any!

User avatar
applestar
Mod
Posts: 30551
Joined: Thu May 01, 2008 7:21 pm
Location: Zone 6, NJ (3/M)4/E ~ 10/M(11/B)

Quick post to say I decided today that Bounty is too strong for using with tomato seeds after breaking quite a few nice long roots. :?
I'm not having problems with pepper and eggplant seed roots, however.

I'm going to try using inexpensive paper napkins as well as regular printer paper. I have noticed that printer paper is ready to fall apart into pulp after just a couple of days when soaked in warm water.

@pepperhead -- it seems like seeds I harvested tends to have excellent germination when done correctly. But I'm finding pepper germination to be still difficult to manage. ...but I'll figure it out yet! Isn't it so satisfying when they do sprout?

User avatar
applestar
Mod
Posts: 30551
Joined: Thu May 01, 2008 7:21 pm
Location: Zone 6, NJ (3/M)4/E ~ 10/M(11/B)

Tomato seeds love this. They demonstrated one objection I have wirh this kind of pre-germination method. I was busy yesterday and today -- this evening, came home to a mess of sprouted, cotyledons fully extended... MUST BE POTTED seedlings :roll:
image.jpg
This meant starting my first tray of 2" mini soil blocks :()

...I also already have three 8 miniblocks @ 2 1/2 gal rice milk containers of peppers and eggplants, another 4 and 6 miniblocks of tomatoes, plus one more block... 30 tomatoes in miniblocks and 17 peppers and eggplants.

pepperhead212
Super Green Thumb
Posts: 2888
Joined: Wed Oct 15, 2014 1:52 pm
Location: Woodbury NJ Zone 7a/7b

applestar wrote:Quick post to say I decided today that Bounty is too strong for using with tomato seeds after breaking quite a few nice long roots. :?
I'm not having problems with pepper and eggplant seed roots, however.

I'm going to try using inexpensive paper napkins as well as regular printer paper. I have noticed that printer paper is ready to fall apart into pulp after just a couple of days when soaked in woarm water.

@pepperhead -- it seems like seeds I harvested tends to have excellent germination when done correctly. But I'm finding pepper germination to be still difficult to manage. ...but I'll figure it out yet! Isn't it so satisfying when they do sprout?
I tried posting this last night, but the site cut out on me! They must have been doing some updating.

How 'bout using toilet paper? Nothing breaks up better, and there is some stronger stuff that may hold together for you, but still disintegrate eventually.

There are always some peppers I have had trouble with when germinating right next to others that did great, so I know it's not me! And occasionally I have had varieties that would not shed a single seed husk! Those I simply don't try again. The ones with only one or two husks I try to remove by donning an eye loupe, and using two tweezers, or a tweezer and a scalpel. I have maybe a 50% success rate, though some are on so tightly that I don't even try it.

User avatar
applestar
Mod
Posts: 30551
Joined: Thu May 01, 2008 7:21 pm
Location: Zone 6, NJ (3/M)4/E ~ 10/M(11/B)

@pepperhead -- Helmethead surgery? Wow. I need one of those "eye loupe thingies" :bouncey:

TP is a possibility, though I have a -possibly- illogical aversion to using them. I will first use up the accumulated pile of take out and fast food napkins, then I will probably go ahead and use TP.

Germinating peppers and eggplants has been a hit or miss so far, even with this method. I may have to seriously think about using bleach or that chemical you mentioned that I can't think of right now. There are some varieties that I have received in trade that are too precious to me not to succeed in growing them.... :(

@asmx91 is the online name of the tomato and pepper growing enthusiast from whom I learned this method, and she was correct. Her pictures had spoons with the handles cut off... And I also had to start cutting off the spoon handles once I really got going.... I used up all my spoons on the peppers and and eggplants and first group of tomatoes. I was in despair until I thought of trying forks. I started decapitating these forks in preparation for the sprawling basket types, dwarfs, and very late varieties that are currently soaking
Image
The spoon handles turned out to be perfect size for labels.

The luffa seeds I mentioned above have been sprouting nicely on the Nutella lid + open-top domed MacCafé lid in place of straws to hold up the top of the zip bag.
Image
Here are 5 seedlings all potted up in 2L bottle SWC (Self-watering Container):
Image A 6th sprouted seedling was planted today (no picture).

pepperhead212
Super Green Thumb
Posts: 2888
Joined: Wed Oct 15, 2014 1:52 pm
Location: Woodbury NJ Zone 7a/7b

One of my seven pot jonah sprouts just came up today! Only one of those is left of all of the pots I started sprouts in, though one of the Red savinas seems stunted, so I dug up one of the extra Mustard habs and planted it in that pot, in case the RS never recovers.

User avatar
applestar
Mod
Posts: 30551
Joined: Thu May 01, 2008 7:21 pm
Location: Zone 6, NJ (3/M)4/E ~ 10/M(11/B)

7 pot Jonah, eh? :cool:
Well, I'm trying to grow more sweet peppers this year -- I have Chocolate Cake :D
image.jpg
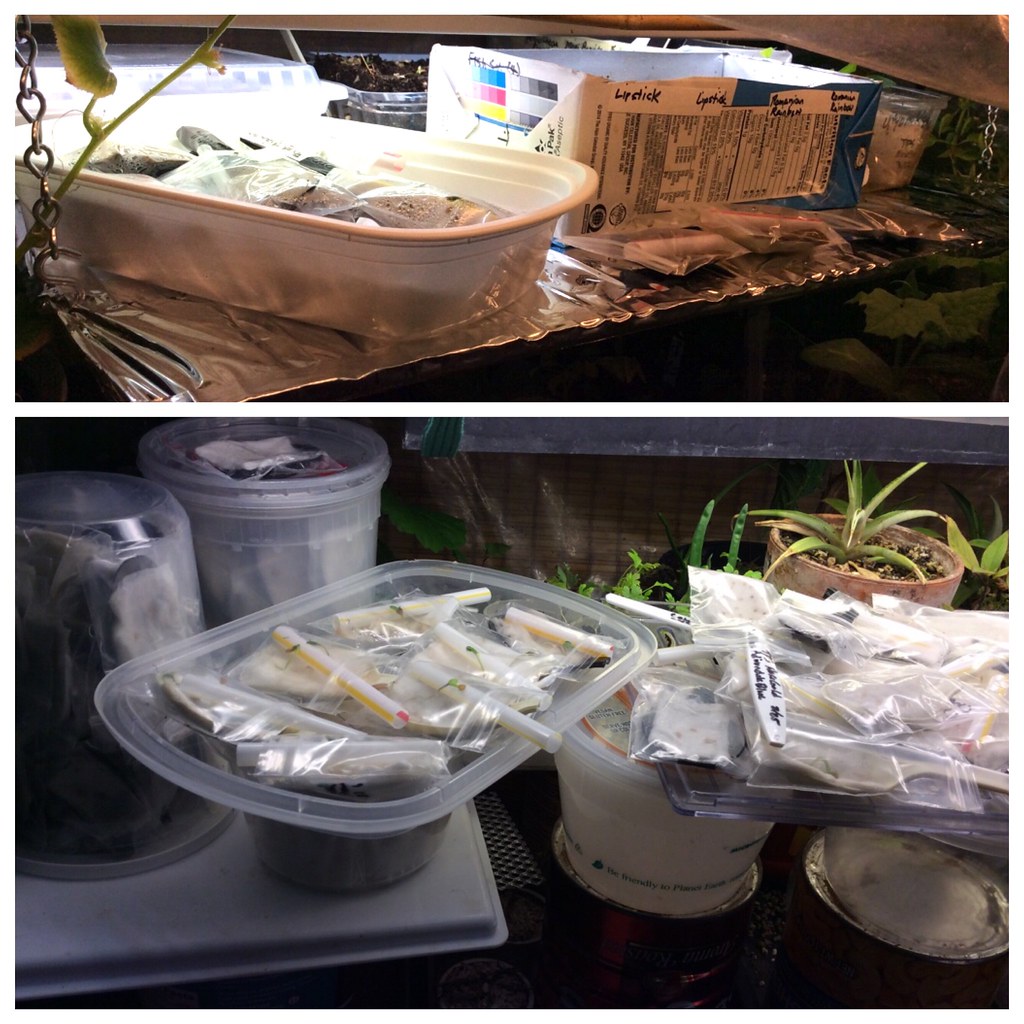
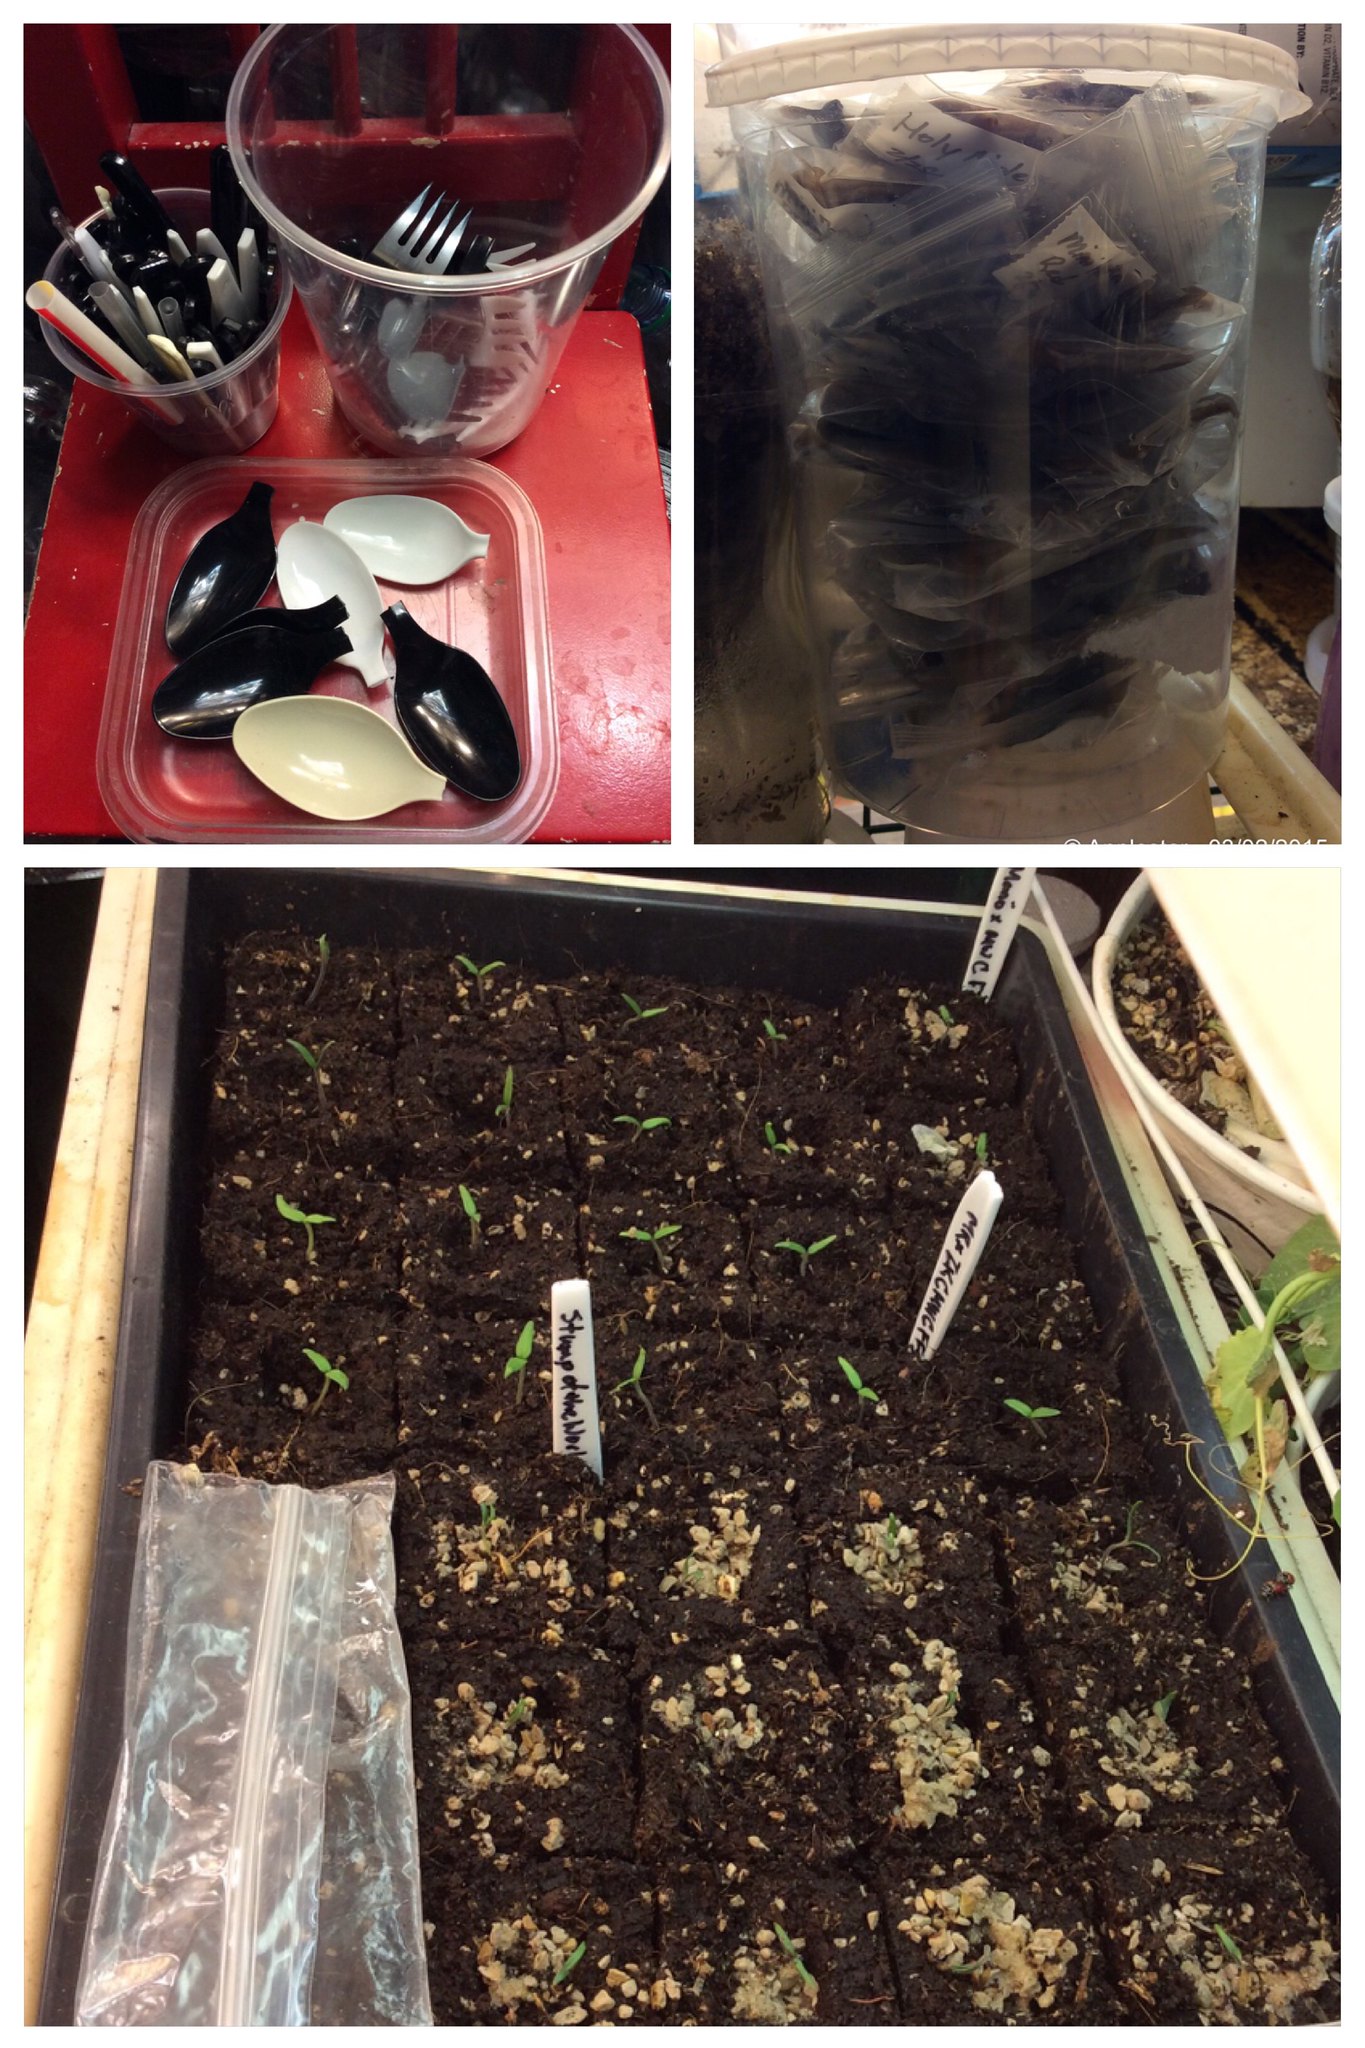
I'm also posting to show that forks work, too. :D
-- you can t really see them, but all of these have at least one germinated seed in them. I've run out of 2x3 seed bags so I'm using 2x2 size in which the spoons and forks hardly fit... But that seems OK.

Stick with cheap utensils. I'm not even using the "dinner size" plastic utensils one would buy for parties -- these are all various fast food and take out food freebies. McDonald ones are mostly sized for children's hands -- useless for adults but perfect for germinating seeds. I have found that forks work, too, as long as you replace them with spoons when they germinate. It's relatively painless to slip the flat fork out and slide the spoon in.

I've settled on putting a piece of regular matte tape on the bag to write on with a Sharpie marker. This way, the tape is easily removed when the seeds have all sprouted and the seed zip bag and the spoon can be washed for re-use. The tape turns white due to the moisture or heat, so I put the labeled side on the bottom so as not to block the light to the sprouting seeds.

The fast food and take out napkins as well as printing paper are much better than Bounty kitchen paper towel -- without the strengthening fibers woven into them, the paper turn into loose pulp and the roots can be easily slipped out or the wet paper can be easily picked from around stubborn roots with a sharp tip of a bamboo skewer.
image.jpg
These were the earliest to germinate out of Dwarfs and Very Late to,ago varieties that were put in to soak on March 1 and spoonseedzipbagged on March 3. (Before anyone says anything, Berner Rose is NOT a very late variety. I just wanted to start some of them NOW and didn't have a "group" to fit it in since pink beefsteaks are scheduled for later start next week.)
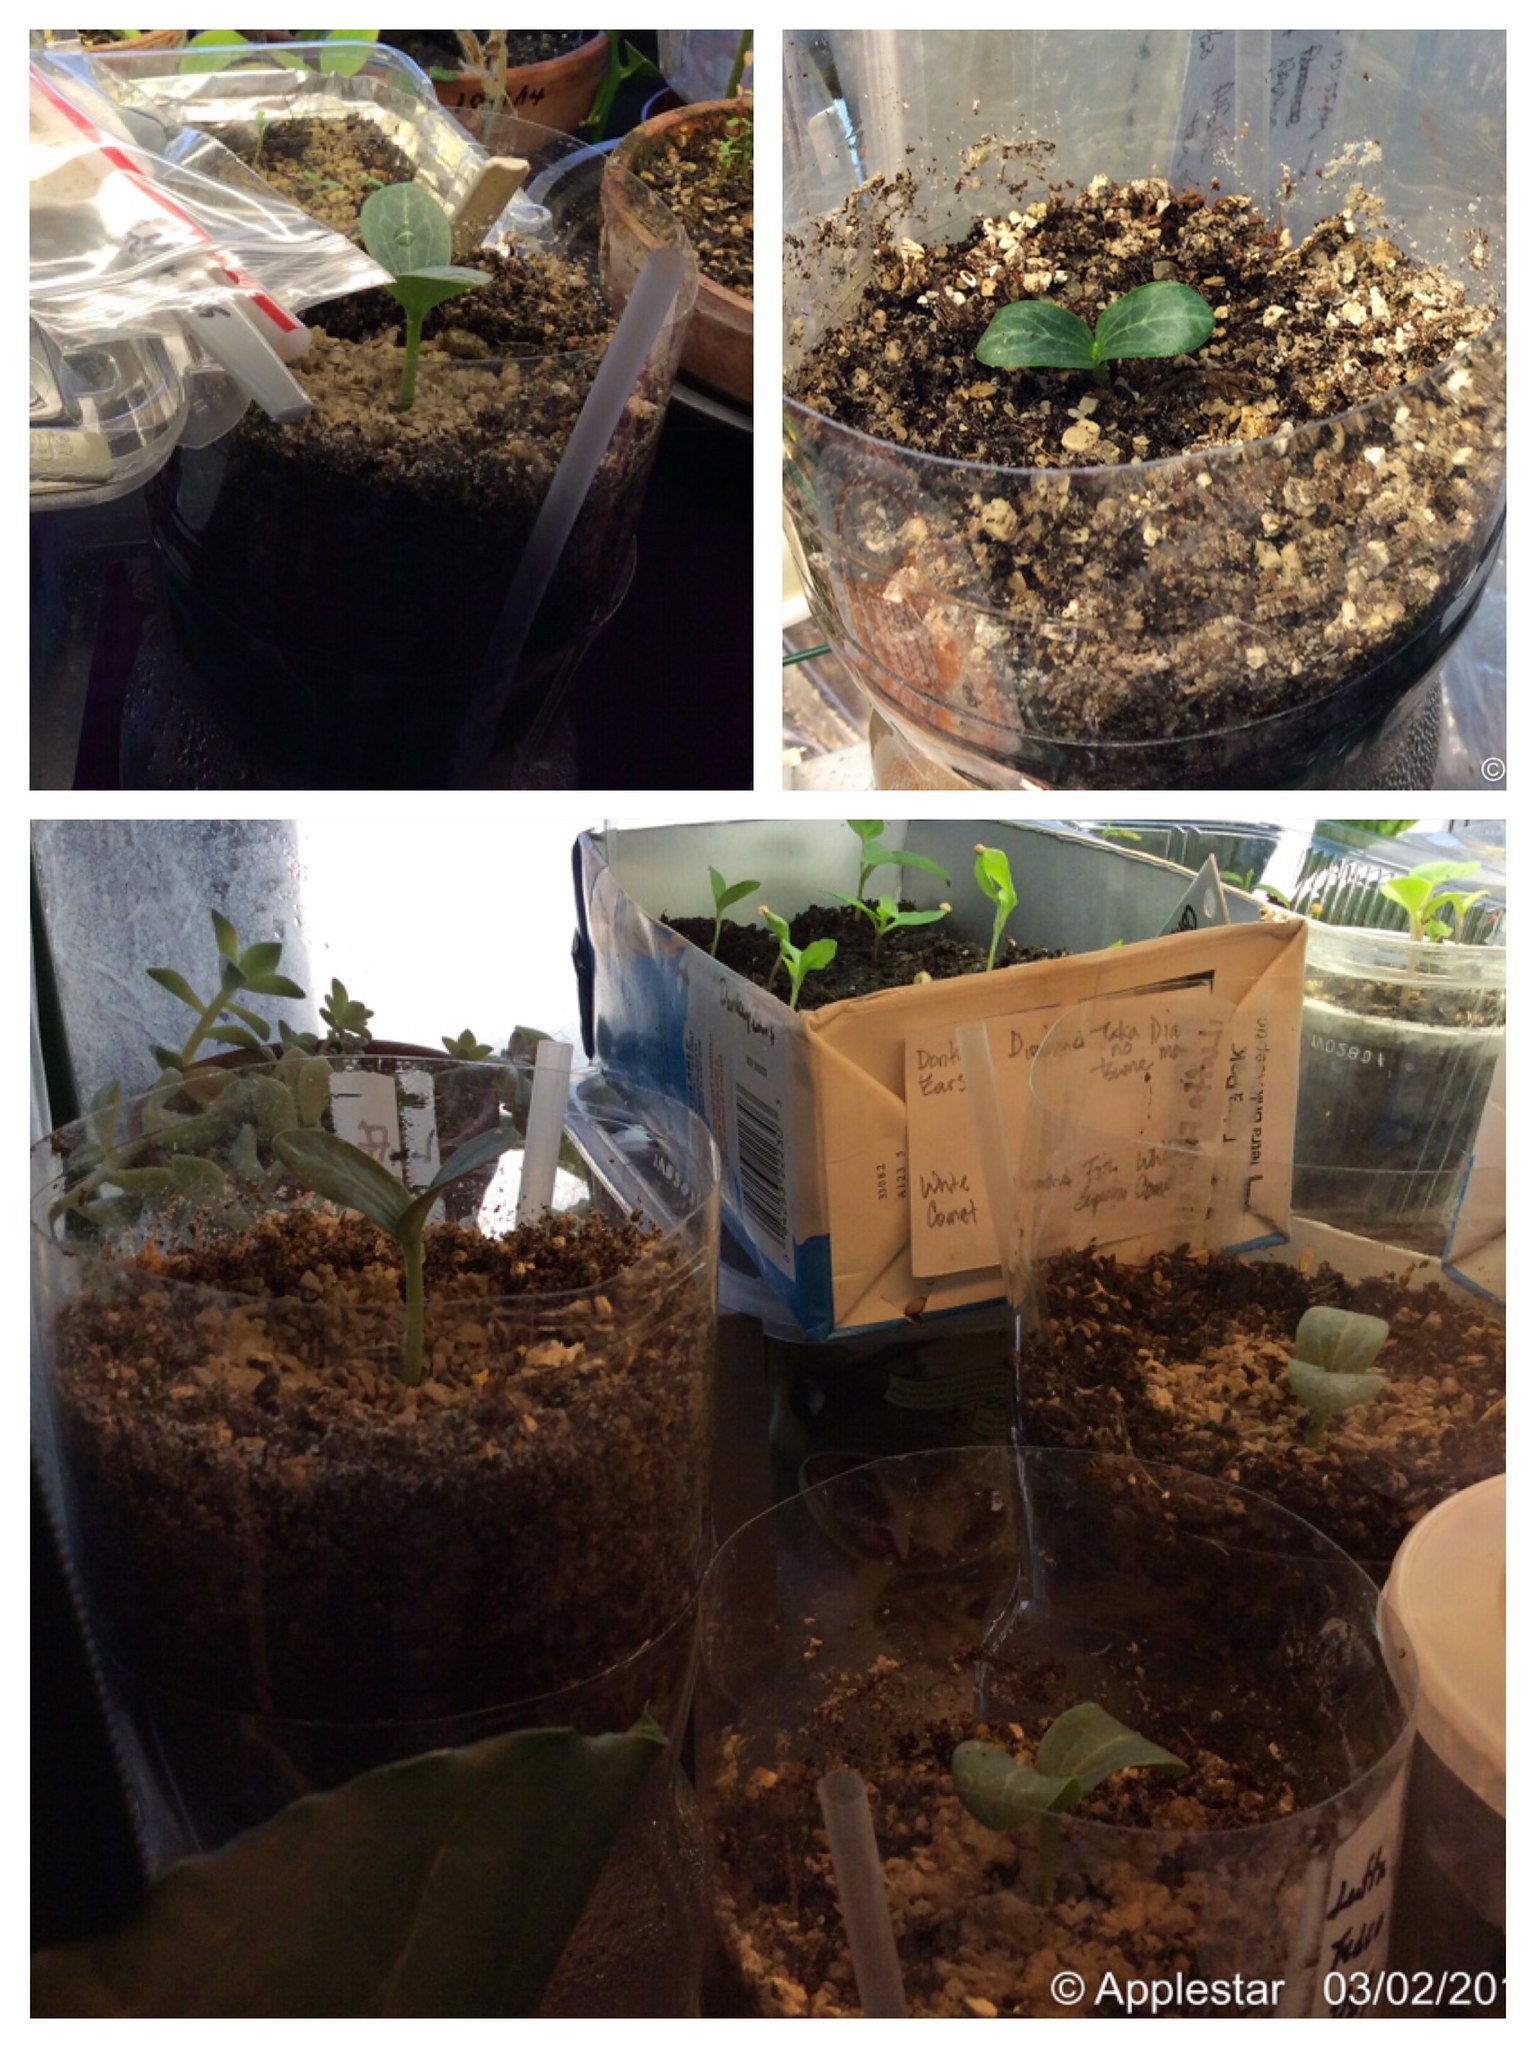
pepperhead212
Super Green Thumb
Posts: 2888
Joined: Wed Oct 15, 2014 1:52 pm
Location: Woodbury NJ Zone 7a/7b

applestar,

Speaking of germinating eggplants, have you gotten the pea eggplant to germinate? Those things take a long time, and are slow, once germinated, but eventually, they take off! I have three very small seedlings growing now in the same pot, waiting for one to look best, but I hate to toss the other two, so let me know if you need one (or both!)

My other 7 pot jonah is looking good now, with a set of true leaves. The stunted red savina doesn't seem like it is going to grow, so I stuck an extra mustard habanero in that pot, and it is already bigger than the red savina, even though it was just an extra, that popped up late! They were really good peppers last year, so I'll just have an extra, in place of the red savina.

User avatar
applestar
Mod
Posts: 30551
Joined: Thu May 01, 2008 7:21 pm
Location: Zone 6, NJ (3/M)4/E ~ 10/M(11/B)

No, the pea eggplants haven't germinated... But I'm waiting on a bunch of other's too -- mostly peppers. This is new technique for me so I'm not expecting 100 % success rate. :|

I really appreciate your offer to save me those pea eggplant seedlings, pepperhead! Thanks so much :D
I'll likely have extras, too, that you might be interested in -- maybe we could trade once mine are better established. 8)

User avatar
applestar
Mod
Posts: 30551
Joined: Thu May 01, 2008 7:21 pm
Location: Zone 6, NJ (3/M)4/E ~ 10/M(11/B)

OBSERVATIONS:

...this is kind of "new" to me...

In this method, you let the seedlings sprout completely out on the moist paper supported with a spoon in individual zip bag.

So far, what I'm seeing is that the sprouting ones try to grow upward within the small airspace created by the spoon, then the sprouting seed leaves get stuck in the condensed moisture under the top side of the bag. Adding the straw creates more lift, enabling the cotyldons to emerge without being saturated and the hypocotyl to remain dry.

When there are multiple sprouting seeds, some are not as well protected and end up more mashed between the bag and paper. Compared to ones that have dried stems, those have weaker/more tender stems and leaves and seem to take longer to settle in after being planted.

The peppers and eggplants seem to grow shorter more thickened and branched roots and root hairs that stay on the dry side which make them easier to remove from the paper. In comparison, tomatoes grow very long taproots that will remain saturated in the depth of the moist paper unless previously dug out along with more advanced sibs that were already planted. Once removed from the layers of paper and laid on the surface of new stack of moistened paper, the exposure to air seem to stimulate root hairs to grow.

User avatar
applestar
Mod
Posts: 30551
Joined: Thu May 01, 2008 7:21 pm
Location: Zone 6, NJ (3/M)4/E ~ 10/M(11/B)

Germinated, sprouting tomato seed spoonzipbag pile....
image.jpg
Loooong sprouted tomato taproot :shock:
image.jpg
(These are 2" mini soilblocks.)

User avatar
applestar
Mod
Posts: 30551
Joined: Thu May 01, 2008 7:21 pm
Location: Zone 6, NJ (3/M)4/E ~ 10/M(11/B)

Sprouted Tomato, Eggplant, and Pepper seedlings:
image.jpg

User avatar
applestar
Mod
Posts: 30551
Joined: Thu May 01, 2008 7:21 pm
Location: Zone 6, NJ (3/M)4/E ~ 10/M(11/B)

I must say this seedbag germination technique has been super productive. Tomatoes are popping up like clockwork using this method. And since I decided to follow the "3 seeds per variety for insurance" formula, and "6 seeds for segregating crosses" and "20 seeds per variegated variety" to be able to pick out the best variegated seedlings ...suffice it to say it's been pretty crazy around here. nutz:

I've posted screenshots of the germination record below. Even though the method has not been 100% foolproof for peppers and eggplants, what these records are making abundantly clear is how this method saves space. Look at some of the varieties that didn't even germinate for a very long time, and some others that may have germinated the first seed fairly quickly, but then took forever and a half for the rest of the group to finally germinate and sprout. I have very limited space, and it wouldn't have been easy to let those blank spaces sit doing nothing under the lights AND on the heat.

As it were, they were crammed into quart deli containers, a big gulp beverage sup, and Chinese take out trays. Only the sprouting seeds needed good space under the lights and even those spoons in zip bags could be semi-stacked.
Image

PEPPERS GERMINATED AND SPROUTED•PLANTED (multiple listing in green text)
Image

EGGPLANTS GERMINATED AND SPROUTED•PLANTED (multiple listing in green text)
Image

PEPPERS AND EGGPLANTS THAT HAVE NOT GERMINATED TO DATE
Image
Right now, it's a bit difficult to tell that the completely sprouted seedlings were planted in soilblocks on the last activity date listed. Later when I have time, I'll probably go back and create a new column and calculate how many days it took from starting (soaking the seeds) to planting.

User avatar
applestar
Mod
Posts: 30551
Joined: Thu May 01, 2008 7:21 pm
Location: Zone 6, NJ (3/M)4/E ~ 10/M(11/B)

image.jpg
image.jpg

User avatar
applestar
Mod
Posts: 30551
Joined: Thu May 01, 2008 7:21 pm
Location: Zone 6, NJ (3/M)4/E ~ 10/M(11/B)

Does anyone keep track of Max/Min of the soil when using heating mats? I guess if you have the heating mat thermostat, the temperatures will stay even? I keep thinking about buying one, then some other purchase take priority.... I think human heating pad with some kind of setting like Low-Mid-High would still count as having an attached thermostat.

So far, my impression from various pepper seed starting threads and comments is that CONSISTENT even temperature of upper 70's to low 80's yield the best "germination" (Defining soil "germination" as knuckling of the seed sprouts out of the surface of the soil mix) at a relatively fast rate.

The temperatures in my indoor "greenhouse" shelves range from low 80's high to as low as 60°F overnight, just from the lights being on during the day and turned off at night. So my pepper (and eggplant) germination has been on the slow side at 12 days on the average.

DAYS TO FIRST GERMINATION
image.jpg
Caveat -- Remember, though, that this is *germination* in the seedzip bags when the first root tip shows... Only recorded first germination on the spoon and not individual seeds so the data is skewed... AND it takes additional time for them to knuckle and sprout. I'm going to process those numbers in more detail later, but there has been WILD variation: some pepper seeds took very long time to knuckle and even longer to *sprout* and unfold their leaves out of the seed shells.

FWIW -- tomato seeds have been consistently "knuckling" in 2-3 days after germination and sprouting out in another couple of days after that.

Mr green
Green Thumb
Posts: 372
Joined: Sat Mar 14, 2015 6:08 pm
Location: Sweden

I just wanna know what the heatmat provides that I cant get in my trays without heatmat? Or what makes it worth expenses of buying and using it?

NJ Bob
Cool Member
Posts: 84
Joined: Mon Feb 09, 2015 8:08 pm
Location: Central NJ, Zone 7A

A heatmat will quicken the germination process. Back in the day of the pilot light my folks would stick their trays in the oven to get things going.

User avatar
applestar
Mod
Posts: 30551
Joined: Thu May 01, 2008 7:21 pm
Location: Zone 6, NJ (3/M)4/E ~ 10/M(11/B)

Here's a tomato seedling that is stubbornly still alive. I didn't realize it but at some point, I had accidentally broken this seedling in half. Today, I was going to cull it if I didn't need it, but then realized that both of the two previously planted Blush seedlings had succumbed to damping off, so inspected this and another imperfect seedling on the spoon and was amazed to find that the broken seedling had grown roots. I don't know if the bottom half of the seedling is going to do anything, but it looked healthy, too....
image.jpg
I planted both halves in the same soilblock. Hopefully one or the other will make it and become a healthy seedling. :-()

User avatar
applestar
Mod
Posts: 30551
Joined: Thu May 01, 2008 7:21 pm
Location: Zone 6, NJ (3/M)4/E ~ 10/M(11/B)

I posted this in another thread, but it was a good evaluation of the Spoonzip method which I had been meaning to add to this thread, so I will cross post it here :-()

Subject: Carnivorous plant - Venus Flytrap from seeds
applestar wrote:
Allyn wrote:That is excellent! :) I haven't tried any method other than the one I described. How do you feel this one works compared to the other method as far as success? I know it's too early to reach any real conclusions, but how do you feel about it?
Hey Allyn. I wanted to think about it a bit before answering, especially since I wasn't sure if the result you saw in the photo above was enough to say it works. But I checked them again today -- and I will post new photos tomorrow but -- I would say the method I'm calling "Spoonzip" (spoon in zipped seed bag) method works well enough, but maybe not AS WELL as the container.

As you may know already, I tried using the Spoonzip method last year to start tomatoes and peppers. And I had great success and spectacular failures. Only first time last year, and I don't believe any technique can be evaluated from just one time trial since you need to LEARN the ins and outs of it first

-- A technique can't be blamed for operator error -- one of my pet peeves with instructional blogs and especially YouTube videos in which they start out by saying "this is my first time doing this..." ...PARTICULARLY when they don't come back and provide a self evaluation of what THEY did wrong or HOW things can go wrong even if they succeeded... But I digress. :oops:

I think Spoonzip is a smaller -tiny- environment which make it more difficult to control EVEN/STABLE temperature and moisture. NUTRIENT is another issue for other seeds, but I realized this is where VFT and other carnivorous seeds would have and advantage since you truly don't need to fertilize them.

Spoonzip is a fantastic technique for saving space for growing a LOT of different varieties and keeping them securely labeled and keeping track of them. (This is where I went WAY overboard last year with the tomatoes and peppers and -seriously- overwhelmed myself :roll: ) if you are using the method to grow a large number of Spoonzipped seeds, it's actually easier to control the environment because you can keep them together in a larger container that will maintain thermal mass.

Spoonzip is a great way to SEE the seeds actually germinating. Tonight, I saw that quite a few more of the seeds on the spoon have tiny white radicles/root tips showing even though they haven't sprouted anything green yet. (I'll post a macro photo tomorrow -- I'll be able to see better how *well* they are doing then. That's another issue, germinating and sprouting are different stages in the seedling development. Some germinate but fail to sprout. I don't know for sure if this is the norm but we just never see that with seeds sown in soil mix, or if it's due to the unstable Spoonzip environment.

BTW I want to clarify that I used unrolled REAL cotton ball (not synthetic fiber) for the Venus flytrap seeds (I need to find where I got that idea from and give credit... Found it :arrow: YouTube video below). I have yet to find out how easy or difficult it will be to remove the seedlings from (or with) the cotton fibers and plant.

The Spoonzip method I used last year for tomatoes and peppers originally was described as using "kitchen paper" for the moist medium, but I found Bounty paper towels to be too strong and found paper napkins from takeout/fast food places were variable -- still working on finding which works best. Printer/copier/office papers actually works well because they fall apart into pulp with no directional fiber to catch/break the tender roots.

(And that's another thing -- the extra, sometimes mind-numbingly delicate step/procedure needed to transfer the tender seedlings to a larger container of real/appropriate growing medium.)


Venus Fly trap in 80 days - YouTube :arrow: https://youtu.be/GIEBZE8hKYQ

User avatar
applestar
Mod
Posts: 30551
Joined: Thu May 01, 2008 7:21 pm
Location: Zone 6, NJ (3/M)4/E ~ 10/M(11/B)

I mentioned in this thread -- Subject: Almost Spring '16...what are you doing (or have done) Today?
applestar wrote:Last night, I went overboard with varieties of tomatoe to start for this year by putting the selected seeds in zip seed bags and adding water to soak them, which means I can't change my mind and put them back :P afterwards, I realized there were still some dwarf and micro varieties that I held back on last time, and I will have to decide whether to give up on them or not. The soaked seeds will need to be started in some way -- either Spoonzip method or more Doubled K-cups. I found more sandwich/bakery clamshells I had been saving and DH is drinking more coffee on weekends since he gave up on sugar substitute sodas, so I might have enough K-cups to start one more batch today.
Well, when I actually counted, there wer THIRTY-EIGHT little zip bags of soaking seeds. :roll:
...so I decided to streamline what needed to be done today in favor of saving time and space (Because I don't have the room) -- that meant using the Spoonzip technique.

But one of the issues I had pointed out in my summary is the way paper napkins tended to have fibers that force directional tearing even when soaking wet, that can be frustrating to work with so as not to damage the tender roots. Printing paper when wet turns into pulp but I noticed there is some kind of binding agent/glue that sometimes encourage mildew to grow (this may be because I'm not using the bleach step).

I decided to experiment by using UltraSorb DE which I bought a while back, thinking it was the large gravel/perlite size, but which turned out to be sand-like in size.
image.jpeg
All 38 Spoonzip bags fit in a large clamshell which would hold 9 or 10 K-cups :-()

Peter1142
Green Thumb
Posts: 312
Joined: Sun Apr 13, 2014 9:23 am
Location: SE NY ZONE 6B

I start my peppers on a ledge above the radiator. Nice and toasty, at least if it is cold outside. This week is going to be warm so I will put the black tray up on the sunny windowsill during the day. I just sowed my sweet peppers! More tomorrow.

pepperhead212
Super Green Thumb
Posts: 2888
Joined: Wed Oct 15, 2014 1:52 pm
Location: Woodbury NJ Zone 7a/7b

@apple - how does that ultrasorb DE absorb water, and does that fine type expand enough that it won't be like clay, when the roots get into it?

BTW, the best paper that I have found for this is toilet paper, as it disintegrates quicker than any other I have tried.

User avatar
applestar
Mod
Posts: 30551
Joined: Thu May 01, 2008 7:21 pm
Location: Zone 6, NJ (3/M)4/E ~ 10/M(11/B)

It's quick draining -- acts a lot like sand. I'm hoping it does at the same time absorb and hold onto water. But I'm having trouble using it as potting mix additive because I really think DE needs to be washed first to remove the micro fine dust-like particles to prevent clay-like, compacting action... And at THIS size, it's a pain to rinse. The larger chunky perlite like size was easier to rinse. I hope I can get that kind again.

Thanks for the TP tip :wink:

pepperhead212
Super Green Thumb
Posts: 2888
Joined: Wed Oct 15, 2014 1:52 pm
Location: Woodbury NJ Zone 7a/7b

Seeing you try that in the spoons makes me think about trying vermiculite in spoons. This is what I use to start all of my later pepper seeds, using those shallow trays with 20 strips. I'll probably still do those that way, since it is much easier to check so many varieties at once, but maybe I'll use it for earlier ones.

User avatar
applestar
Mod
Posts: 30551
Joined: Thu May 01, 2008 7:21 pm
Location: Zone 6, NJ (3/M)4/E ~ 10/M(11/B)

Do let us know how vermiculite works out. My concern would be that vermiculite might be too fluffy and difficult to manage in seed zip bag that are too small -- you may have to use large zip bags.

User avatar
applestar
Mod
Posts: 30551
Joined: Thu May 01, 2008 7:21 pm
Location: Zone 6, NJ (3/M)4/E ~ 10/M(11/B)

This year, I ended up starting all the pepper seeds in doubled K-cups of seed starting mix (Potting mix, coir, sand, perlite/PBRH... Something like 3:3:1:1) PBRH=parboiled rice hulls. They were arranged inside vented sandwich clamshells and placed on a new heat mat -- about 85-90°F/75°F soil temp.
image.jpeg
Germination notes and sprouted seedlings that were moved out of the clamshells up to the lights:

Subject: 2016 Pepper Varieties -- whatcha growin?

Image

BUT, I want to continue exploring and experimenting with The SPOONZIP method/technique in this thread because it is highly effective for some applications and especially when trying to start many different varieties while keeping them clearly labeled and separate, or for germination tests, or pre-germinating before sowing (Peas, cucurbits, etc.) while saving valuable heat mat (or refrigerator) space until germination takes place. (I'm going to try pre-germinating spinach seeds using this method).

If anyone else is trying this method, please post your impressions here. :D

User avatar
applestar
Mod
Posts: 30551
Joined: Thu May 01, 2008 7:21 pm
Location: Zone 6, NJ (3/M)4/E ~ 10/M(11/B)

Tomatoes are not as difficult to start from seeds as peppers, but when trying to grow (too) many :P , Spoonzip method really saves space, ...and it's gratifying to see some of them respond very quickly:
image.jpeg
-- I put a piece of drinking straw in all of the germinated Spoonzips.

User avatar
applestar
Mod
Posts: 30551
Joined: Thu May 01, 2008 7:21 pm
Location: Zone 6, NJ (3/M)4/E ~ 10/M(11/B)

One of the tomato seedlings was a little prankster :lol:
image.jpeg

User avatar
digitS'
Super Green Thumb
Posts: 3934
Joined: Sun Sep 26, 2010 1:10 pm
Location: ID/WA! border

So,

it's inside the drinking straw?

I'm not quite sure what we are looking at, AppleStar.

Steve

User avatar
applestar
Mod
Posts: 30551
Joined: Thu May 01, 2008 7:21 pm
Location: Zone 6, NJ (3/M)4/E ~ 10/M(11/B)

When starting seeds this way, you put a piece of drinking straw on the spoon once they start germinating and open the zip for lifting up the top of the bag to give them room to grow, and for ventilation -- like this.

Image

In this one's case,
Image
-- I procrastinated planting these sprouted seedlings until several had already completely unfolded their seed leaves, which is pretty much the latest you want to wait. They quickly deplete the spoonful of water and need to be watered judiciously twice or more a day, and way outgrow the little bags. But I didn't notice the little seedling inside the straw because until they do unfold their leaves, you don't see much color.

BTW this year's sand sized DE medium is solving the problem I had before with seedlings that had grown this big, which is the way the roots tangled up in the layers of paper that would only tear directionally, requiring really careful handling not to break off the roots. With the DE, filling the spoon with water loosens everything up and all the roots slide right out.

pepperhead212
Super Green Thumb
Posts: 2888
Joined: Wed Oct 15, 2014 1:52 pm
Location: Woodbury NJ Zone 7a/7b

Here's one of the peppers I started in the vermiculite - the Hanoi Market. I started this one early because it is usually one of the slowest to germinate, yet it was the first one this time - in just 5 1/2 days! I transferred all of them to two pots - I planted more than I did for all the others, only because I had a bunch, since I saved them. I'll just snip them, and leave the best, once they get going.
Image


Return to “Seed Starting Discussions”