User avatar
rainbowgardener
Super Green Thumb
Posts: 25279
Joined: Sun Feb 15, 2009 6:04 pm
Location: TN/GA 7b

Aida wrote:Hi rainbowgardener!

I have three questions:

1. Is it recommended to start ALL seeds in containers? I would really prefer to start my seeds in containers, as it seems that everytime the little seed packet says "start outdoors" I dig up and prepare a huge patch, only to have a handful even sprout. :roll:

2. Are the lights necessary? Can I just get any old fluroscent tubes at a hardware store? How long do they need to stay under these lights, usually?(I'm interested in sunflowers, strawberries, tomatoes, radishes)
I'm asking because I have no garage or attic to set up a whole chain-pulled light system, so I would have to resort to keeping the containers in my room, the lights propped up on books or whatever.

3. I'm really confused when it comes to compost, blood meal, bone meal, fertilizers, etc. I've never used anything like that, I don't have a compost pile, and no time to start one(I need to plant!). Do you have any articles explaining this? In terms of seed starting, can I buy these things at a hardware store? How much of what in each container?(I think I'll use yoghurt cups and nothing much bigger, and then transplant outside once they outgrow those)

Jeez louise, I'm sorry for bombarding you with all of this. If anyone else can answer, please do!
Thanks a ton in advance.
If you read back starting at the beginning of this thread, some of these questions have already been answered, but I'll try again.

1. Not all seed. It depends on what. Some things like carrots and root crops generally, do not transplant well and really need to be direct seeded in the ground. Some things that are quick growing and cold tolerant, like lettuce, there's not a whole lot of advantage to starting them indoors (and a little disadvantage in having to harden them off), so they typically are direct seeded, but can be started indoors if you want to. Advantage of starting indoors is that they can be babied more, more protection, perfect conditions.

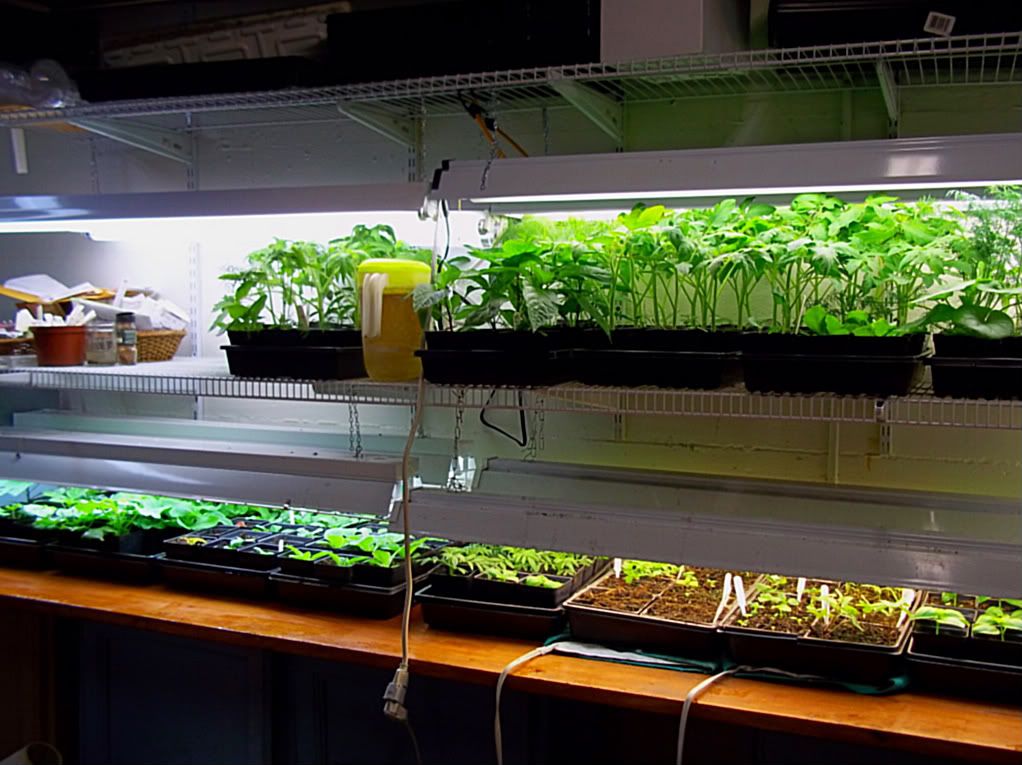
2. Some supplemental light is pretty much necessary. This can be ordinary shop lights with fluorescent tubes. But the lights need to be just a couple inches over the plants. "sunflowers, strawberries, tomatoes, radishes" Strawberries are not started from seed, they are very difficult that way. Once danger of frost is past, look in garden stores or on line and buy plants. They are very cheap, like 25 plants for $12 and you only ever have to buy them once. Radishes are one of those root crops that you really need to plant directly in the ground. They are very fast and easy that way. Sunflowers are quick growing and don't really need to be started indoors, but can be. Tomatoes and peppers are the most commonly indoor started. They will end up being indoors under the lights, 8 - 10 weeks, depending on your climate. Your lighting set up doesn't need to take up very much room. If you have a spare closet somewhere, that works great as a little seed starting room.

3. Compost, blood meal, etc are soil additives for outdoors. For indoors all you need is basic potting soil with Miracle Gro already in it (which is the commonest way potting soil is sold).

User avatar
Aida
Senior Member
Posts: 129
Joined: Sun Jan 06, 2013 4:02 am
Location: Central Florida

Ok, thank you! :)

I'll read back more carefully to see the other answers as well.

DoubleDogFarm
Super Green Thumb
Posts: 6113
Joined: Sun Mar 28, 2010 11:43 pm

For indoors all you need is basic potting soil with Miracle Gro already in it (which is the commonest way potting soil is sold).
Blah!

Eric

User avatar
rainbowgardener
Super Green Thumb
Posts: 25279
Joined: Sun Feb 15, 2009 6:04 pm
Location: TN/GA 7b

I do understand... I don't use the MG anywhere else, only for indoor seed starting and I am working on quitting that and making my own potting soil.

But for beginners, it really is the easiest and most fool proof, rather than trying to mess around with anything else for indoor seed starting, trying to figure out what to add when and how. I never recommend synthetics for outdoor/garden use.

DoubleDogFarm
Super Green Thumb
Posts: 6113
Joined: Sun Mar 28, 2010 11:43 pm

rainbowgardener wrote:I do understand... I don't use the MG anywhere else, only for indoor seed starting and I am working on quitting that and making my own potting soil.

But for beginners, it really is the easiest and most fool proof, rather than trying to mess around with anything else for indoor seed starting, trying to figure out what to add when and how. I never recommend synthetics for outdoor/garden use.
Rainbow, Just a little tease. It is good advice, but I'm pretty sure there are seed starting mixes, near everyone, without synthetic fertilizers.

Rainbow, I like this persons idea. Maybe you should give it try.
I also use my worm bin leachate for watering plants with. I just suck it out of the drip tray with a turkey baster and put it in the watering can and add water. I may not be diluting it quite as much as applestar, something like roughly 1 part leachate to 4 parts water. I just use it right away, so don't bother aerating.

I know it is not worm casting tea, but it is enriched organic stuff. I have to get it out of the tray anyway, so the tray doesn't overflow. So why not put it on my plants? Right now it is just house plants. Later it will be my indoor seedlings.
Eric

User avatar
rainbowgardener
Super Green Thumb
Posts: 25279
Joined: Sun Feb 15, 2009 6:04 pm
Location: TN/GA 7b

:)

User avatar
Jardin du Fort
Senior Member
Posts: 243
Joined: Thu Dec 13, 2012 2:59 pm
Location: Fort Wayne, IN

I have some 1/2" thick cedar left over from the fence, and have been planning on using it to make some seed flats. I know that 3" and 6" (?) are "standard" depths, but was wondering what the typical dimensions of a wood seed flat are? 10" x 20" 12" x 18" does it matter?

:?

User avatar
rainbowgardener
Super Green Thumb
Posts: 25279
Joined: Sun Feb 15, 2009 6:04 pm
Location: TN/GA 7b

It only matters in that it fits your space/equipment. I use 10x20" trays, because the cell inserts fit in them, the 3.5" square pots fit evenly in them. 20" is the depth of my counter that they sit on. And two 2-tube fluorescent shop lights run crosswise across them cover the whole flat with light.

You might have other equipment/space constraints.

User avatar
applestar
Mod
Posts: 30540
Joined: Thu May 01, 2008 7:21 pm
Location: Zone 6, NJ (3/M)4/E ~ 10/M(11/B)

One aspect you might consider is the weight of moistened soil mix+wood that has absorbed moisture+the largest size plants growing in them. Would you be able to lift them/move them around easily? You are less likely to want to work with them if they take effort to do so.

The other is if you are using lights, the best configuration seems to be 4 tubes across the rectangular flats laid perpendicular to the direction of the tubes, but if you are making custom sizes, you could maybe make 1/2 the standard 1020 size.

You might also want to consider how many would neatly fit on the grow shelf or bench/table you will be using. Remember this might be related to the weight question -- I.e. existing surfaces or new surfaces that can support the weight without bowing, etc that may interfere with even watering.

ALSO, it's a coincidence that you mentioned using fence pickets because I recently received soil block makers as a gift and was thinking about making trays to hold the blocks out of them. If you ever consider soil blocks, you'll want sizes that would accomodate the sizes of your blocks neatly and will want one of the sides to be removable, though if you are handy, you may just make custom trays separate from seed flats. Wish I had leftover cedar pickets like you though. :wink:

imafan26
Mod
Posts: 13986
Joined: Tue Jan 01, 2013 8:32 am
Location: Hawaii, zone 12a 587 ft elev.

I actually start my seed outdoors but because single cells take up too much space on my bench,(some cells always die off), I grow in compots (community pots).
I like to use 4 or six inch pots or recycled tofu containers. It is best for me to have a large surface area but only 2-3 inches deep.
I use moistened peatlite with a little osmocote added. Peat is hard to wet so it is important that the media be moistened first. I've also used Miracle grow potting soil. It works but is more expensive than peatlite. I sometimes will use recycled potting mix.
I put anywhere from 4 (cucumber) to 15 (pepper, mesclun) or more (green onions) in a pot.
The pot goes out on an open bench on trays. I use a second tray as a cover for pepper seeds. The doves will pick the seeds out of the pots if I don't. I water the bench once a day unless it rains hard enough.
Once the plants have sprouted and have true leaves I transplant to larger pots or to the ground.[/b]

User avatar
LindaD
Full Member
Posts: 22
Joined: Sat Sep 01, 2012 5:09 am
Location: mississauga

Thanks for the good seed starting info. I enjoyed reading it and alwys learn something new. The picture shows a good, organized setup...Think I should strive for that and clean up my work area before starting seeds this week...happy germinating! :lol:
p.s must clean up my pots well inadvance and am trying out coir pots for the first time!

lisbonslady
Newly Registered
Posts: 1
Joined: Tue Mar 12, 2013 3:33 pm
Location: Vineland, NJ

Great info, thanks... this is my first year really starting seeds and I'm excited but it seems I have already made some choices that are not ideal.

I have a heat pad and a plastic tray but I have small peat pots as I thought they would work better to transplant... but they are small, I can fit 50 cells on the tray... and I am starting tomatoes and peppers to plant outdoors in 6 weeks and I am guessing they will need to be transplanted before then.

A few questions - I don't have a dome but I did cover them with plastic wrap until they sprout - is that a good thing to do? The plastic is almost touching the soil and I am hoping that's ok...

Since I have the peat pots is mold the major concern when I bottom water? Anything else I should be careful with with them?

Also I did use seed starting mix - how would I fertilize later when they have true leaves - with something diluted in the water?

oh boy, so much to learn! Thanks in advance :)

User avatar
rainbowgardener
Super Green Thumb
Posts: 25279
Joined: Sun Feb 15, 2009 6:04 pm
Location: TN/GA 7b

We have a whole thread going in this section https://www.helpfulgardener.com/forum/v ... 3&start=30
which started with some other seed starting issues and evolved into people's difficulty with peat pots.

Linda - I am now using coconut coir in my homemade potting soil to replace peat. Environmentally it is more sustainable, being grown, rather than mining a fossil resource. But as a pot, I would think all the problems that apply to peat pots would apply to coir ones.

The major concern with peat (and probably coir) pots is all the issues about managing water. I really don't think you can bottom water with them, not only will they get moldy, they will keep the water and your soil may not get properly moist. If you can get the soil moist enough, either bottom or top watering, the peat pots don't let it dry out as it needs to. Eventually if the pot starts drying, it will suck the water away from the plants.

And if you got them thinking you could just transplant seedlings IN the pots and they will biodegrade, DON'T do it. The pots don't biodegrade in any reasonable time to help the seedlings and the roots will be smothered in there. You have to take the seedlings out of the peat pots. Usually the only way to do that is to tear/peel the pots off, because the roots will have grown in to them.

Honestly if you just started, I would start over with plastic. Starting out I use the little cells, 72 cells to a 1020 tray

https://www.greenhousemegastore.com/prod ... ys-inserts

If you read the beginning of this thread, I do not use humidity domes at all. They may (?) benefit some seeds, but they aren't necessary and they quickly become a liability. And it just aggravates all the moisture problems of the peat pots. I would just remove the plastic and you HAVE to remove it as soon as the first seeds sprout, which means you have to watch all the time to see when that is. Sometimes seeds sprout overnight.

The reason they sell seed starting mix (other than to get $$ out of your pocket) is that seeds don't need any fertility to germinate and get started. But once your seedlings have their true leaves, they will need some kind of nutrients. What you use for that depends on your philosophy - it could be VERY dilute miracle grow type stuff, it could be commercial organic fertilizer, it could be fish emulsion if you don't have cats in the house, it could be AACT compost tea (we have a whole huge Sticky thread on that in the compost section) . But basically yes, something in the water, until you transplant in to regular potting mix that does have nutrients.

Best Wishes and next time, come here first! :) It makes me mad that these days there's this whole big seed starting industry that exists to sell people things they don't need (fancy expensive seed starting kits with humidity domes) that often (peat pots) are actively injurious to growing seeds.

MissChris
Newly Registered
Posts: 5
Joined: Wed Mar 20, 2013 9:52 pm
Location: Ohio

Awsome thread, thanks for all the tips. This is my first year starting seeds and I think the only thing I did right was the grow lights lol.
My tomatoes just sprouted a few days ago, so I am going to dig out the heating pads in hopes that they don't get leggy like the broccoli is!

User avatar
rainbowgardener
Super Green Thumb
Posts: 25279
Joined: Sun Feb 15, 2009 6:04 pm
Location: TN/GA 7b

Leggy is not about heat, it is about light. The heat is most important for germination. Once well started, they can do without it (though they will continue to grow faster with more warmth for awhile). Leggy is they are not getting enough light, so they are stretching to try to find some.

User avatar
digitS'
Super Green Thumb
Posts: 3930
Joined: Sun Sep 26, 2010 1:10 pm
Location: ID/WA! border

You can actually slow down the legginess by lowering the heat.

It can almost be: Less light - less warmth. More light - more warmth.

Of course, less warmth will slow growth but if the plant doesn't have enough light to make good growth, it is better to have growth slowed than a weak plant.

Steve

MissChris
Newly Registered
Posts: 5
Joined: Wed Mar 20, 2013 9:52 pm
Location: Ohio

Thanks for the heating tips! The brocoli was most likely because I didn't have the light low enough. I now have the light right down on them and the plants propped up, they fall over if not propped
So are they able to be saved do you think or goners? They just started get their sets of true leaves and were started about 3 weeks ago

User avatar
rainbowgardener
Super Green Thumb
Posts: 25279
Joined: Sun Feb 15, 2009 6:04 pm
Location: TN/GA 7b

Falling over means they are not doing well at all. It could be damping off, if they are a little bit pinched in at the base of the stem and lying flat. In tha case they are definitely goners.

Or it could be that they are just really really leggy, so spindly that they can't support themselves. In that case they might possibly be saved. But if they were planted three weeks ago and are just now starting to get true leaves, they aren't growing very well. My broccoli germinated in less than three days and got true leaves a week or so after that.

You might read back through this thread from the beginning and start fresh, now that you know a little more...

But honestly, in my part of Ohio it will be time to put the broccoli plants in the ground any day now, as soon as the weather breaks a little. You might just buy yourself some broccoli plants from the nursery and focus on keeping your tomato babies happy. They have a lot more time before they might be going out.

MissChris
Newly Registered
Posts: 5
Joined: Wed Mar 20, 2013 9:52 pm
Location: Ohio

That is true. I am hoping once we get thru the snow storm tomorrow that we would finally be done with winter! Thanks for the advice!
I don't believe the broccoli is dampening, I just don't think I had the lights low enough when I started them. I think I will keep nursing them until its time to plant and see what they look like. Thanks again=)

jlazanich
Newly Registered
Posts: 8
Joined: Thu May 02, 2013 11:55 am
Location: Ohio

Just wanted to say thanks all for the great information! It has really been helpful!

rydia131
Newly Registered
Posts: 6
Joined: Sat Mar 16, 2013 7:42 am

Nice write up but I respectfully disagree with you on the seed starting kits with the domes being seed killers. I have used them now several times and have had nothing but success. I agree with removing the lids once a sprout appears but that is told in the directions. As a new gardener, if I can have success with these I don't think they are an item to avoid like you stated.

tenderloingardener
Cool Member
Posts: 71
Joined: Fri Jul 05, 2013 7:39 pm
Location: San Francisco

Wow. It must be nice to have all that room and equipment. :D . I cannot afford any of this stuff, and even if I could my "apartment" is way too small to for it. I am a ghetto farmer, making use of a ledge that runs around my building that gets from 4-6 hours of sun a day, and a fire escape that gets less. When say budget, I mean BUDGET.

My question is, how bad did I screw up by sowing the thyme in the same "seed flat" by which I mean a recycled plastic food container into which I cut drainage holes, with the basil? As soon as I did it I thought, UH OH. Because it seems that thyme likes a dryer atmosphere than the good old basil which never fails me, but I'm hoping that since thyme comes up more slowly than basil (in 7 days I've already got basil seedlings) I will have the basil moved out by the thyme (I couldn't resist) the slower ones sprout and the water content needs to be cut back...foolish hope???

What do you experts think? Have I already killed the thyme seeds by keeping them in a nice damp basil environment or is my "plan B" which is more like a hope and a prayer, going to work???

Thank you.

DoubleDogFarm
Super Green Thumb
Posts: 6113
Joined: Sun Mar 28, 2010 11:43 pm

rydia131 wrote:Nice write up but I respectfully disagree with you on the seed starting kits with the domes being seed killers. I have used them now several times and have had nothing but success. I agree with removing the lids once a sprout appears but that is told in the directions. As a new gardener, if I can have success with these I don't think they are an item to avoid like you stated.

It's ok to disagree. I don't agree with everything stated here. These tips and tricks are based on Rainbow's experience and not set in concrete. What works for you is fine. If the starting kit works, continue using them. Based on sales alone, one would think they work. If they didn't sell the stores would not stock them.

Eric

User avatar
rainbowgardener
Super Green Thumb
Posts: 25279
Joined: Sun Feb 15, 2009 6:04 pm
Location: TN/GA 7b

It is clearly possible to have success with them. It is also very easy not to get the dome lifted in time and do your seedlings in from damping off. And since it is never true that all your seeds sprout at the same time, you have to lift it, as you said, as soon as the first seeds sprout, which means it isn't in place for all the others.

So I don't see the point of it, since all the seeds sprout just fine without domes.

But sure, always glad to hear everyone's opinions and experiences :)

tenderloingardener
Cool Member
Posts: 71
Joined: Fri Jul 05, 2013 7:39 pm
Location: San Francisco

Okay. This is likely a really stupid question. I went to buy a clamp light to use-a friend of mine gave us an aquarium, so I thought-I could make a germinating terrarium from it. Most of the bulbs in San Francisco (Home of the Progressive Mafia :shock: ) are fluorescent. You can only get old filament bulbs for special kinds of lights.

Well, I was looking in a thrift store and found an actual spot light. Like a stage light. Actually, there were several of them, but I just got one. The one with the still working very high wattage expensive bulb in it. Will this work? It's a filament bulb. (SSSH. Don't tell anyone! The lighting cops will be at my home in a twinkle) :lol:

So, it's not fluorescent. But it's warm. Must one use a fluorescent light, and if so, why? This is a a full spectrum light, so the red? (It's been a while since college) light waves are there. The heat is there-it's like a miniature sun. In fact, had to take the "spot" part off because it was too focused and would have fried anything in it's path.

I can put in a 75 watt bulb if it has to be fluorescent, but I'm wondering why a full spectrum light wouldn't work...

Thanks for putting up with the newbie on a major budget!

DoubleDogFarm
Super Green Thumb
Posts: 6113
Joined: Sun Mar 28, 2010 11:43 pm

:roll:
Last edited by DoubleDogFarm on Fri Aug 02, 2013 9:09 pm, edited 1 time in total.

Dillbert
Greener Thumb
Posts: 955
Joined: Sun Apr 04, 2010 3:29 pm
Location: Central PA

tenderloin -

you could be up against a bit of a problem.

first, the aquarium thing. great for retaining humidity.
retained humidity is great until the seeds sprout; then it's death by damping off.

the incandescent can "spot" light energy. but it generates so much heat you may easily cook the seedlings in a perfectly sealed enclosure (I.e. fish tank)

the fluorescent don't generate so much heat, but they need to be very close (1-2" over the sprouts) - which unless it's a 55 gallon long style, is going to be tricky as the lights are longer than the tank and you'll not get them close enough.

you do not need a "plant light" or a "full spectrum" - actually the light spectrum output of most of those degrades very very rapidly - looks good to the eyeball, to the plants - not so much.

User avatar
rainbowgardener
Super Green Thumb
Posts: 25279
Joined: Sun Feb 15, 2009 6:04 pm
Location: TN/GA 7b

You have already gotten good answers, but just to agree -- your aquarium has no ventilation and will hold way too much humidity for your plants and the filament bulbs put out way too much heat. Sorry, but I don't think it will work. Simpler is better. All you need is some kind of seed flat under a fluorescent light.

User avatar
applestar
Mod
Posts: 30540
Joined: Thu May 01, 2008 7:21 pm
Location: Zone 6, NJ (3/M)4/E ~ 10/M(11/B)

If the light fixture takes screw in bulbs, use a 26W 6500K CFL bulb. I used 6500K tubes and full spectrum plant lights in some old T-12 aquarium fixtures that I strapped to the bottom of shelves off and on for 5 or 6 years until the ballast finally rusted or burned out last year. It was getting really hard to find tubes for them anyway.

You can probably find used T-8's since most everybody is upgrading to T-5's.

User avatar
Molly_Lenore
Newly Registered
Posts: 7
Joined: Tue Jan 14, 2014 1:53 am
Location: Kernersville, N.C.

I can not staaaaand peat pots! They almost always kill anything, if its lucky enough to even get started. I love the plastic cells. I *do* use a dome some times but only for ones that like more heat (certain tomatoes, also peppers..). I like to save up all those ventilated plastic containers that strawberries and blueberries come in and use those as little terrariums to start my pepper plants in.
My seedlings never seemed very happy in that $4 a bag organic seed starting mix I got from Wal Mart last year, so I went back to the potting mix. Something in the seed starting mix made everything dry out really fast all the time. I don't have any special lights, though. I sit mine all in front of a big glass door that gets about 6 hours sun during the day.

User avatar
rainbowgardener
Super Green Thumb
Posts: 25279
Joined: Sun Feb 15, 2009 6:04 pm
Location: TN/GA 7b

I don't use seed starting mix either and I also hate the peat pots. I'm sure that would have been said at the beginning of this thread. Depends on what you are growing how well in front of the window without supplemental light works. Lettuce and greens should be fine. Tomatoes, not so much. It also makes a difference what direction your window faces and how direct the sun is coming in.

User avatar
applestar
Mod
Posts: 30540
Joined: Thu May 01, 2008 7:21 pm
Location: Zone 6, NJ (3/M)4/E ~ 10/M(11/B)

Just adding (possibly repeating) --

Windows -- be aware of

• structures that can block the sun (other buildings, trees, shrubs, protruding architectural features, outside awnings, etc.)
• layers of "window" material (insect screens, winter storm windows, multi-glazed/insulated windows, window film)
• high tech UV and heat (IR) -- wavelengths of light -- blocking windows
• "dirty" windows and screens
• interior window treatments (sheer/lace curtains, blinds, shades, swags, valances)

cherry
Newly Registered
Posts: 1
Joined: Wed Feb 26, 2014 1:47 pm

I am just a newbie for gardening. Last year I planted several tomato plants; they grew up so good but no flower, no fruit come up. Anyone can help to show me is there any wrong with those tomato plants and how I seed them good for the coming season? Thanks

User avatar
rainbowgardener
Super Green Thumb
Posts: 25279
Joined: Sun Feb 15, 2009 6:04 pm
Location: TN/GA 7b

you would have been better off to start your own thread in the Tomato Forum, rather than tagging along on my seed starting thread, which isn't even relevant, since you either bought plants or didn't have trouble starting the seeds.

And any time you ask a question, you will get much more and better help, if you tell us where you are what your current weather and climate are and something about the conditions, such as were these tomato plants in full sun (at least 6 -8 hrs daily).

I didn't understand the part of the question about "how I seed them" for the coming year. It sounds like planting wasn't the issue if they were growing well.

Without more information, I have two guesses. 1) not enough sun. Tomato plants will grow in areas that are too shady for them, but they won't flower or fruit much. 2) too much nitrogen fertilizer. Excess of nitrogen makes plants grow very big and leafy, but at the expense of flowers and fruit. If you are fertilizing, look for Tomato Tone or something like that that has N-P-K values something like 4-6-6.

User avatar
mikeabraham
Newly Registered
Posts: 6
Joined: Wed Feb 26, 2014 10:36 am
Location: Cumbria, Uk
Contact: Website

Awesome start to the thread, will try and follow this in my adventure into becoming a seasoned gardener :wink:

nosebleed21
Full Member
Posts: 44
Joined: Sun Feb 16, 2014 7:26 am
Location: Philippines

rainbowgardener wrote:Someone asked for this, so I thought I would start one and others can chime in. If the mods like this, they can sticky-fy it. All of this has been written in other threads here, but I think not all gathered up in one spot.

The basics of what you need for starting seeds is good light fluffy "soil" (usually soil-less mix), light, heat, consistent moisture, containers.

Soil: The basic Miracle Gro potting soil works fine. Or you can make your own mix with peat moss or preferably coconut coir (a non-mined, more renewable product), perlite and/or vermiculite, compost. They sell seed starting mix which is very fine textured, but has no nutrients. If you use this, you will need to start fertilizing once the seedlings have true leaves.

Light: Does not need to be fancy grow lights. Most often people just use ordinary fluorescent tubes in cheap shop light fixtures. This would probably not be good enough light for growing fruiting plants to maturity and fruiting, but is great for starting seeds. But the lights have to be right down close to the plants, like just 2-3" above, hung on chains so that they can be raised as the plants grow. They should be on 16 hrs a day (some people even do 18, but 24 hrs is NOT better, they do need the rest period). Note that some very fine seeds like petunias and impatiens need light to germinate. Do not cover these seeds at all, just very lightly press them down so they are in contact with the soil.

Heat: Most (but not all) of the garden seeds that people would typically be growing germinate much better (faster, more reliably, better germination rate) with soil temperatures above 72. There is a sticky in this section with a chart of germination temps. The seed packet will usually tell you what temp the particular plant needs for germination. For plants that need warm soil, you need to have a way to provide that. They sell special plant heat mats, but regular pharmacy heating pads sold for people work just fine as long as they don't have automatic timed cut off. Or some people have had good results keeping them on top of refrigerator (but that is usually a dark spot, so you would need to watch carefully and move them to the lights as soon as sprouted) or using incandescent light bulb under the shelf they are on to provide heat, etc.

Moisture: This is probably the trickiest part, kills most seedlings. Baby seedlings have very little root system, so cannot be allowed to dry out or they die. However they are also very sensitive to being too wet. There is a fungal condition called damping off that young seedlings are prone to in conditions of low air circulation and too much moisture/ humidity. The stem starts kind of rotting just above soil level, gets a little bit pinched in and the seedling keels over, ends up lying flat on the soil. Once that happens, it is kaputt, all you can do is get rid of it. So you need to provide consistent barely damp, preferably with good air circulation. Easiest way to do that is by "bottom watering": having all your cells/ pots/ containers in trays. Then you just pour a little water into the bottom of the tray, just until it just touches the bottom of the pots, so the soil in the pot can wick it up. Probably add a little bit of water each day, but NOT if there is any water left from the previous day.

Containers: NOT peat pots. They are a menace. Hold too much moisture and stay too wet and then suddenly dry out and suck all the water away from the plant. And if you are bottom watering, they will get all moldy on the bottom. Use plastic. Can be the little cells and pots made for the purpose or it can be plastic yoghurt cups, drink cups, or whatever is handy as long as you put plenty of drainage holes in them. If you are using heat mats, it is typical to start plants in the little grow cells, so that you can crowd a lot of seeds onto one mat. If you do that, once they are well sprouted and have their first pair of true leaves they will need to be transplanted out into little pots.

AVOID the little seed starting kits sold with domes and peat pots, they are seedling killers! I don't use a dome at all, to easy to damp off your seedlings. If you do use a dome, remove it as soon as the seedlings are sprouted.

The main other thing you need to be aware of for seed starting is TIMING. If you start seeds too early, they will out grow your space before it is warm enough outside to put them out and you will end up with long spindly plants. If you start them too late, you will end up putting them out in the heat of summer. You need to be aware of the difference between cold weather crops, which are frost tolerant, like cool weather and tend to fizzle as soon as it gets hot and warm weather crops which die in frost and like hot sunny weather. Cool weather crops include peas, brassicas [broccoli, cabbage, cauliflower, etc], root crops like potatoes and carrots, and green leafies [lettuce, spinach, chard, kale, etc]. Warm season crops is pretty much everything else. Corn and beans are earliest of warm season, then tomatoes and peppers, and the cucurbits[squash, melons, cucumbers, etc], are the latest, need the soil really nice and toasty warm. So you want to have your seedlings ready to go out at the right time for the season they like.

At this site it will tell you when your average last frost date is:

https://www.almanac.com/content/frost-ch ... ted-states

The seed packet will tell you how many weeks ahead of that date to plant your seed. That will at least give you a good starting point until you have more experience with your own garden.

That's all the basics. With more experience, you will learn nuances, like grouping things together in trays that have similar requirements (especially for moisture vs drought tolerance), but this is enough to get you going.

Anyone else can chime in, with their experience/ tips.

Image

(Bottom shelf right side, you can just see a couple blue lines with cords coming out from them. These are the heating mats. I have everything coming down to power strips so that I can turn all those lights on and off with one button. The mats are on a different strip so they stay on 24/7)

Your grow light is a dream...want one...my biggest challenge is damping off not sure if I'm watering too little or too much not sure if a mister will do the trick or watering it instead the next day will help if the soil seems moist..also should I firm the soiless medium or it should be fluffy?

Juliuskitty
Green Thumb
Posts: 364
Joined: Sun Aug 18, 2013 6:13 pm
Location: South Florida

I am nor rainbowgardener, but I can answer this. :)

High humidity and wet soil surfaces will certainly invite damping off. That's why we only water from the bottom up after seedlings break the surface. This virtually eliminates damping off, at least it has for us. Good luck..........

User avatar
rainbowgardener
Super Green Thumb
Posts: 25279
Joined: Sun Feb 15, 2009 6:04 pm
Location: TN/GA 7b

my biggest challenge is damping off not sure if I'm watering too little or too much not sure if a mister will do the trick or watering it instead the next day will help if the soil seems moist..also should I firm the soiless medium or it should be fluffy?


DO NOT use misting, that will aggravate the problem, adding more humidity to the system. As Julius said, damping off is a fungal condition that occurs in settings of too much moisture and too little air circulation. So yes if at all possible use bottom watering (put all your pots in trays and just pour a little water in the bottom of the tray, just enough so that it touches the bottom of the soil and the soil can wick it up). I usually water every morning, but if there is still ANY of yesterday's water in the tray, I don't add more. Adding a little personal fan to the set up helps. I also put a small pinch of cinnamon in the water I water with. It is a natural anti-fungal and prevents damping off and fungus gnats.

I don't know how to explain the firming thing- somewhere in between compacted and fluffy. When I fill a pot with potting medium, I water it from the top this time (because there is nothing in it yet). This is necessary so that the medium is moistened. It also settles the mix, so it sinks down. Then I add more mix to the pot and do it again. If I am planting seeds, I just scatter them on top of the soil and then press them down lightly so they are in good contact with the soil. Then I scatter more mix on top of the seeds (unless they need light to germinate). If I am putting a seedling in the pot, I use a label stick to press the potting mix towards the sides leaving a planting hole in the center. Put the seedling in the hole, and then press the soil around the seedling, a firm slightly, getting rid of excess air and again making sure the plant and roots are in good contact.

mainegardener
Newly Registered
Posts: 5
Joined: Sat Feb 08, 2014 1:19 pm
Location: DownEast Maine Coast

Hello Rainbow,
I love this thread. It has been very helpful to me.
Question: I have some seedlings that are up now, so when is best time to start thinning?
Tomatoes are almost with 2 true leaves now.
Should I thin now - and what is best way to do that?
I heard that we should not pluck but instead trim with scissors those that we want to remove.
Can you advise?
Thanks so much.

User avatar
applestar
Mod
Posts: 30540
Joined: Thu May 01, 2008 7:21 pm
Location: Zone 6, NJ (3/M)4/E ~ 10/M(11/B)

Not rainbowgardener, but quick question -- tell us what you are growing since thinning technique can depend on the plant and also how they are being grown. Is it just tomatoes?


Return to “Seed Starting Discussions”