User avatar
ID jit
Green Thumb
Posts: 339
Joined: Tue Nov 01, 2016 10:00 am
Location: SE New England: zone twilight or 5b... hard for me to tell some days.

Questions on 2-litre SIPs

Firstly, thanks for all the help you have all offered. Learning curve here for me is steep and the more I learn, the steeper the curves seems to become.

Have been looking at 2-litre SIPs or SWCs or what ever the proper spoonful of alphabet soup is for them.

Have 1 down, 29 to go and have a bunch of question:
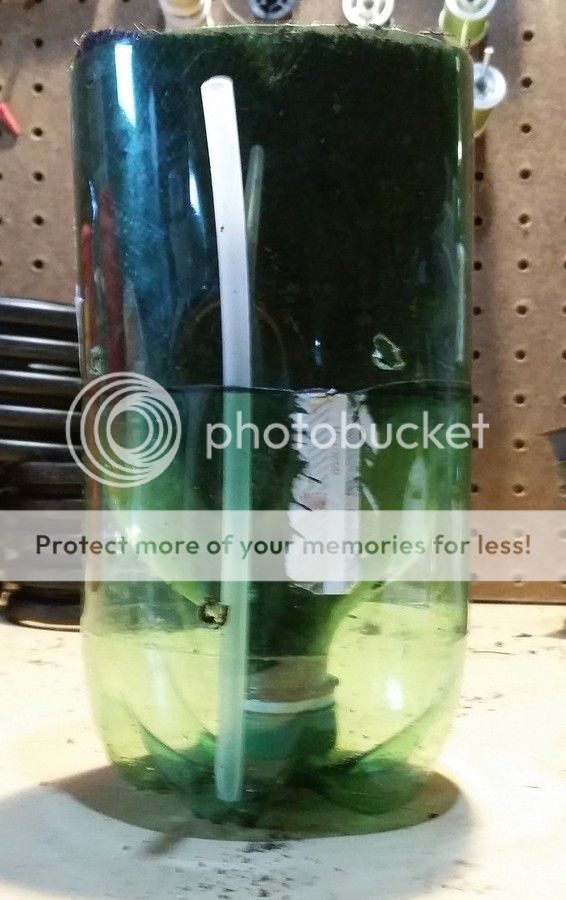
Image

Started by looking here: https://www.helpfulgardener.com/forum/vi ... 21&t=60946
Then went looking around the web. Seems like there are eleventy billion designs for these things, all slightly different.

Most have a drain hole and a tube going into the reservoir section and the planter section has a least a couple of holes in it beneath the level of the reservoir section. I get that part. It is drainage, filling access, overfill protection and ventilation.

What is baffling me is that some stop there, others are identical with (probably) a landscape fabric liner. Some have aeration holes (with and without a liner) going up the outside of the planter section, not only below, but also above the top of the reservoir section.

General assumptions I am making:
More aeration is better.
More drainage and ease of water flow is better.
2-litre SIPs are pretty hard to botch. Biggest thing is to get water from the reservoir to the soil and have some aeration holes in the planter section below the reservoir top for drainage and root aeration.

What is going on with the fabric? Is it just there to prevent a little of the soil from escaping? Would any synthetic fabric work, like cheap polyester or something else inert and rot resistant? How necessary is the fabric? Could the fabric be detrimental to the plant/process over all?

Or, the short version: What is the most effective design for one (or thirty) of these creatures?

Thanks again for all your help with understanding this stuff.

imafan26
Mod
Posts: 13997
Joined: Tue Jan 01, 2013 8:32 am
Location: Hawaii, zone 12a 587 ft elev.

I think the fabric is optional, it is there mostly to keep the resevoir from getting silt in it and to block the light, since most plant roots do not like being exposed to light.

You have the idea.

You need a reservoir (it is best to use rainwater or distilled water. Hard water will contain more salts and salt build up is bad, that is why sips are usually not for permanent plantings. If you did not change the soil or drain the SIP over time the salts from the water and from the fertilizer will build up and become toxic to the plants. Normally in a pot, you would flush the pot at least weekly to leach salts from the pot. You can see salt build up on the outside of terra cotta pots and the white salts around the drainholes of pots. The size of the reservoir can vary. Larger reservoirs mean you can water less often. Thirsty plants like tomatoes need a large reservoir because a mature tomato in production can drink up to 4 gallons of water a day.

To keep the reservoir from encroaching into the upper soil zone you need an overflow drain other wise your plants will drown. More than one hole is better since a small drain hole may get clogged. The drain should be 1/4 to 1/2 inch below the separator.
The perforated separator allows water from above to drip through to the reservoir when it gets watered from above or it rains. The holes with the tubes built into the reservoir creates the wick. Soil and roots will grow into the wick and water roots will grow in the reservoir. Up above the separator the soil roots should stay moist by wicking up water as needed but still allow air pockets to form in the soil so the roots will remain aerobic.

Mulching the container further reduces water loss and prevents splashing back onto the foliage as well as reduce weeds. The watering tube allow you to water directly into the reservoir and avoid over watering the plants.

The bottle SIPs I have seen don't have a lot of water in the bottom. Not all of them have fill tubes either. The bottom of most bottles still have their cap on. A hole is drilled into the cap and a wick made of cotton string, sock, or felt is passed through the hole. The wick is integrated into the soil and you want the wick close to the root zone. Water usually is not filled passed the neckof the bottle. Becausse water finds its own level, if you fill past where the soil zone is, then the soil in the bottle will be saturated as well. Since the bottles are small, they can be top watered or lifted to water. Fill tubes are optional and unless they are outdoors they don't need overflow drains. I had problems using clear containers for pots, there are very few plants that like their roots exposed to light, so the pots had to be covered or painted to block light, otherwise the algae would grow.

User avatar
ID jit
Green Thumb
Posts: 339
Joined: Tue Nov 01, 2016 10:00 am
Location: SE New England: zone twilight or 5b... hard for me to tell some days.

Imafan26,
Thanks, that actually clears up a lot.

What I am working with are 30 strawberry runners I started rooting on 31OCT. Just transplanted them into 12 oz solo cups with one 1/4” threw the bottom and two 1/4” at the very base of the cup. Am thinking 2-litre SIPs are going to be the next step for them. They are going to be living under 16 hours a day of LED 'Day Light' in the basement. Still haven't figured out why I started them rooting, but that is another story.

Algae is a nutrient and oxygen thief, so in needs to be kept at bay.
Roots should be protected from the light.

Thus, painting the bottles would probably be the best idea. Since that isn't going to be an option for me this time of year, I need to go with the optional non-rotting, porous fabric. (Am sure the fabric store lady is going to love me.)

Since these are going to be monitored, indoor 2-litre SIPs, I can skip the fill tube and drain hole in the reservoir if I am careful with watering. This will also eliminate the ventilation threw the reservoir section.

Since I am going with the fabric liner, I should probably run four to six lines of holes up up the planter section from the neck to the opening at the top. Since the fabric is going to slow the aeration process, the more holes the better. Might be a little messy to top water, but it seems livable.

Am looking at the capped top and lower neck of the bottle as being the same as the “well” in the one 12 gallon SIP I have built so far.

Thanks much.... have a clear plan now.

I HATE my brain.

You mentioned a rain water, distilled water and salts build up – first thing that went through my head was “what do I have here that I can fabricate a 5 - 10 gallon a day solar still out of”.

Next thought was how to use refrigerator ice maker water line and grommets to link all 30 little reservoirs into one big reservoir with a single, central filling location.

The truly bad part is I had to work out both puzzles.

User avatar
applestar
Mod
Posts: 30550
Joined: Thu May 01, 2008 7:21 pm
Location: Zone 6, NJ (3/M)4/E ~ 10/M(11/B)

Well, I have settled on 4 drilled 1/4" holes in the approximate shoulder of the bottles in addition to radiating slits made with box cutter (slits didn't seem enough since they don't open up until roots push them open) then two smaller holes on opposite sides of the reservoir.

I'm experimenting with filling the bottom of the reservoir with sand. I pack the neck of the bottle with sphagnum moss. The bottom of the water feeder straw should be above the reservoir water level/drain holes. I consider it to be air supply and air shaft -- theoretically, a slight thermal dynamic current should occur with drain holes as intake vents and straw as exhaust. It will also allow air to escape if heated.

I've been using a pipette to add water via the straw as well as the drain holes. But I also flood the main container and allow nutrient rich water to percolate down. With next ones I make, I'm going to switch to the big straws they supply for 7-11 slurpees which hopefully are big enough for watering with turkey basters.

I want to try connecting multiple sip reservoirs with aquarium air tubing using Global Bucket siphon tubing system.

I haven't worried about blocking light from the roots. The dark green algae covers the interior of the container. Isn't that enough? With worms in the soil mix, the biofilm build up occurs pretty quickly.

pepperhead212
Super Green Thumb
Posts: 2886
Joined: Wed Oct 15, 2014 1:52 pm
Location: Woodbury NJ Zone 7a/7b

I always make much larger SIPs (mostly 18 gal), and what I use under the medium, to keep most of it out of the reservoir, is a shade screen that I get at the local hardware store. This is a screen, with very small holes, which keeps most of the peat and coir out of the reservoir.

User avatar
Allyn
Green Thumb
Posts: 480
Joined: Tue Mar 03, 2009 5:38 pm
Location: Mississippi Gulf Coast - zone 8b

l'll just add a quick two cents here:

I made these 2-liter SiPs for my venus flytraps. I found the fill tube (straw) unnecessary and really quite a PitA. I found it easier to leave the fill tube out and just dunk the bottom of the SiP into the rain bucket (I keep a 5-gallon bucket to catch rain water for my flytraps). I hold it in the water and let it fill through the drain holes. When the water is above the drain holes, I lift it out and let it drain off the excess.

Also, they can be really top-heavy. I haven't tried putting marbles or stones in the bottom, but I may do that on any I make in the future. Just be aware. . .top heavy and easy to topple over.

User avatar
ID jit
Green Thumb
Posts: 339
Joined: Tue Nov 01, 2016 10:00 am
Location: SE New England: zone twilight or 5b... hard for me to tell some days.

Applestar,
That all kind of makes sense:

Fill tube is a ventilation chimney, more ventilation is good, back to fill tubes and 4 drain holes in the reservoir. If you figure out an easy fill method, let me know.

Fine round aquarium gravel/course sand in the bottom of the reservoir is a good idea too. Not a bad trade off a lot more stability for a little self volume for water in the reservoir.

The global Bucket Siphon system – I have lost way too many fish and aquarium pumps in my lifetime to trust siphons much any more. I ran a 125 gallon tank on a filter system held in two 32 quart coolers under the tank for years with just grommets and pvc pipe and it never leaked. There was a lot more pressure there than there will be with maybe 2 to 5 gallons of water pretty much all at the same head hieght.

Worms and a biofilm....that just may work for me since these are not display plants, just containers to grow plants in when they get to be too big for their 12 oz solo cups. 30 years of aquariums has me conditioned to cringe when I see an algae bloom.

Have been thinking about these too:
https://www.youtube.com/watch?v=leSZg9uUwSU
https://www.youtube.com/watch?v=8U1V7V164vU
https://www.youtube.com/watch?v=qxV-8aB5eLo

Allyn,

I like the dunk-n-fill method (idiot proof for the most part with nothing to over think and over analyze :-() )

Thanks for the heads up on probable tip overs. Need cut my bottles a little more equally I think. Stones & rock.... chuckles..... I am in New England.... we have a little bit of soil between our stones and rocks.... I think I just might be able to find a few strays.

Again, thanks to all of you for all of your help. You are saving me a boat load of little experiments.

User avatar
Allyn
Green Thumb
Posts: 480
Joined: Tue Mar 03, 2009 5:38 pm
Location: Mississippi Gulf Coast - zone 8b

ID jit wrote:.... Stones & rock.... chuckles..... I am in New England.... we have a little bit of soil between our stones and rocks.... I think I just might be able to find a few strays.....
Indeed. I lived on the North Shore of Massachusetts before I moved to the Gulf Coast. There are a great many rocks and stones there. I miss Cape Ann. :) You'll find plenty of ballast for your SiPs. :)


Return to “Container Gardening Forum”