User avatar
pinksand
Greener Thumb
Posts: 869
Joined: Thu Aug 23, 2012 2:13 am
Location: Columbia, MD

Very true Rainbow! When we were house hunting this time last year, all I watched was HGTV, which may have skewed my perspective a bit ;)

I've always worked within existing gardens, so starting from scratch is something completely new to me and I don't know quite what to expect. I tend to get a bit crazy about trying to finish projects, but you are so right that gardens are always an ongoing project that will continue to evolve every year.

I'll keep you posted on this project come April!

User avatar
pinksand
Greener Thumb
Posts: 869
Joined: Thu Aug 23, 2012 2:13 am
Location: Columbia, MD

Just wanted to give an update and ask for a few recommendations/tips...

I was able to revive some of my butterfly weed and blanket flower seedlings that had been neglected and crispified. My sunflower seedlings are doing great on the other hand and I can see true leaves starting to pop out! The lavender and agastache haven't shown a hint of germination yet... I know they take longer and the package says they like cooler temps, so I'm hanging in there with them, keeping them moist... we'll see but so far it's not looking too hopeful. I may end up trying to sow some of the seeds outside as well.

It looks like I have some bulbs coming up in the lawn on the side. I'd hate to smother these (most likely daffodils). Any suggestions for when I go about spreading the cardboard etc? Should I attempt to dig them up? Leave them?

I found a garden arch that I'm thinking of purchasing but then got to thinking about what to plant to climb the arch? I know you often see roses, but I'm a fan of gardening in bare feet and bare hands so thorny plants aren't on the top of my list. Any suggestions for something not too invasive?

I'm thinking that I'll purchase my shrubs and ornamental grass first as suggested and get those planted the first weekend to help keep everything in place. If my seedlings are ready and hardened off I'll plant those as well. I'll plan to add things here and there over time.

I have a question about directly sowing seeds outdoors... if I'm planning to mulch, how does this work exactly? Should I leave seeded sections unmulched?

User avatar
rainbowgardener
Super Green Thumb
Posts: 25279
Joined: Sun Feb 15, 2009 6:04 pm
Location: TN/GA 7b

Yes, you can't mulch on top of your seeds. Part of the point of the mulch is to suppress weed seeds, but it works the same on seeds you plant. Mulch after the seedlings are up and established.

One of the vines I like is the trumpet honeysuckle vine (lonicera sempervirens). It is a native honeysuckle and hummingbirds love it. It is long blooming and then has berries afterwards. Mine has not spread at all, just gets bigger.

User avatar
pinksand
Greener Thumb
Posts: 869
Joined: Thu Aug 23, 2012 2:13 am
Location: Columbia, MD

Ooo I really like the lonicera sempervirens! I'm assuming it's fragrant? I love the color! The arch was on sale so I went ahead and bought it :) So much for waiting a year and spreading out these expenses... oh well!

I've found a few different stone stores/quaries. Anything in particular I should keep in mind when picking out the stones for the path?

User avatar
rainbowgardener
Super Green Thumb
Posts: 25279
Joined: Sun Feb 15, 2009 6:04 pm
Location: TN/GA 7b

You would think being honeysuckle it would be fragrant. Unfortunately, it's an American honeysuckle and unlike its foreign cousins, no fragrance. But still a very nice plant for an arch.

If you wanted fragrant, good choices would be clematis (the native one is clematis virginiana, called Virgin's Bower. Or the white blooming sweet autumn clematis. The big showy colored ones they sell aren't particularly fragrant). Or common hop that they use in beer making, that is a pretty vine with fragrant flowers. Or american wisteria - But then your arch needs to be very big and strong, because it gets huge. The American wisteria is not so aggressive and spreading. The asian wisteria that they usually sell is very invasive.

User avatar
pinksand
Greener Thumb
Posts: 869
Joined: Thu Aug 23, 2012 2:13 am
Location: Columbia, MD

Interesting! I didn't particularly want fragrant, just automatically think of it when I hear "honeysuckle." The woods here are full of the bush honeysuckle :( and although I love the smell when they first start to bloom, when they all turn yellow it becomes a bit sickeningly sweet in the humid heat.

I think the trumpet honeysuckle is still my favorite of those, I love the color and it will be in view of the kitchen window so I'd love if we got some hummingbird visitors :) Thank you so much for the suggestion, I'm adding it to my "To Buy" list!

User avatar
pinksand
Greener Thumb
Posts: 869
Joined: Thu Aug 23, 2012 2:13 am
Location: Columbia, MD

I ordered weigela, 3 pink muhly grasses, trumpet honeysuckle, red hot poker, bee balm, Agastache cana, a peony, and carpet sedum mix. I'm not sure when they will be shipped, but hopefully it will be well timed! I'd also like to get a few golden false Cypress shrubs because I love their cheery chartreuse color in the dead of winter. I'm thinking that blue festuca grass might be a nice addition as well for some texture.

My sunflowers are getting their second set of true leaves and I will be hardening them off when those fill in. Since I started my seeds a bit later than planned, everything else is still tiny!

My neighborhood is very hilly so I've been trying to take note on what neighbors have done to deal with erosion. A lot of people have island gardens in the middle of a slope and they're bordered in various styles. My favorites have rocks of various sizes bordering the bed and I think I like the more natural look of the rock. I'm thinking of going this route and digging the rocks into the ground a ways keep them in place. It this a terribly idea Elizabeth? If you think so, do you mind explaining a bit more about the locking wall? I did a google search and it came up with all kinds of very different ideas so I'm not exactly sure what kind you were referring to.

User avatar
rainbowgardener
Super Green Thumb
Posts: 25279
Joined: Sun Feb 15, 2009 6:04 pm
Location: TN/GA 7b

The interlocking concrete blocks I have used to build 4 different retaining walls down my steep slopes are kind of like this:

Image

The big box Home Depot/ Lowes kind of places have them, in a bunch of different sizes and shapes and colors. The ones I have used just have a lip that hangs down from the bottom/back of the brick. It hooks over the brick below to hold it in place. There's other kinds that have various slots/tabs.

They are super easy. The hardest part is that the first course has to be buried half way in the ground on a layer of paver sand and has to be ABSOLUTELY level. After you get the first course laid all the rest is dry stacking blocks.

User avatar
pinksand
Greener Thumb
Posts: 869
Joined: Thu Aug 23, 2012 2:13 am
Location: Columbia, MD

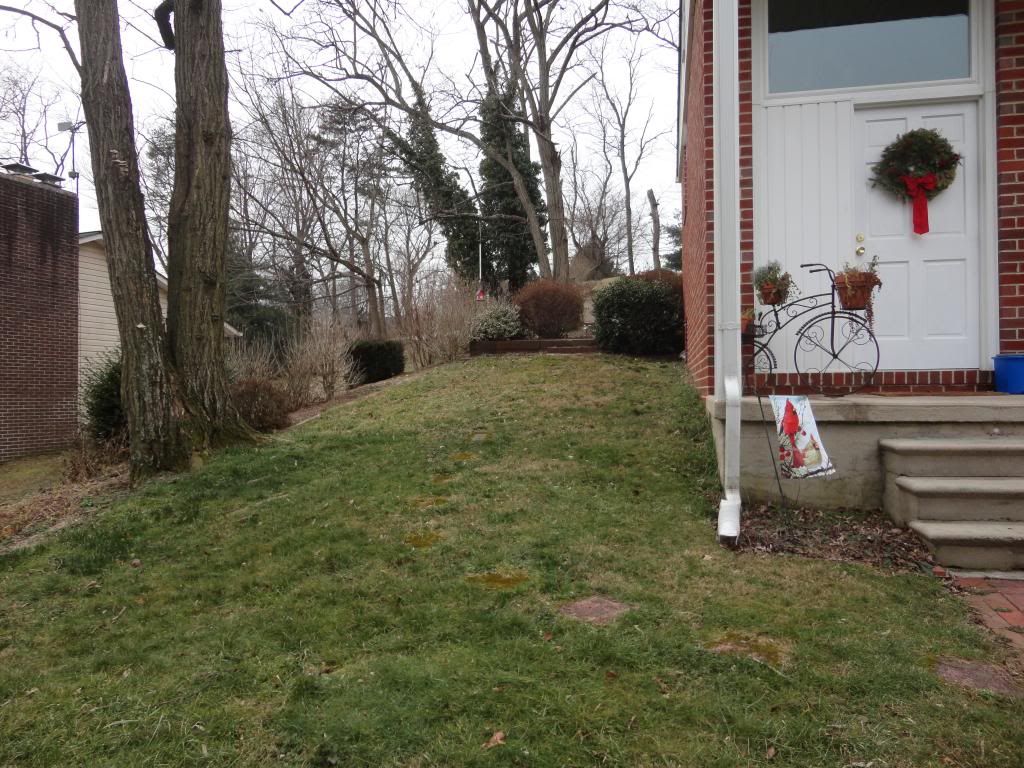
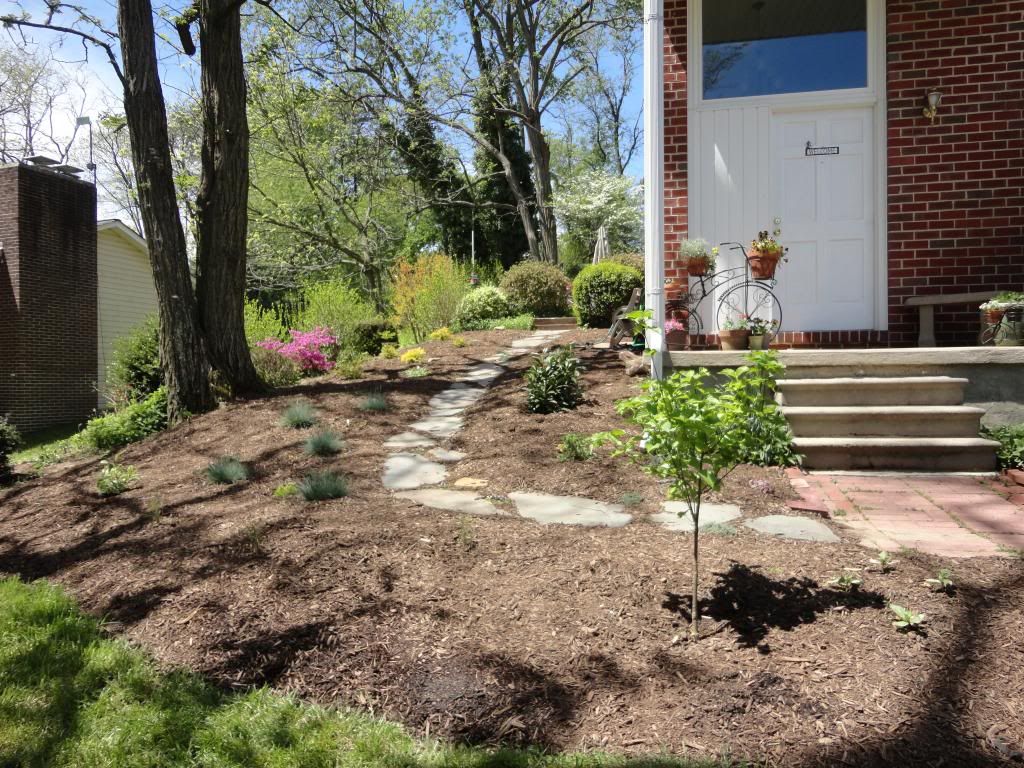
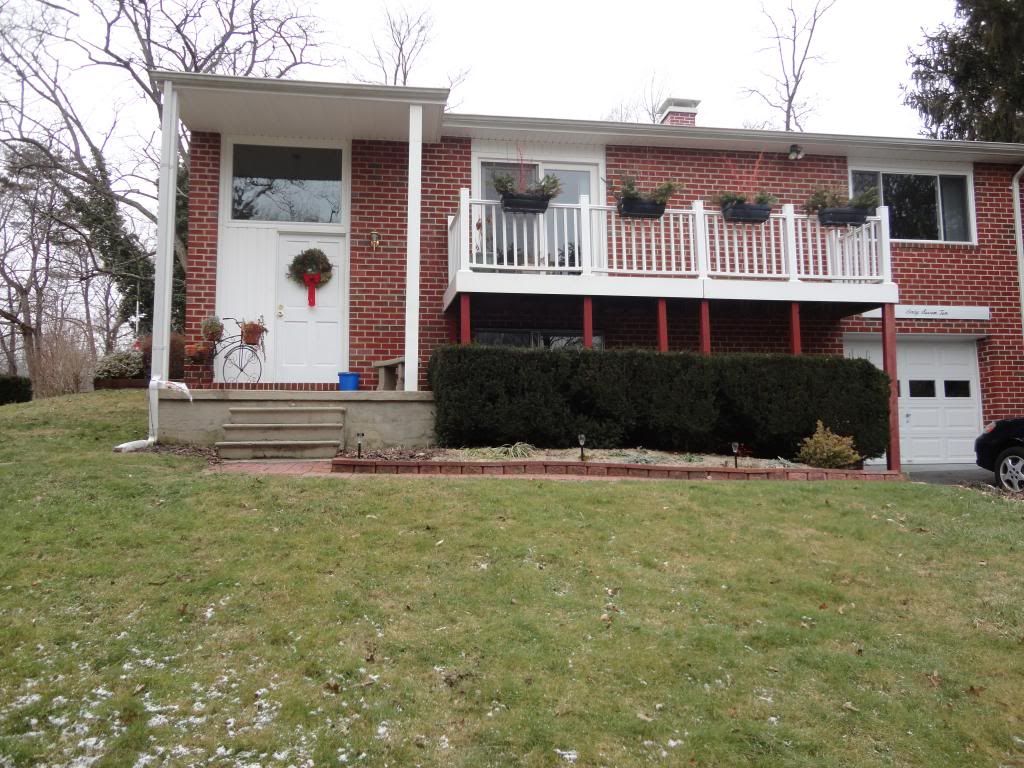
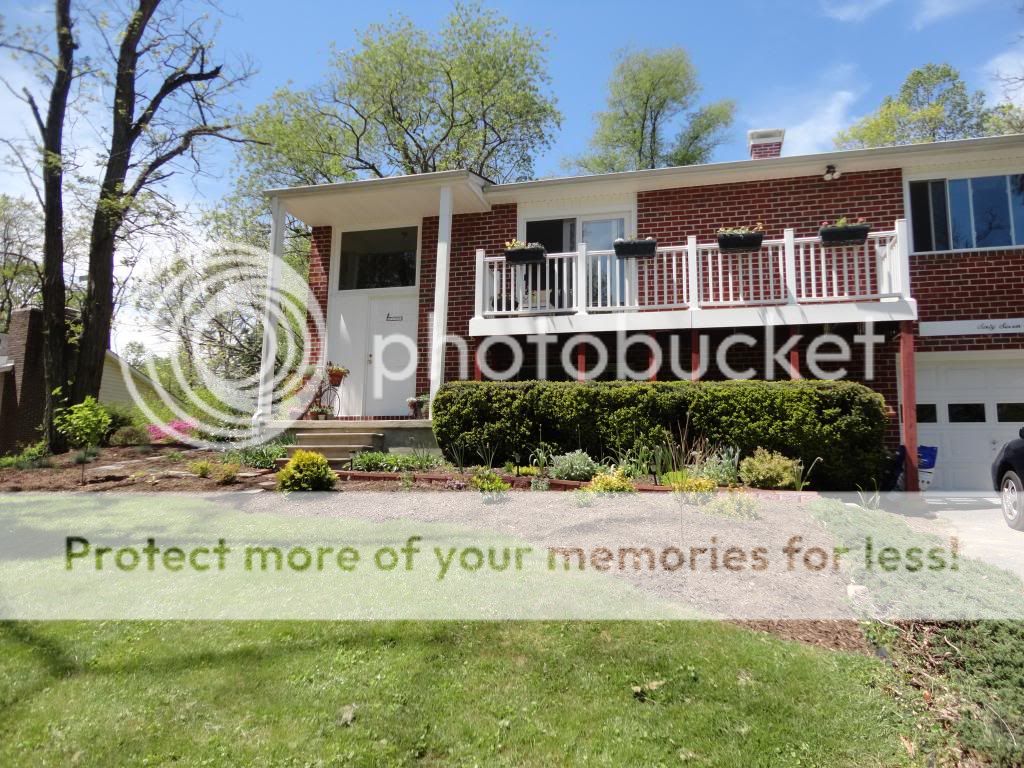
I've been meaning to post some "After" photos. It will of course take time for everything to grow and fill in, so it looks a bit pathetic at the moment but over the next few years it should fill in nicely I think. There are lots of blazing star bulbs in front of and next to the locust tree. A lot of the perennials in there should naturalize and my seedlings will eventually mature and bloom. My pink muhly grass is TINY!!! I ended up returning the arbor and am on the lookout for another that will go towards the top of the path, so for now the trumpet honeysuckle is in a pot until it has something to climb.

Before
Image

After
Image

Wow, there are some plants you can't even see in this photo they're so teeny! :(

Before
Image

After
Image

You can't really see it, but I have a dormant pink dogwood planted in the curve on the right. It's a twig!

User avatar
rainbowgardener
Super Green Thumb
Posts: 25279
Joined: Sun Feb 15, 2009 6:04 pm
Location: TN/GA 7b

Very nice! It will be beautiful. Show us again later in the season, when it will have filled out a little and then next year when it will have filled in a lot! :)

Dillbert
Greener Thumb
Posts: 955
Joined: Sun Apr 04, 2010 3:29 pm
Location: Central PA

wow. nice job! - my back hurts just looking at the work! (g)

User avatar
pinksand
Greener Thumb
Posts: 869
Joined: Thu Aug 23, 2012 2:13 am
Location: Columbia, MD

Thank you both! For your encouragement and the help you provided, Dilbert with the path and RBG with the plant selection!

I directly sowed some of my leftover seeds last weekend and just saw some butterfly weed sprouting out there... at least I hope that's what it is!!! I have little areas here and there where I've cleared the mulch and planted various seeds so we'll see how that goes. At least I have a few seedlings that made it from my indoor attempt.

It was a lot of work and there were evenings that I couldn't move, but it was totally worth it! My neighbors were all shocked by how quickly we got it done. They laughed when I'd tell them my goal for the day. The path took 1 full weekend including trips to the store. The rest of the garden took the entire following weekend from morning through dark. I ended up recruiting friends to help the second day :)

I'll take some more photos at the end of the season! The railing boxes should be filled in better by then as well. RBG - I planted different things in each one of them... trying to follow your advice to fight the symmetry ;)

User avatar
tomf
Super Green Thumb
Posts: 3233
Joined: Mon May 18, 2009 8:15 am
Location: Oregon

Nice changes, I like the path along the side of the house, it makes you feel like it is some place you want to go. I like landscaping that carries the eye to some place and makes you want to know what is down there.

User avatar
applestar
Mod
Posts: 30551
Joined: Thu May 01, 2008 7:21 pm
Location: Zone 6, NJ (3/M)4/E ~ 10/M(11/B)

That looks beautiful, pinksand!
Enjoyed "watching" the progress. You all did a wonderful job. :D

User avatar
rainbowgardener
Super Green Thumb
Posts: 25279
Joined: Sun Feb 15, 2009 6:04 pm
Location: TN/GA 7b

Incidentally, the interlocking concrete block picture above is just one I found on line to show what the blocks look like. In this thread

https://www.helpfulgardener.com/forum/vi ... 62#p298962

I posted some pictures of the retaining walls I actually built.

User avatar
pinksand
Greener Thumb
Posts: 869
Joined: Thu Aug 23, 2012 2:13 am
Location: Columbia, MD

Wow, you did a fantastic job!

I was hesitant to post photos because I was embarrassed that I didn't follow the advice about the wall :oops: I was also confused since a lot of the photos I saw online looked like the walls were at the bottom of the steepest part of the slope and the ground at least seemed to be leveling off a bit where the wall was placed. My new garden is on the more level section of the hill and the wall would begin where the slope steepens, so it seemed a bit backward. Did you work to level a section of the hill for that stepping bath at the bottom of the first photo or was that section just less steep than the contained garden?

I guess it comes down to a depleted budget and intimidation. I was worried I'd do a shoddy job and the wall would just end up falling down the hill. Thanks for sharing photos of your projects! We'll see... this could get added to my "to do" list.

User avatar
tomf
Super Green Thumb
Posts: 3233
Joined: Mon May 18, 2009 8:15 am
Location: Oregon

That is not her wall, I thought so too, but in a different topic she said no and posted photos of her walls.
I am sure you would be able to make a wall with the same blocks and do a fine job.

User avatar
pinksand
Greener Thumb
Posts: 869
Joined: Thu Aug 23, 2012 2:13 am
Location: Columbia, MD

:lol: Yes I know, I was responding to this comment with the link to the thread you're referring to.
rainbowgardener wrote:Incidentally, the interlocking concrete block picture above is just one I found on line to show what the blocks look like. In this thread

https://www.helpfulgardener.com/forum/vi ... 62#p298962

I posted some pictures of the retaining walls I actually built.
Thank you for your bode of confidence though!

valley
Greener Thumb
Posts: 1335
Joined: Tue Mar 06, 2012 1:25 am
Location: ranches in sierra nevada mountains California & Navada high desert

I'm impressed, you really knew what you wanted and put the work in. The pictures are super.

User avatar
rainbowgardener
Super Green Thumb
Posts: 25279
Joined: Sun Feb 15, 2009 6:04 pm
Location: TN/GA 7b

It was just steep hillside. I made all the paths, just by cutting into the hillside to make a vertical place for the retaining wall and then spreading that dirt to be the path and compacting it. It is retained, but not terraced, that is behind the retaining wall it is not flat (except the top one with the herb garden behind it). I didn't try leveling the hillside into a series of flat terraces, that would have been way too much work - digging in to the clay/rock/roots/ buried trash was hard.

Building the wall is really pretty easy. The main trick is digging a trench for the bottom layer and then partly filling it back up with paver sand. You want the bottom layer to be half buried. And then you need to make sure it is PERFECTLY LEVEL. If it isn't, your wall will eventually fall apart. After you have the bottom layer all laid and leveled, all the rest of it is very easy and fast, just stacking blocks.

Thanks for all the kind words! Mine was more work than some, because of hauling all the blocks down the hill and then having no level place to stand while I was working on it (until I got the path made).


Return to “Landscaping”